The objective of this tutorial is to create an Apache Flink project to analyze sales data. We have taken the Sales data set for this project. After processing the data from the Flink System, we will push the result information to the Client System and after that, the Client System will show data in a table format.
So readers ... are you ready to create an Apache Flink project.(Product Purchase Data State)
1. Idea Of Project
| a. The Flink System download raw data files from the Client System for sales analysis in periodical order. | 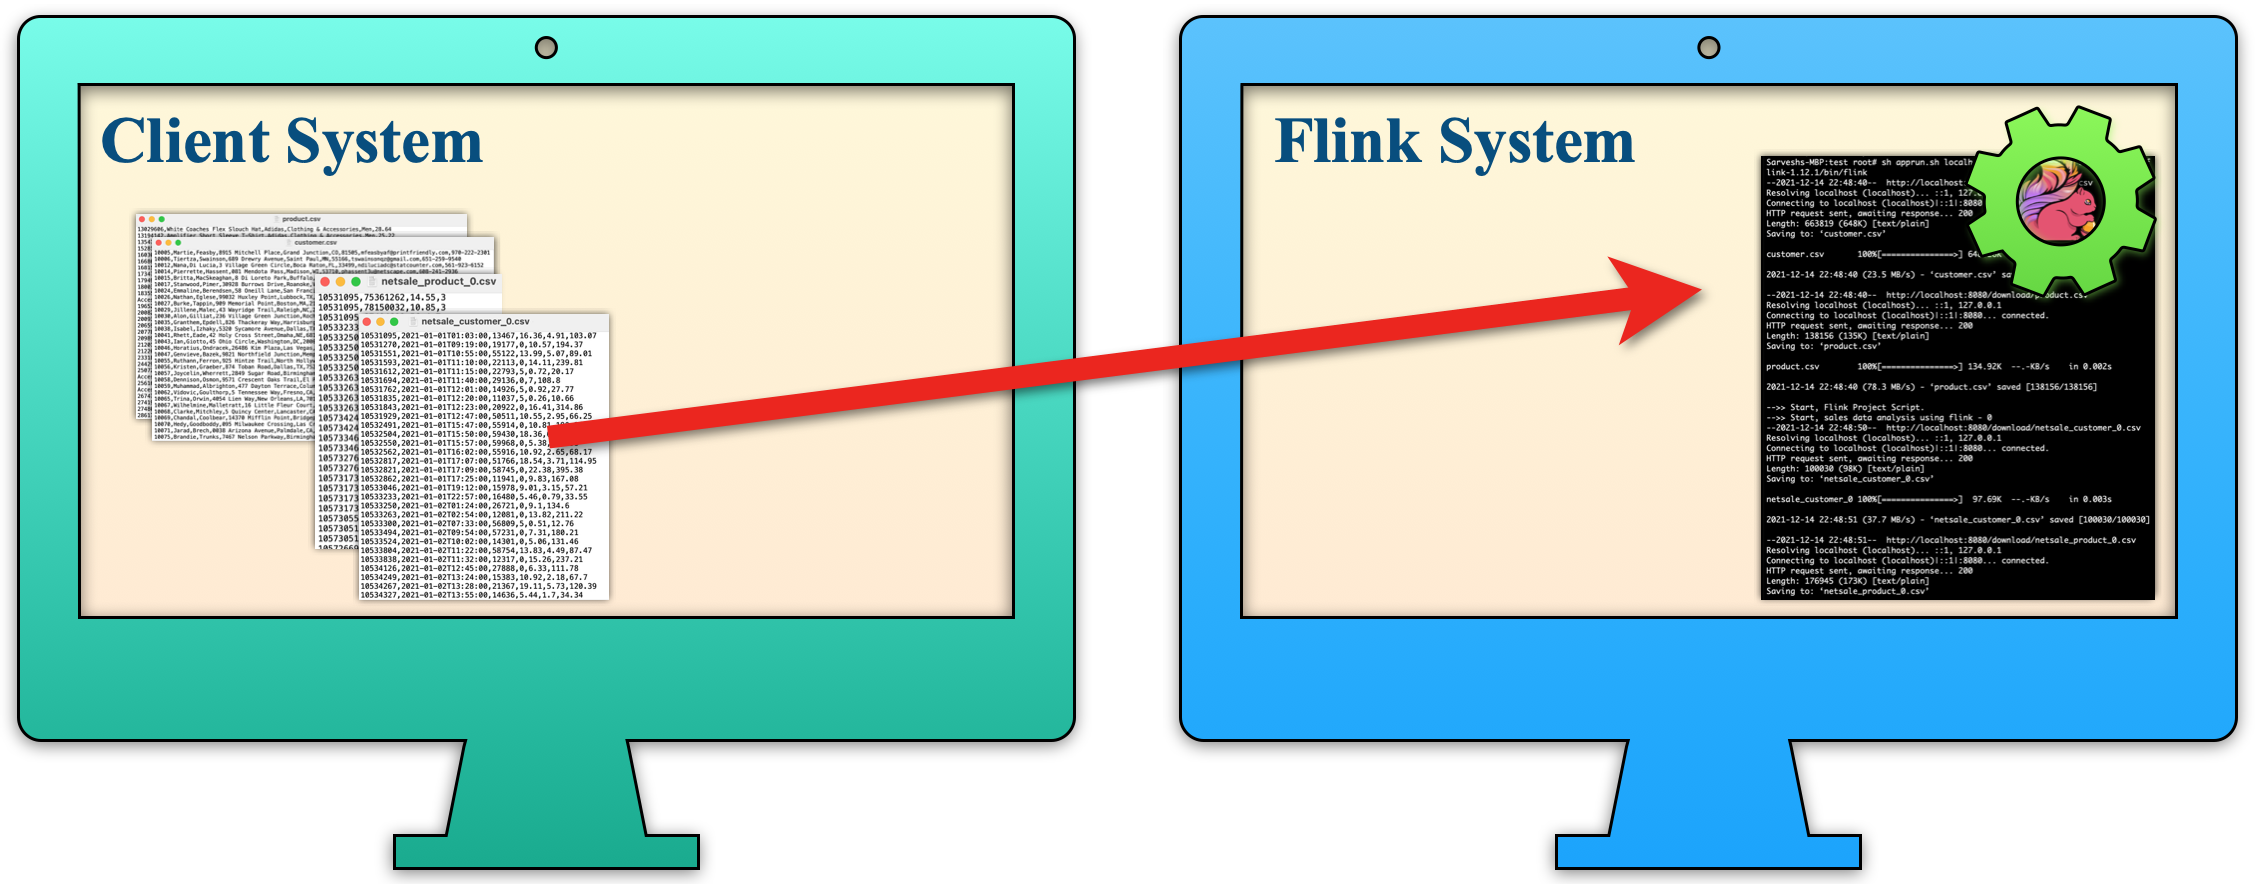 |
| b. Once the sales data for a period is downloaded, the Flink System starts processing. | 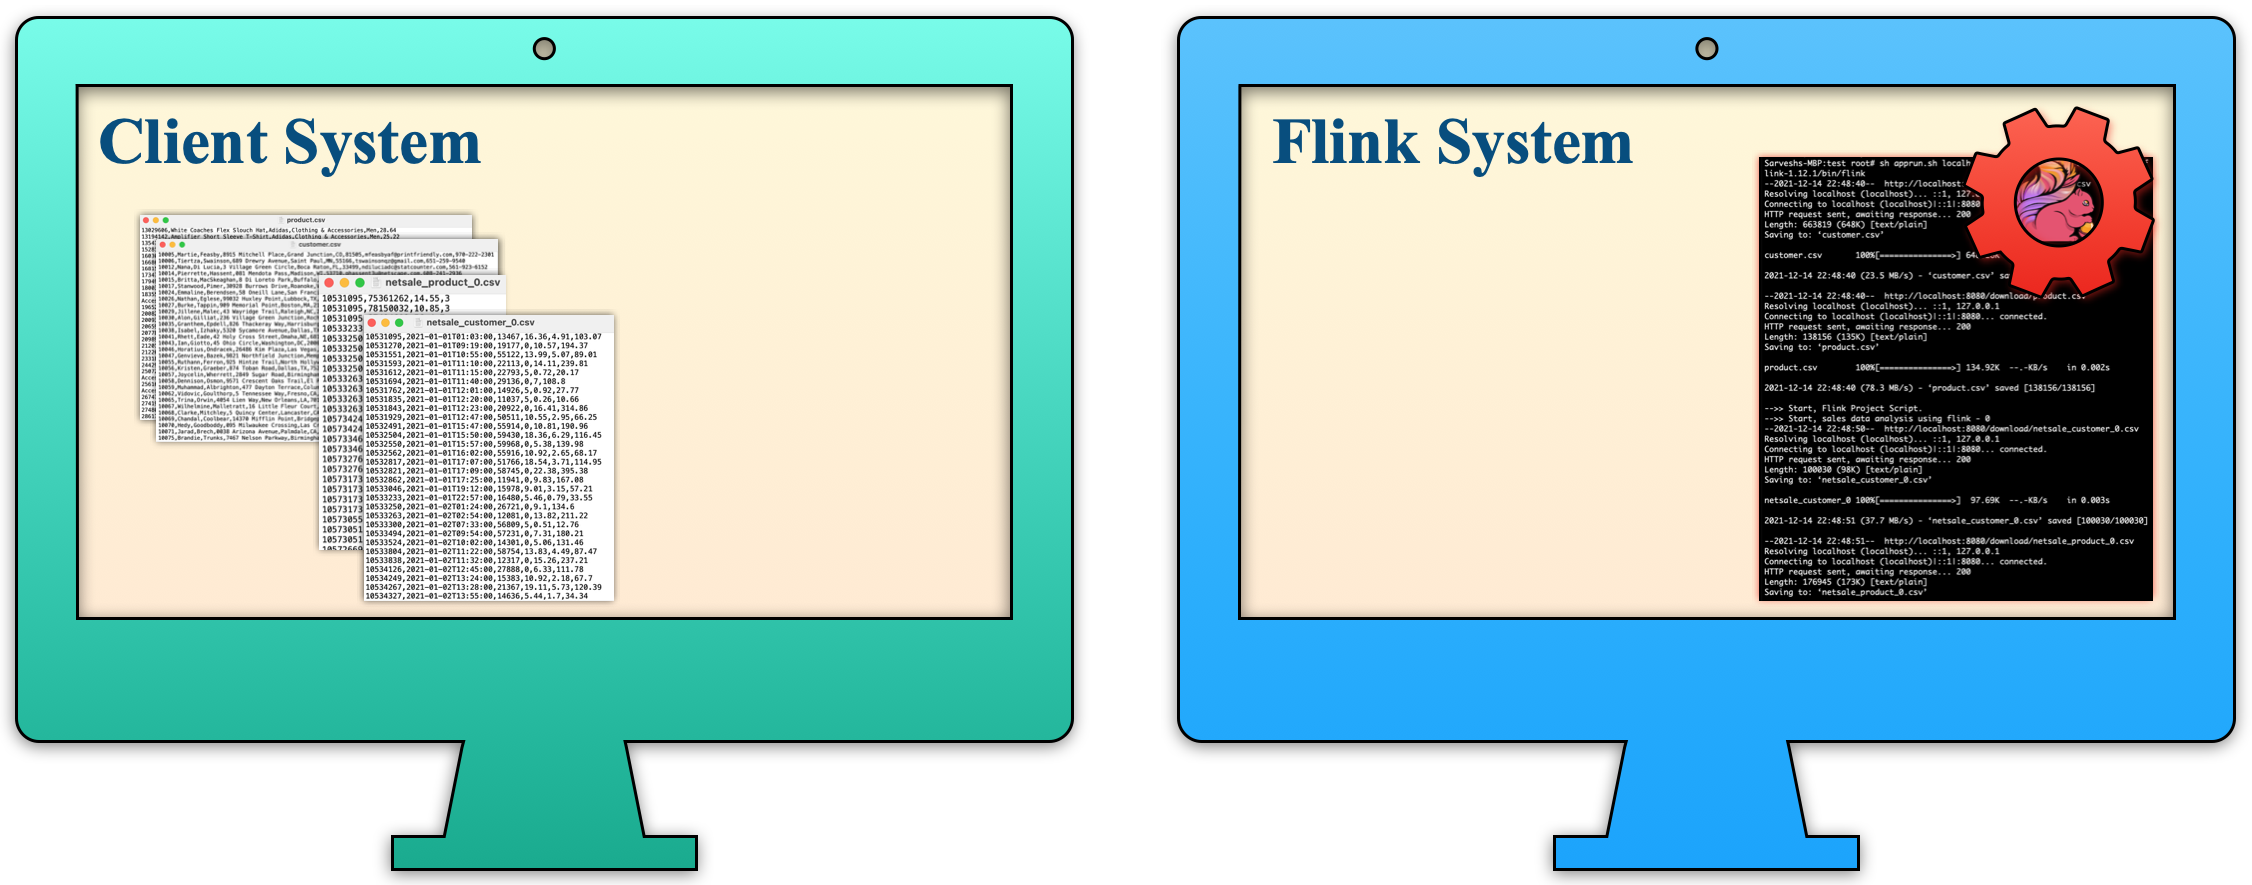 |
| c. Once the result file is created then the Flink System sends that result file to the Client System in periodical order. | 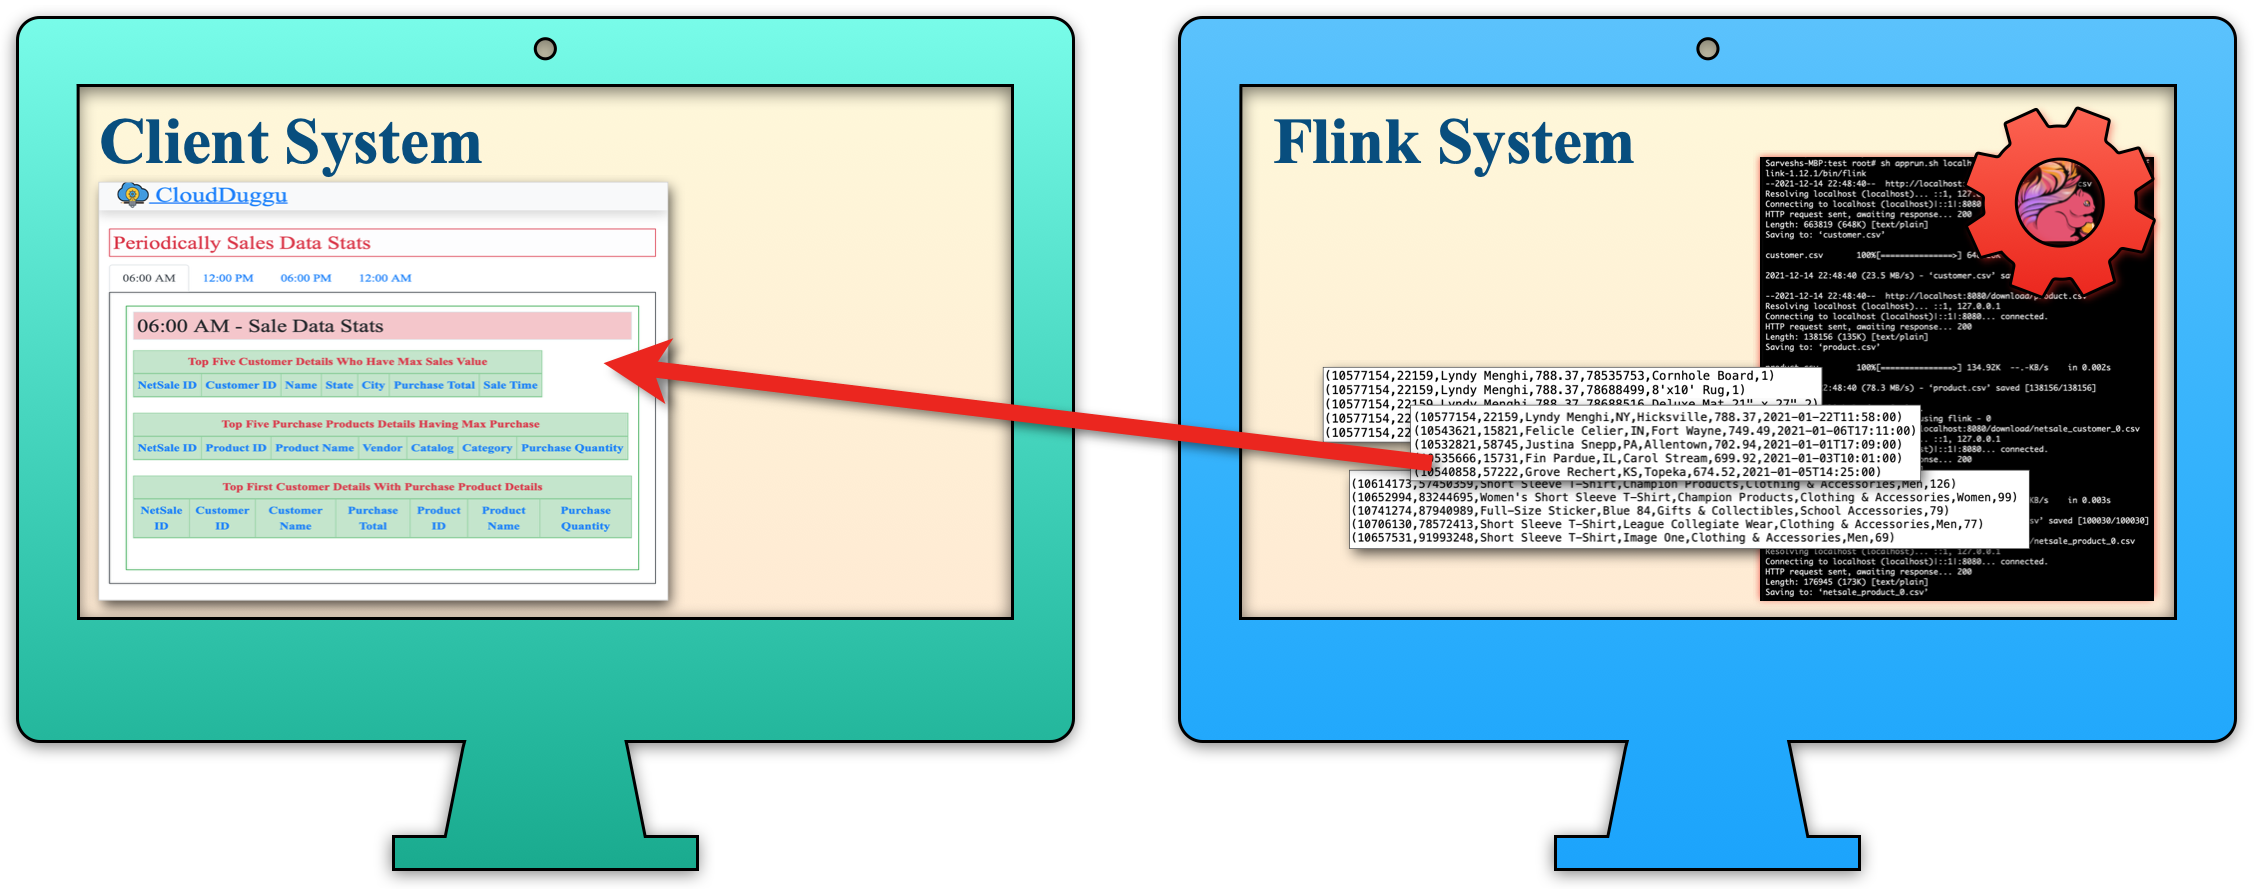 |
| d. The Client System displays the results in a table format, similar to that obtained from the Flink System. | 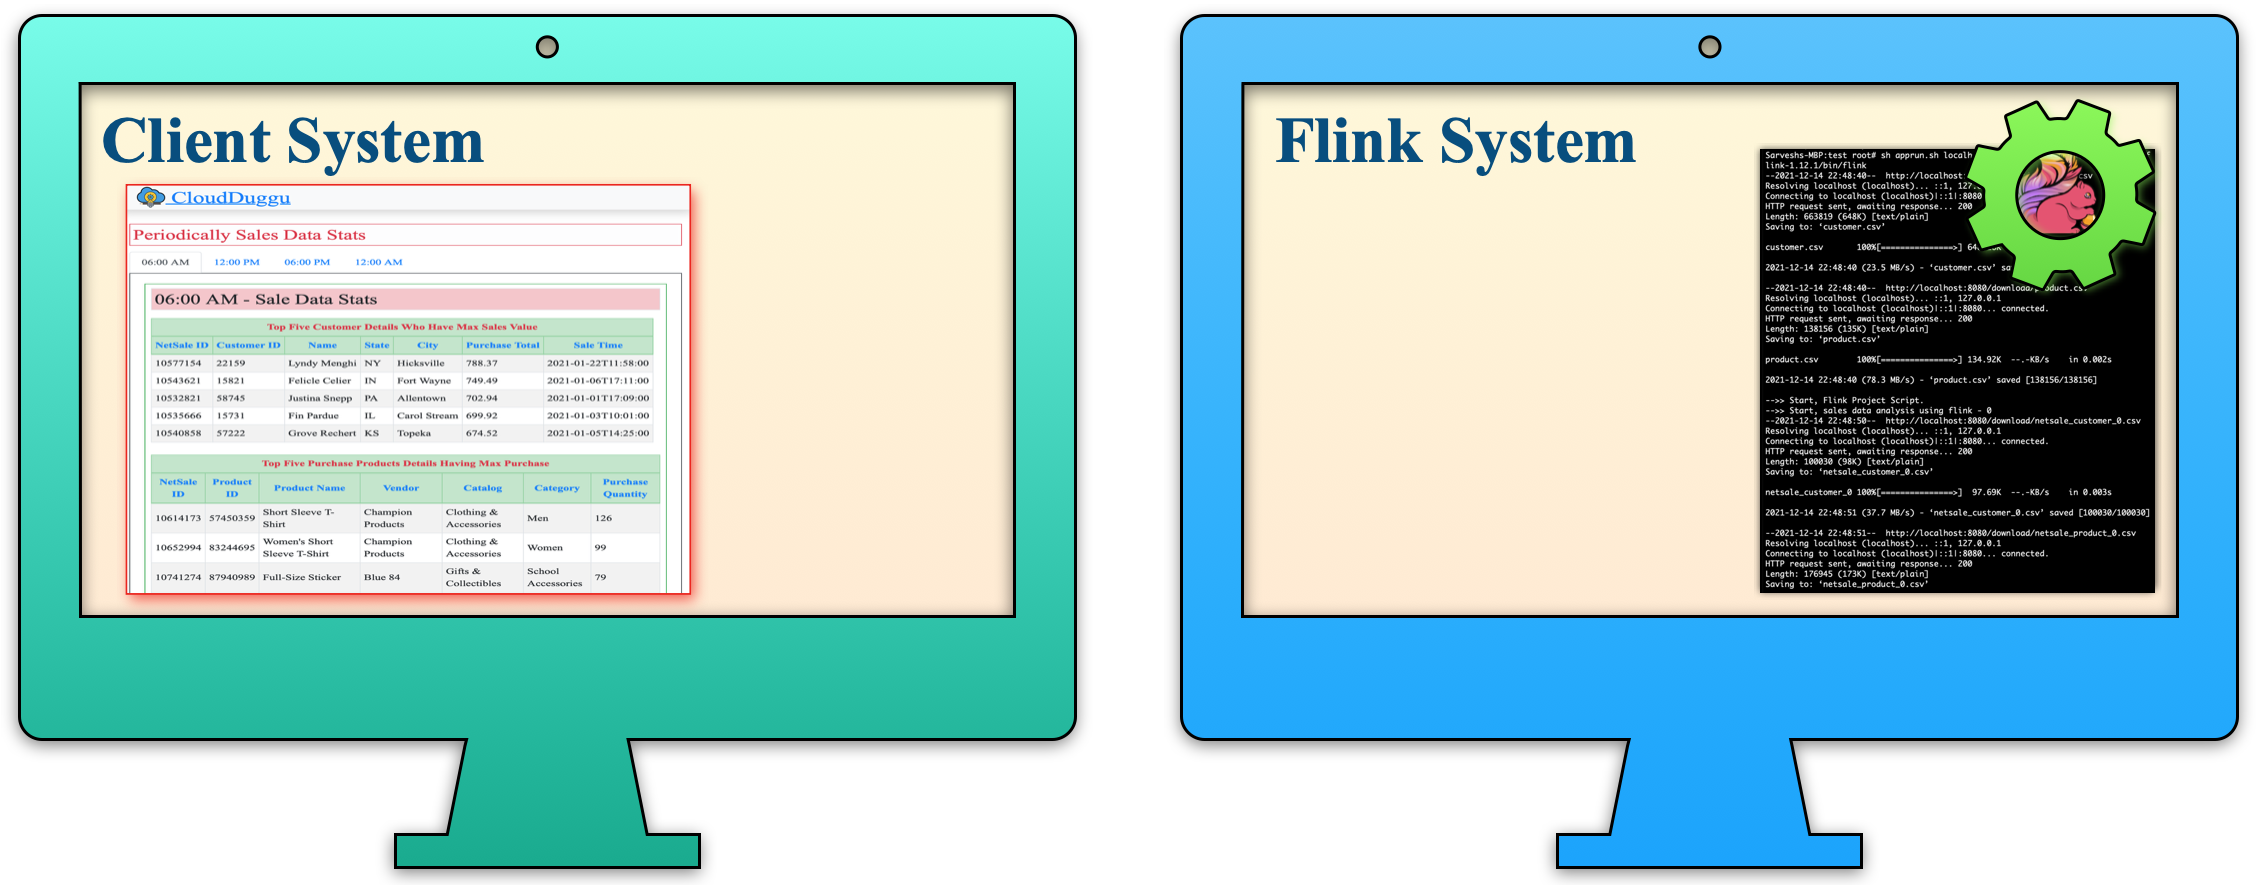 |
2. Building Of Project
To run this project you can install VM (Virtual Machine) on your local system and configure Flink on that. After this configuration, your local system will work as a Client System and VM will work as a Flink System. Alternatively, you can take two systems that are communicating with each other and on one of the systems, Flink is configured.
Let us see this project in detail and run it using the below steps.
| a. The Client System | ||
|---|---|---|
| It is an example of the Spring Boot JAVA Framework. When we will build this project then it will create a "client.jar" executable file. | 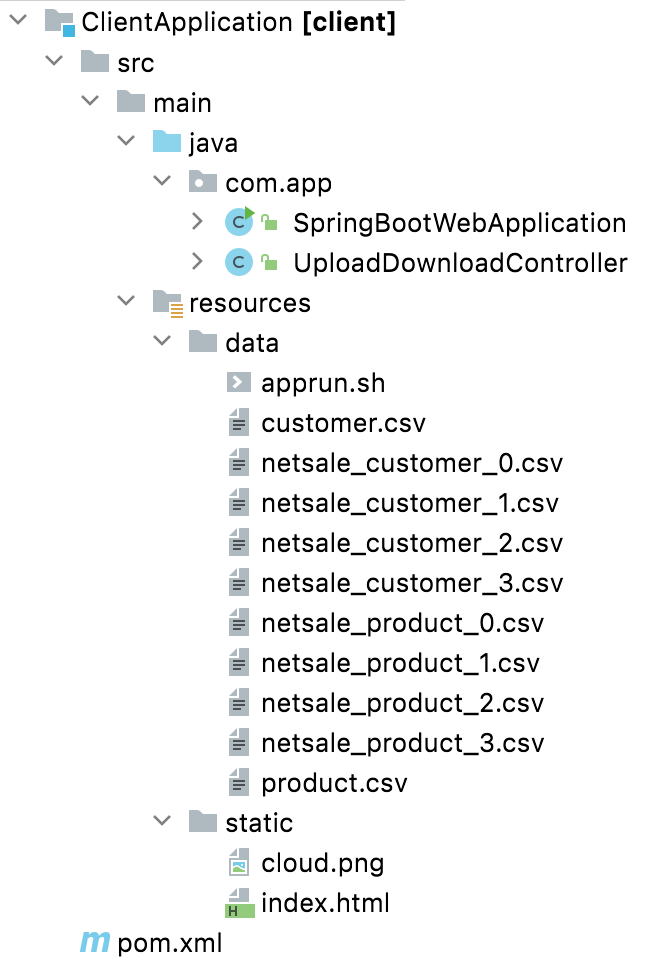 |
|
| It has java code, data files, and static HTML pages. | ||
| Java code has 2 files, SpringBootWebApplication.java and UploadDownloadController.java | ||
| SpringBootWebApplication.java is the main project file, which is responsible for building code and running it on an embedded server. | ||
| UploadDownloadController.java is used to provide download & upload URL HTTP services. For downloading data files it uses the download client URL and for uploading result files it uses the upload client URL. | ||
| data folder has sales data CSV files for the Flink application. Also, contain a shell script file (apprun.sh) which helps to run download/upload services and execute the Flink project jar. | ||
| The Static folder has HTML page code (index.html). This is the main client view page that shows the Flink process result data. | ||
| pom.xml is a project build tool file. This file has java dependencies and builds configuration details. | ||
| For creating the “client.jar” file we use the command "mvn clean package". | ||
| Click Here To Download the "ClientApplication" project zip file. | ||
| a. The Flink System | ||
|---|---|---|
| It is an example of the Java Maven Project. When we will build this project then it will create a "sales.jar" executable jar file. | 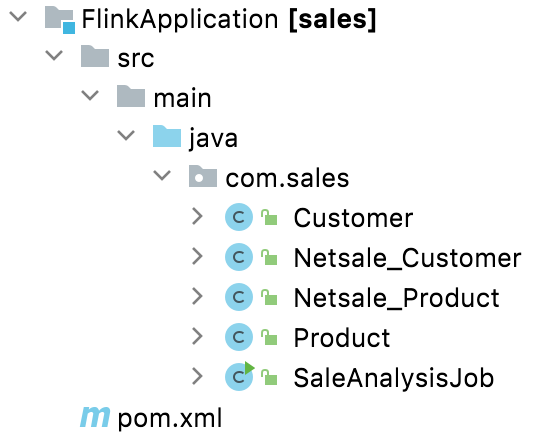 |
|
| It contains five java files and one deployment file pom.xml. Among java files, there is one main java file (SaleAnalysisJob.java) that contains all the Flink code logic and the other four are entity java files that contain variable mapping with the CSV data file. | ||
| The main Java code files are SaleAnalysisJob.java.
In this code file, first, read the CSV file data and then convert it into Flink DataSet object according to the data. 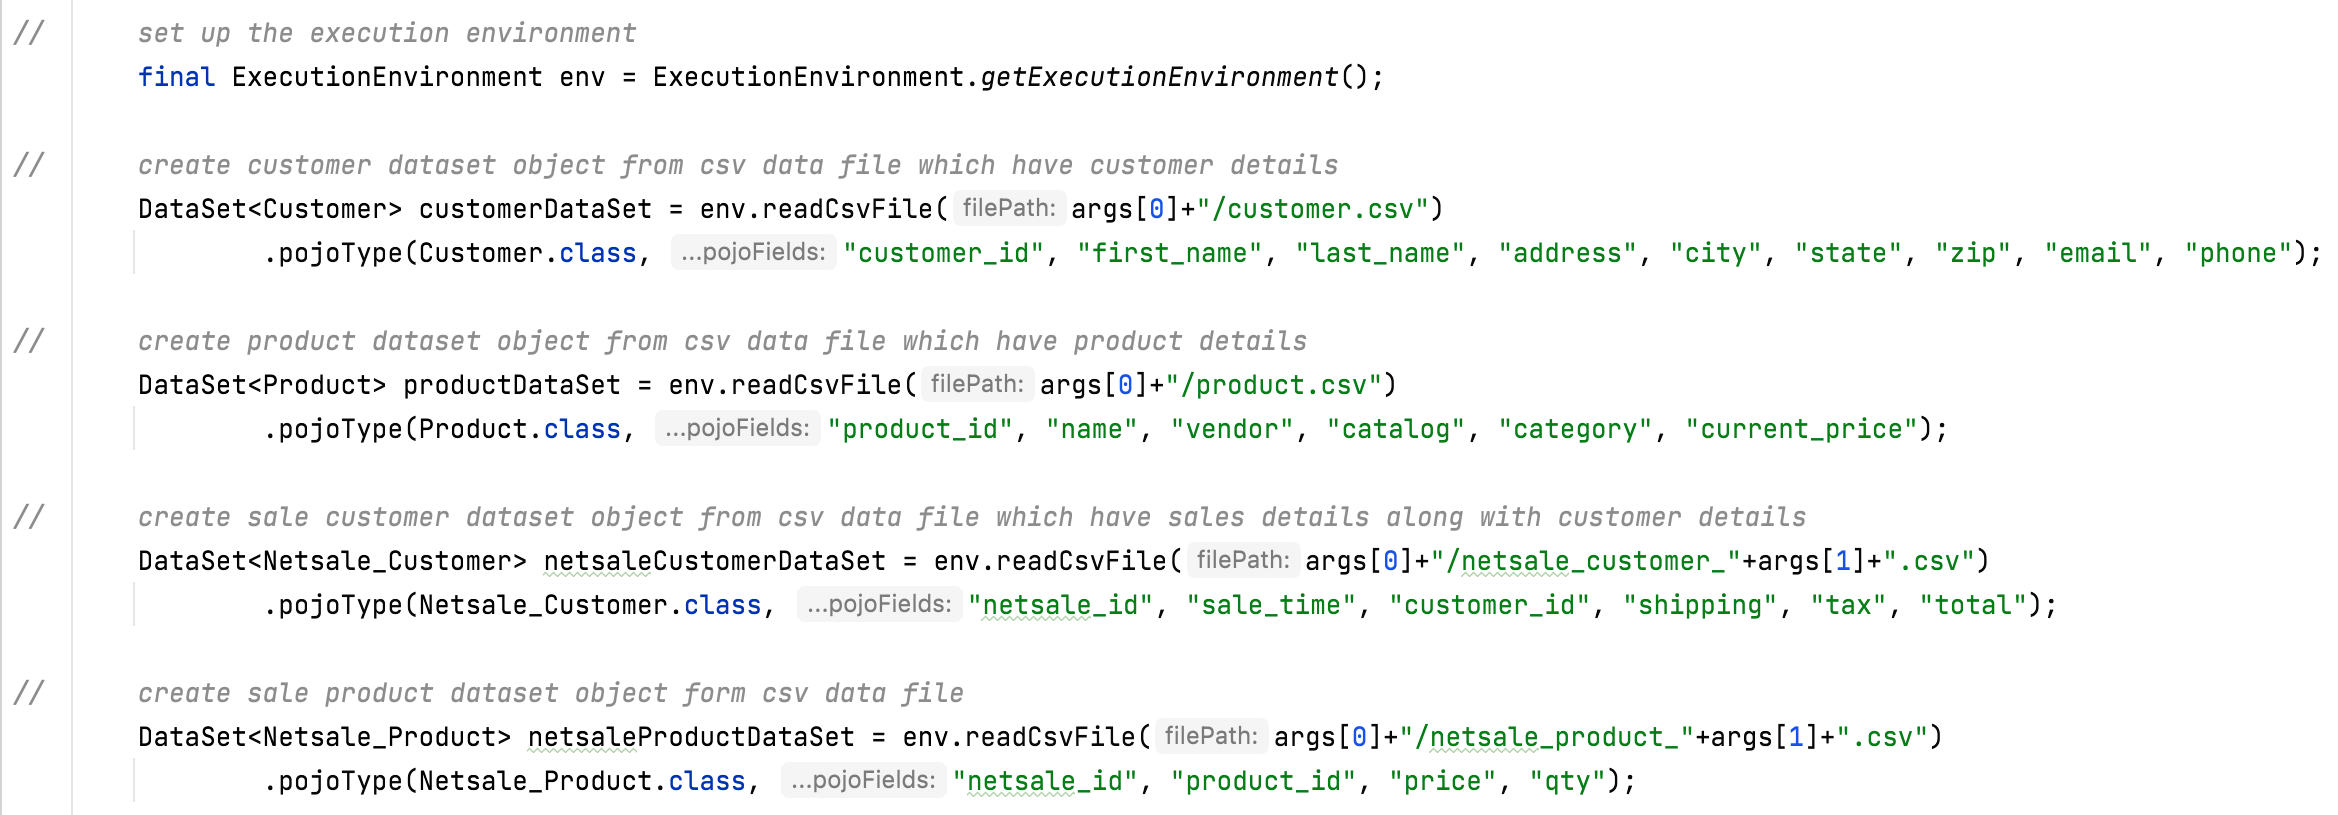
|
||
In the next process, apply Flink Join with the created Flink DataSet object and add join logic on it. After collecting the join result, applying the aggregate function on it, and finally storing the result into the CSV file.

|
||
| pom.xml is a project build tool file. This file has java dependencies and builds configuration details. | ||
| For creating the “sales.jar” file we use the command "mvn clean package". | ||
| Click Here To Download the "FlinkApplication" project zip file. | ||
3. Run The Project
| a. Client System | b. Flink System | |
|---|---|---|
| 1. | Download client.jar in the Client System. Click Here To Download the "client.jar" file. |
Download apprun.sh Linux shell script file in the Flink System which helps to download data files then run Flink sales.jar file and upload result files to the Client System. Click Here To Download the "apprun.sh" file. Click Here To Download the "sales.jar" file. |
|

|
|
| 2. | Run client.jar in the client system. At execution time pass server port 8080. Here we can use a different port if the port is already used in the client system.java -jar client.jar --server.port=8080
|
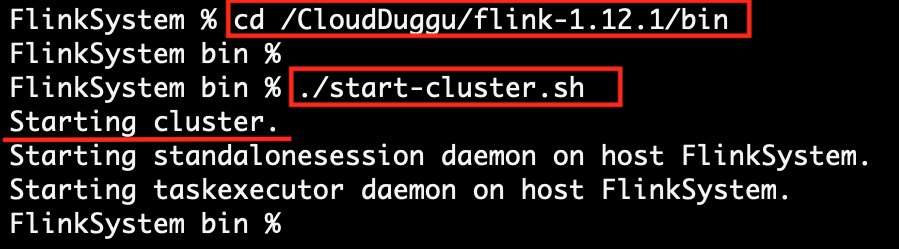
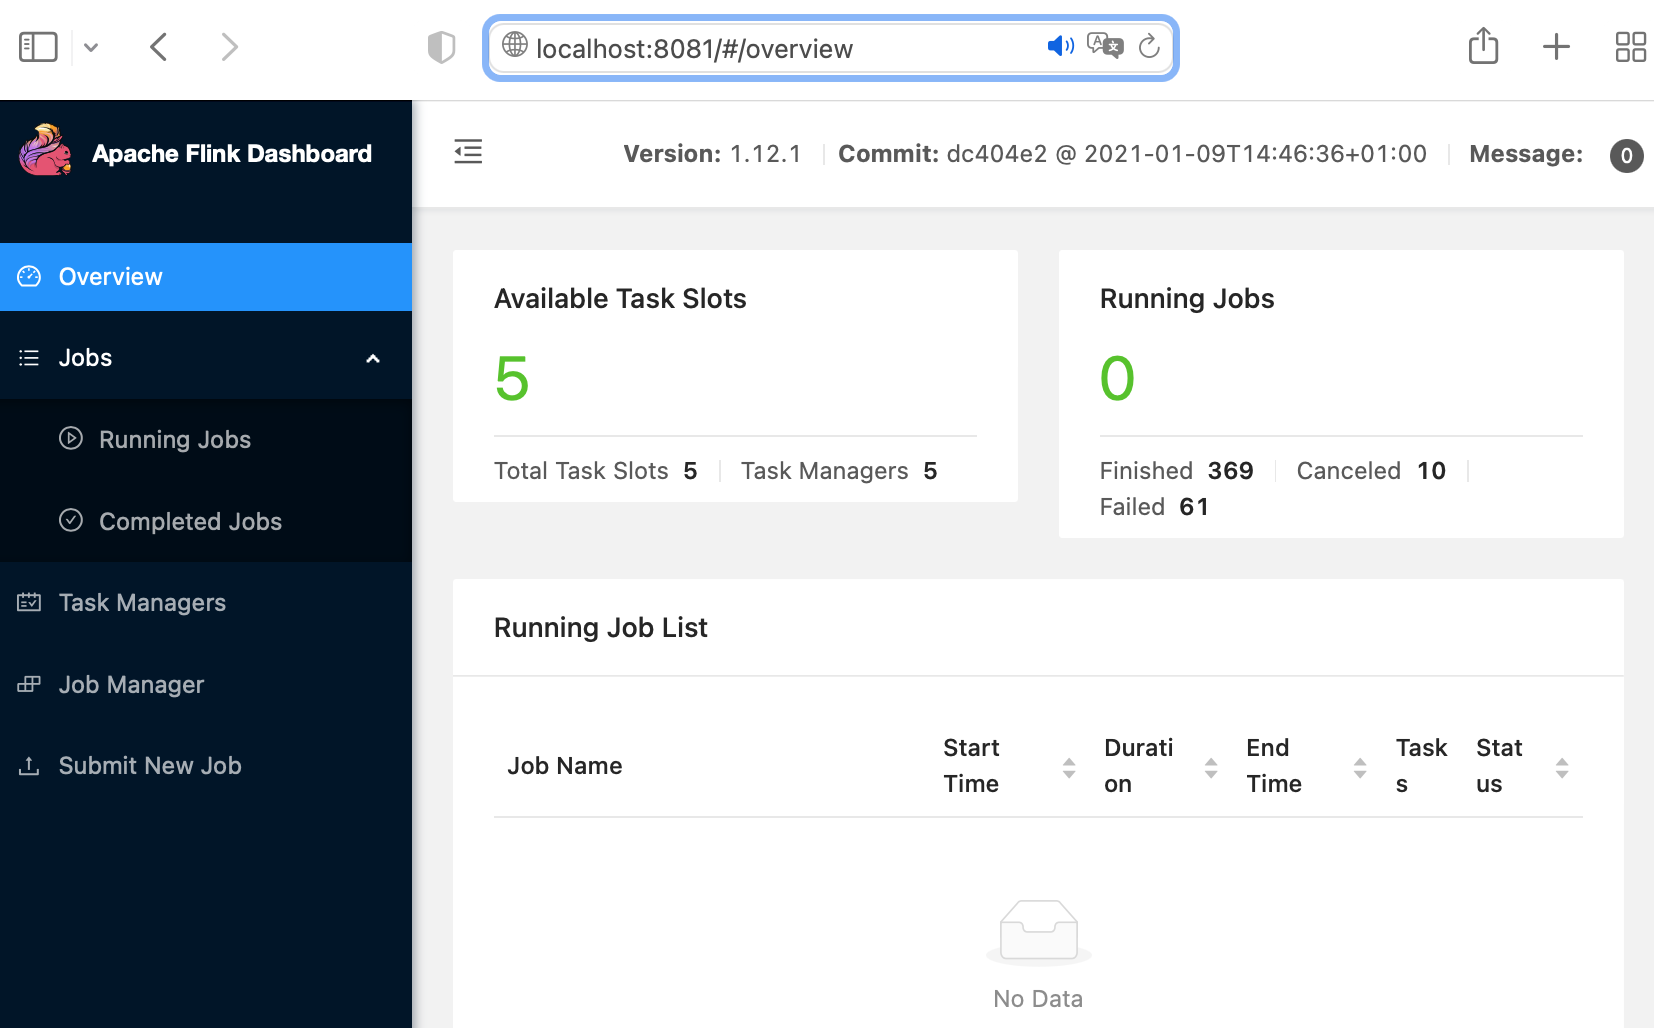
Run Flink service (./start-cluster.sh) in Flink system. After running the Flink service successfully, view the Flink Dashboard page in the browser (http://localhost:8081/)where all the running and completed jobs are shown. |
 |
|
|
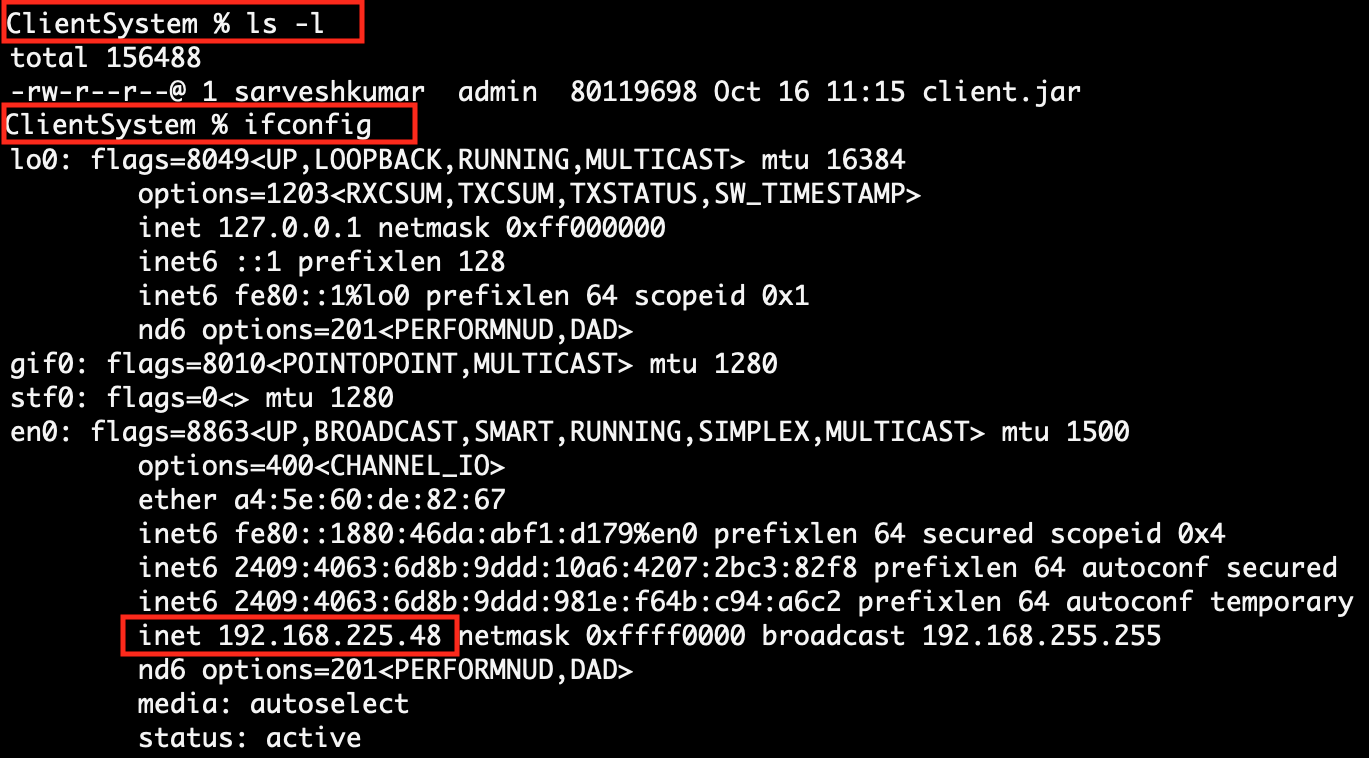
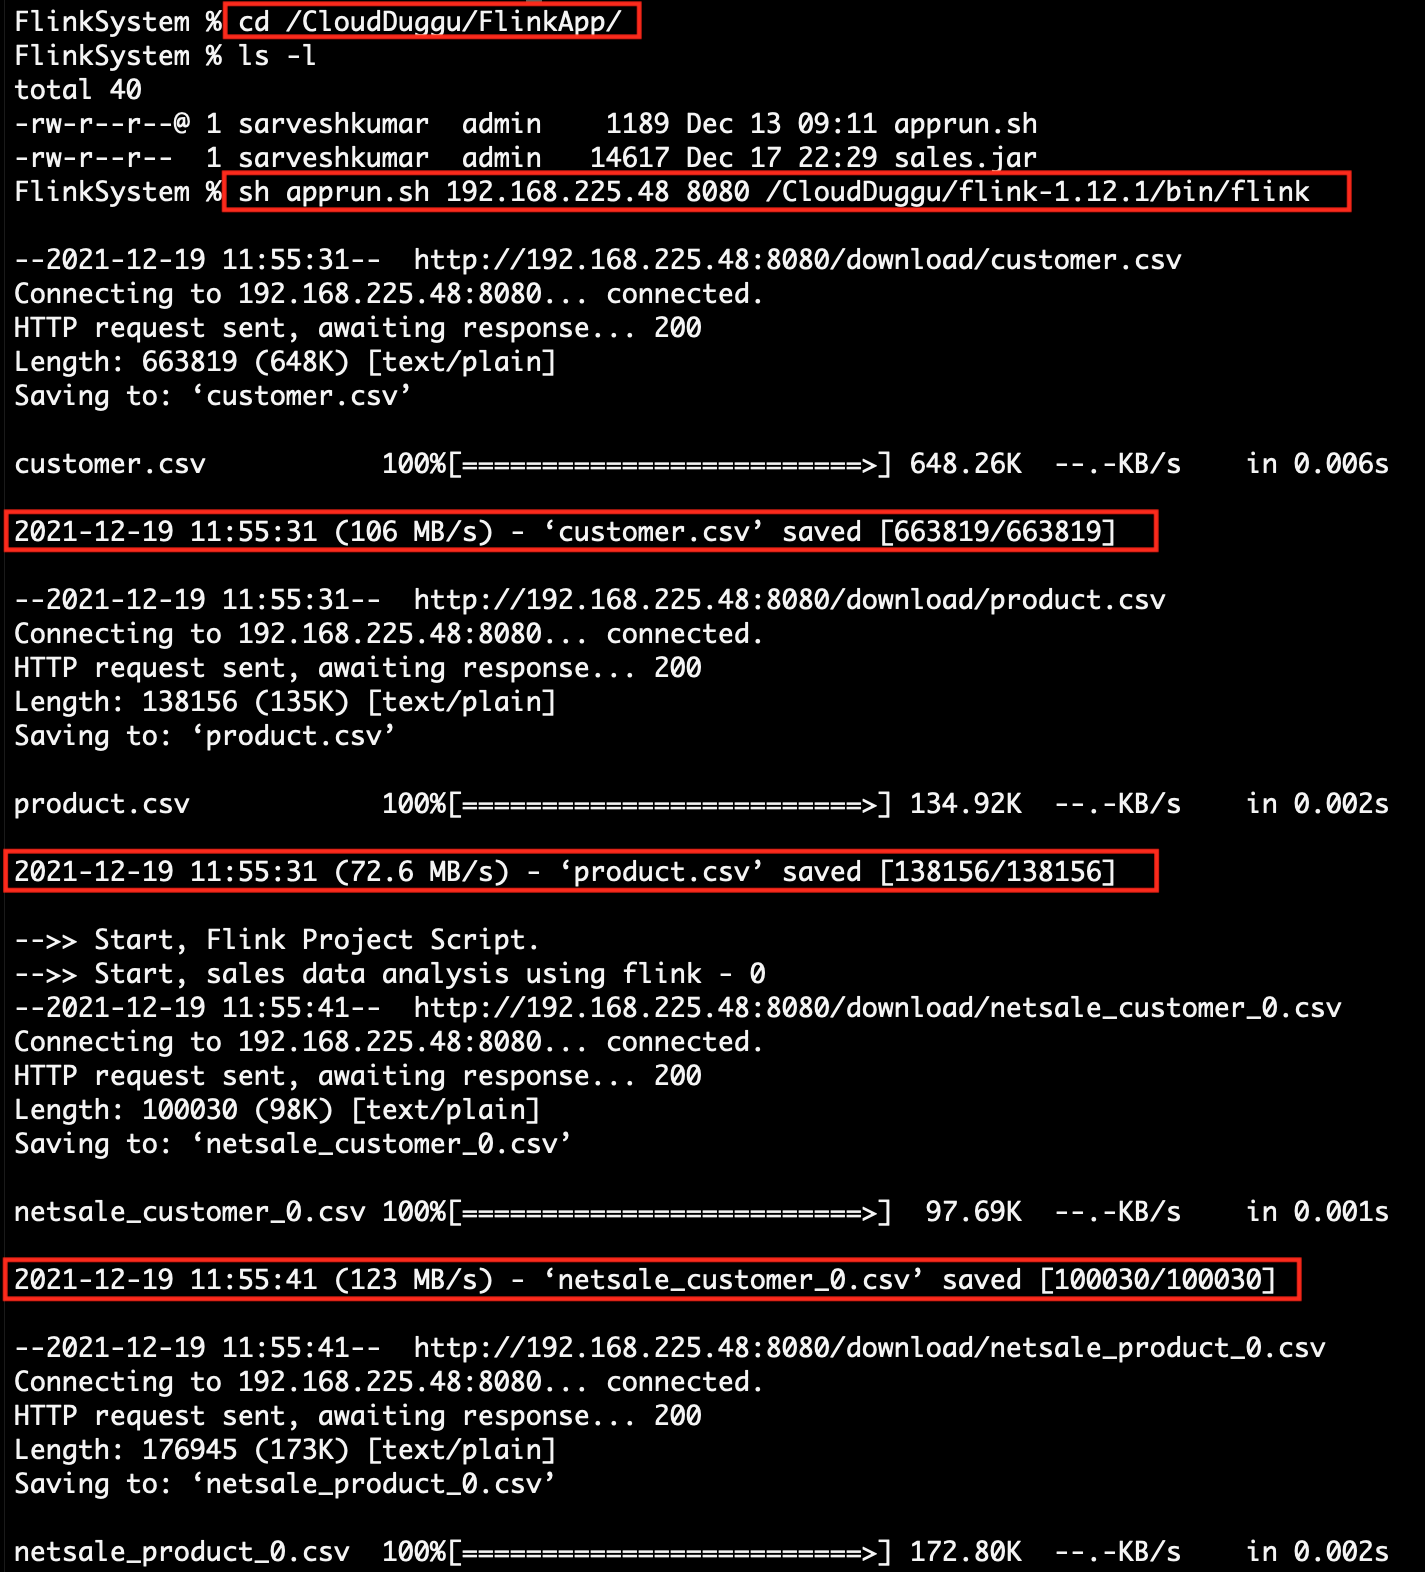
| 3. | Check the Client page on the browser using URL: http://localhost:8080 | Execute the script file apprun.sh. At the time of running the script, pass the client-IP-address, client-port-number and Flink downloaded service path together as argument values.
[ sh runflink.sh <client-ip> <client-port> <flink-service-path> ] sh apprun.sh 192.168.225.48 8080 /CloudDuggu/flink-1.12.1/bin/flink
|
 |
 |
|
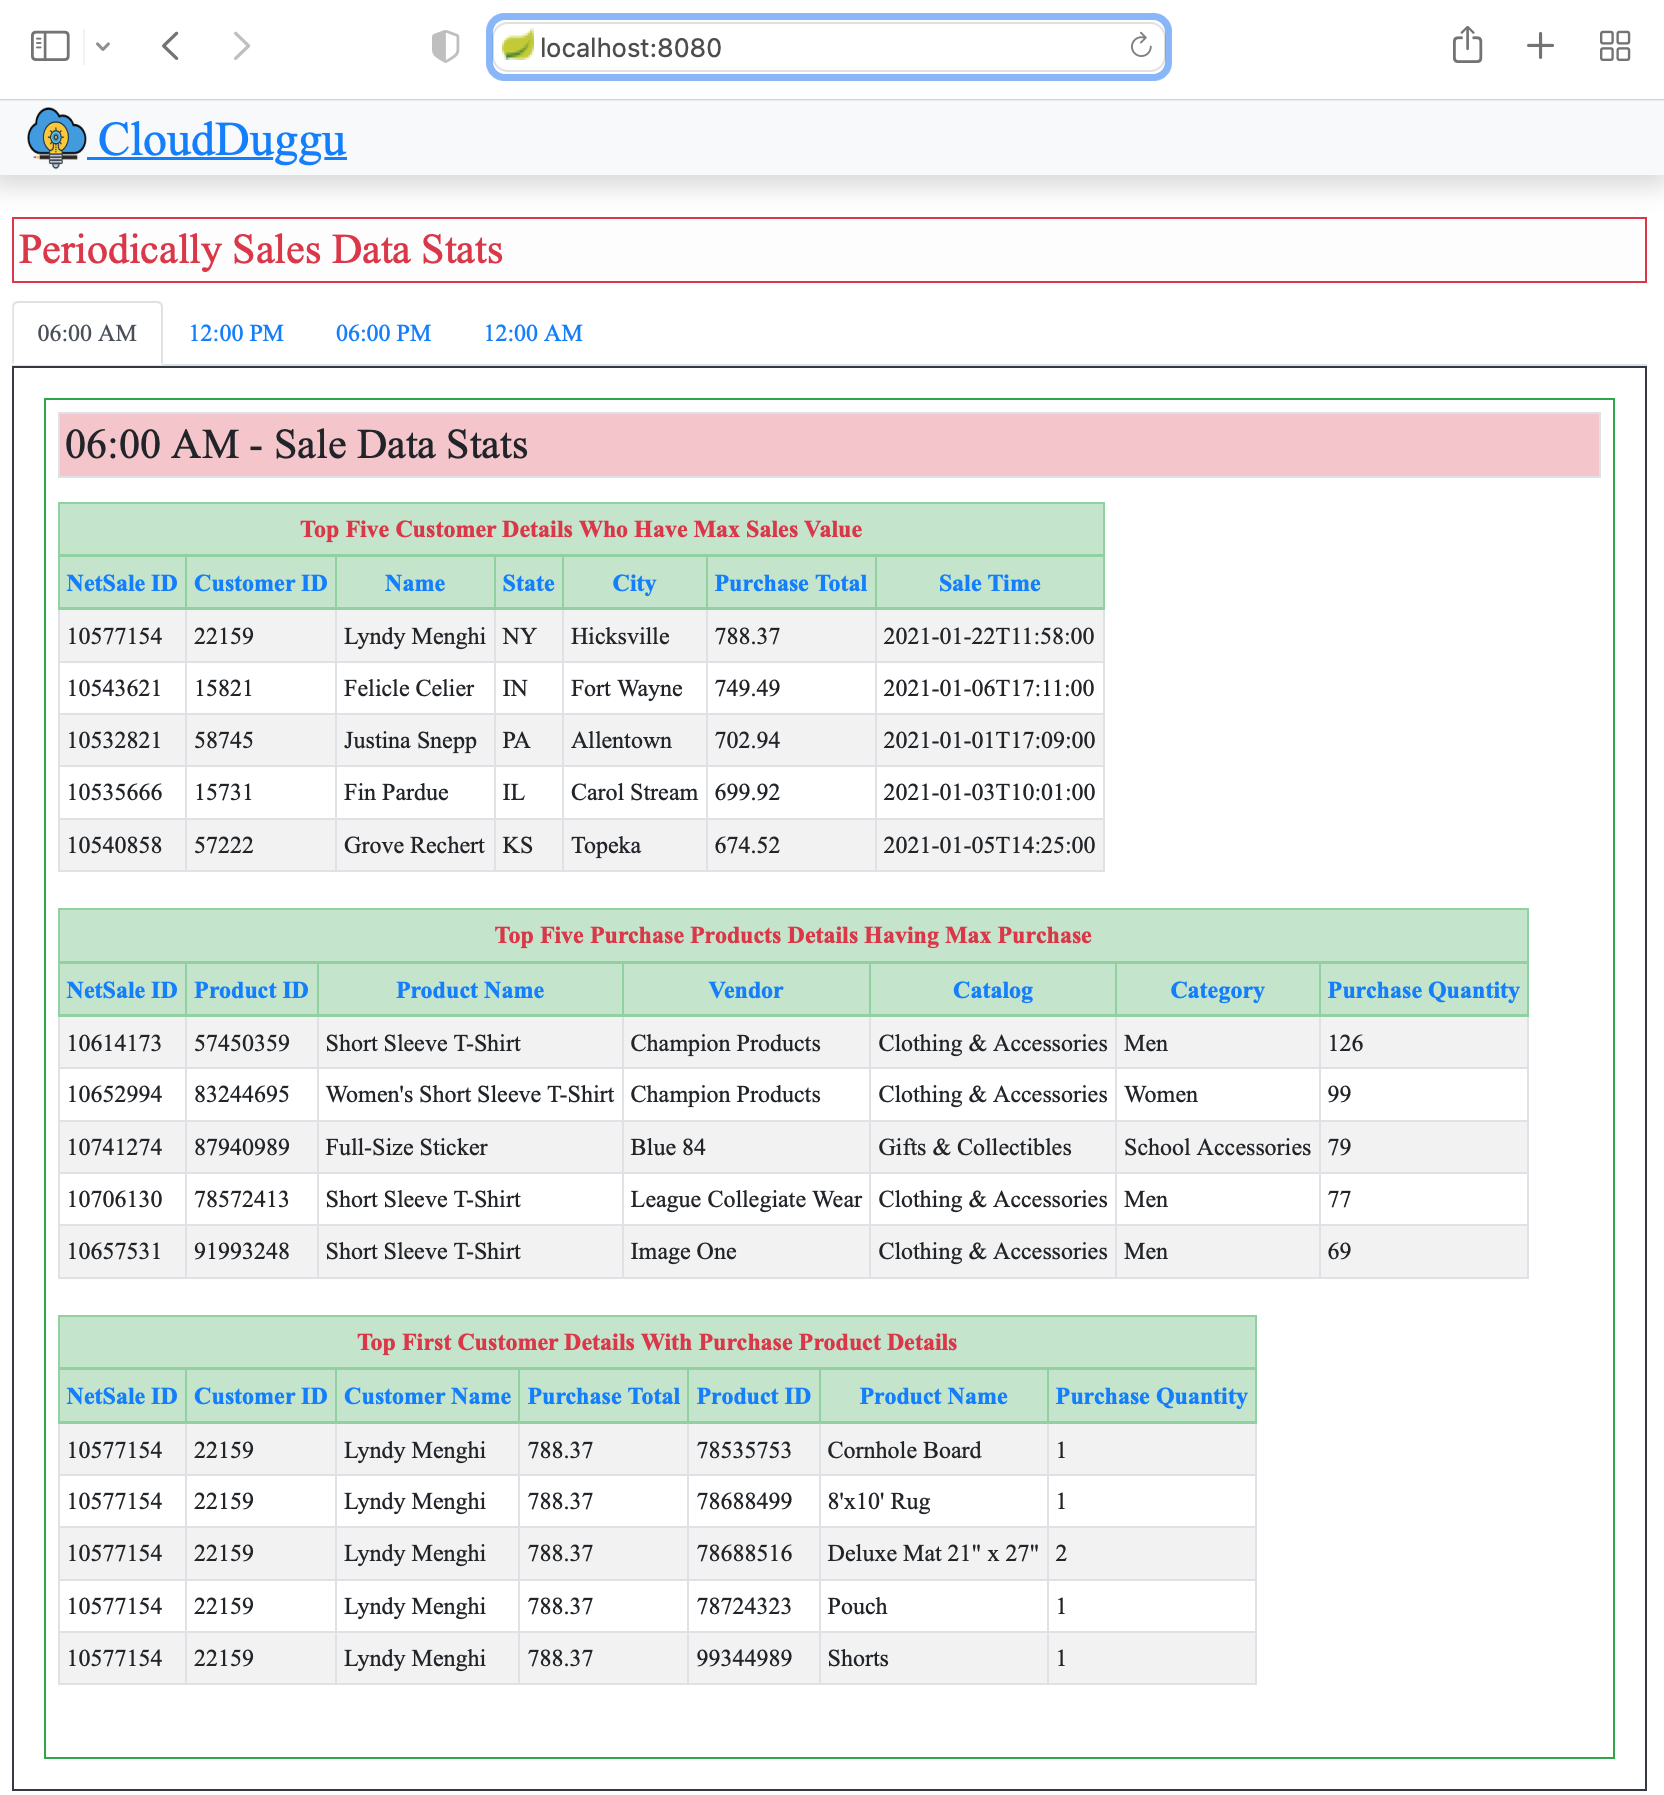
| 4. | The Client System is ready to download data files and upload result files. After the updating result by the Flink System, the Client System automatically shows result data in table format on the browser page (http://192.168.225.48:8080). |
The Flink System continues to download data files in a loop from the Client System and process them through Flink Project Application and periodically upload the result data file to the Client System. |
 |
 |
|
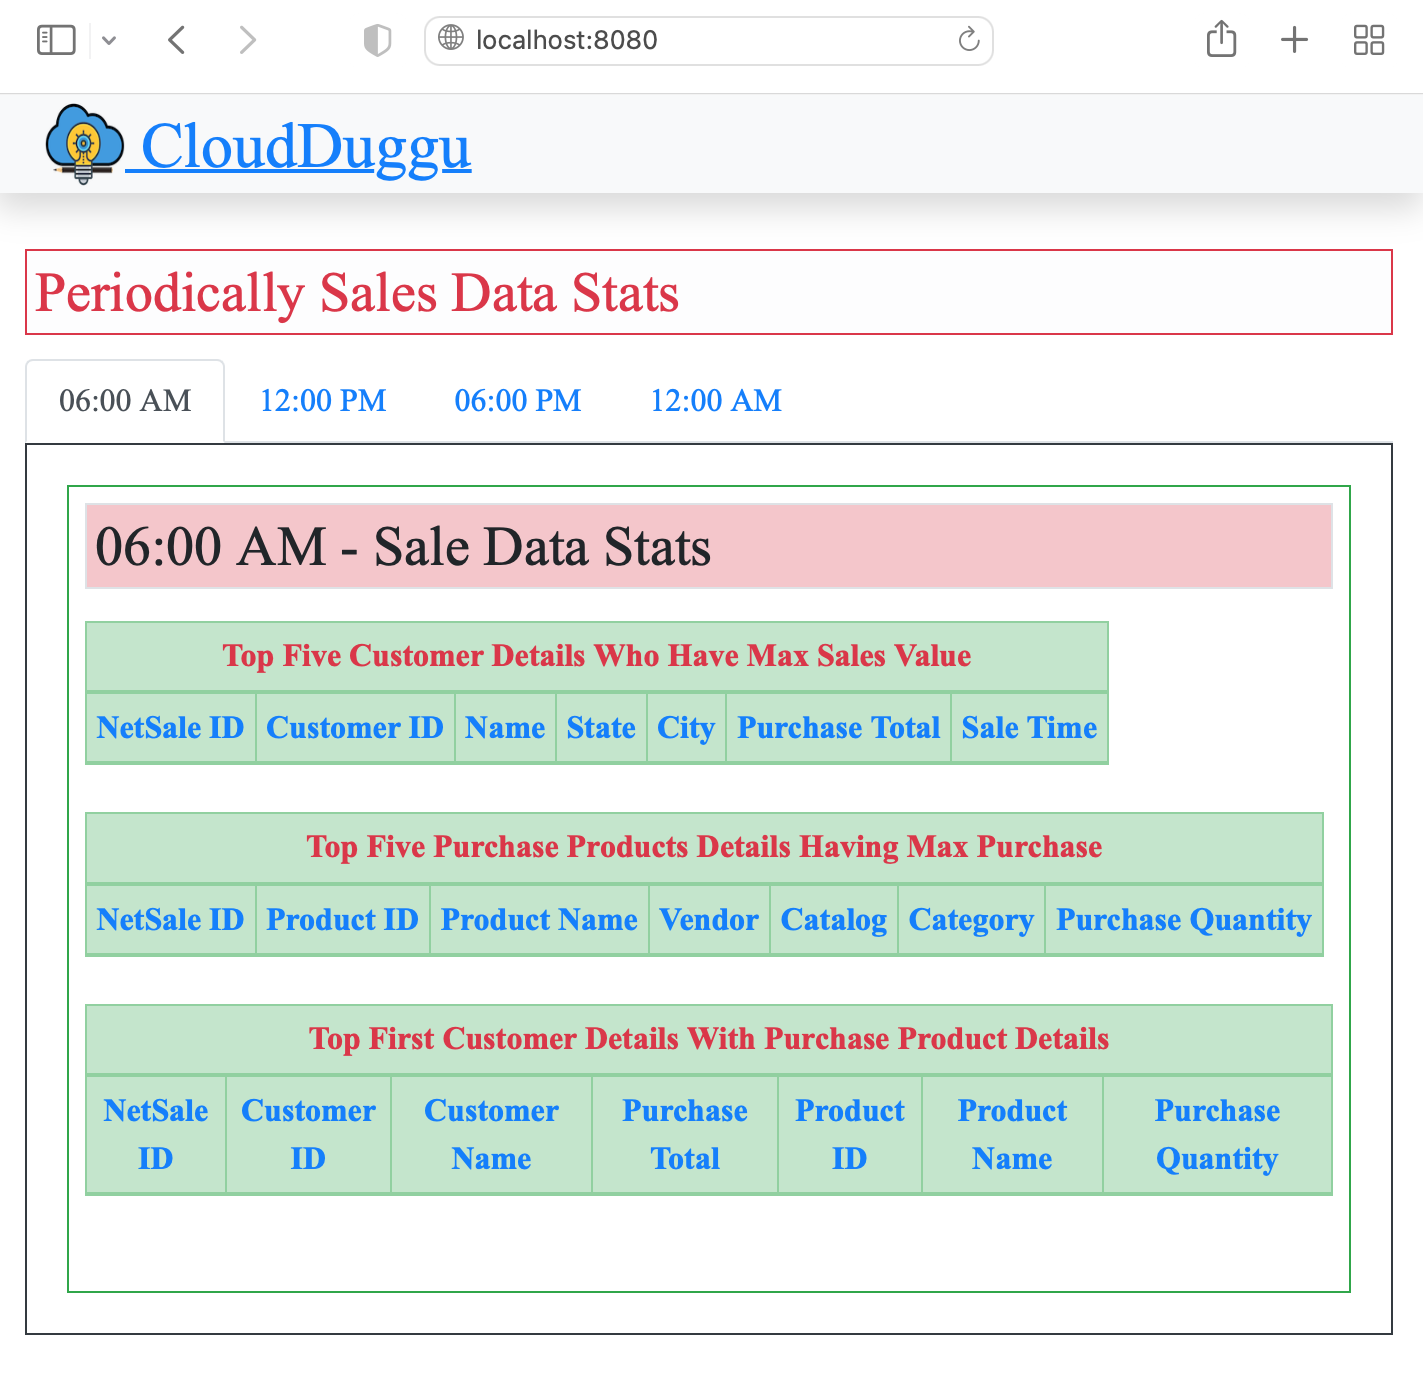
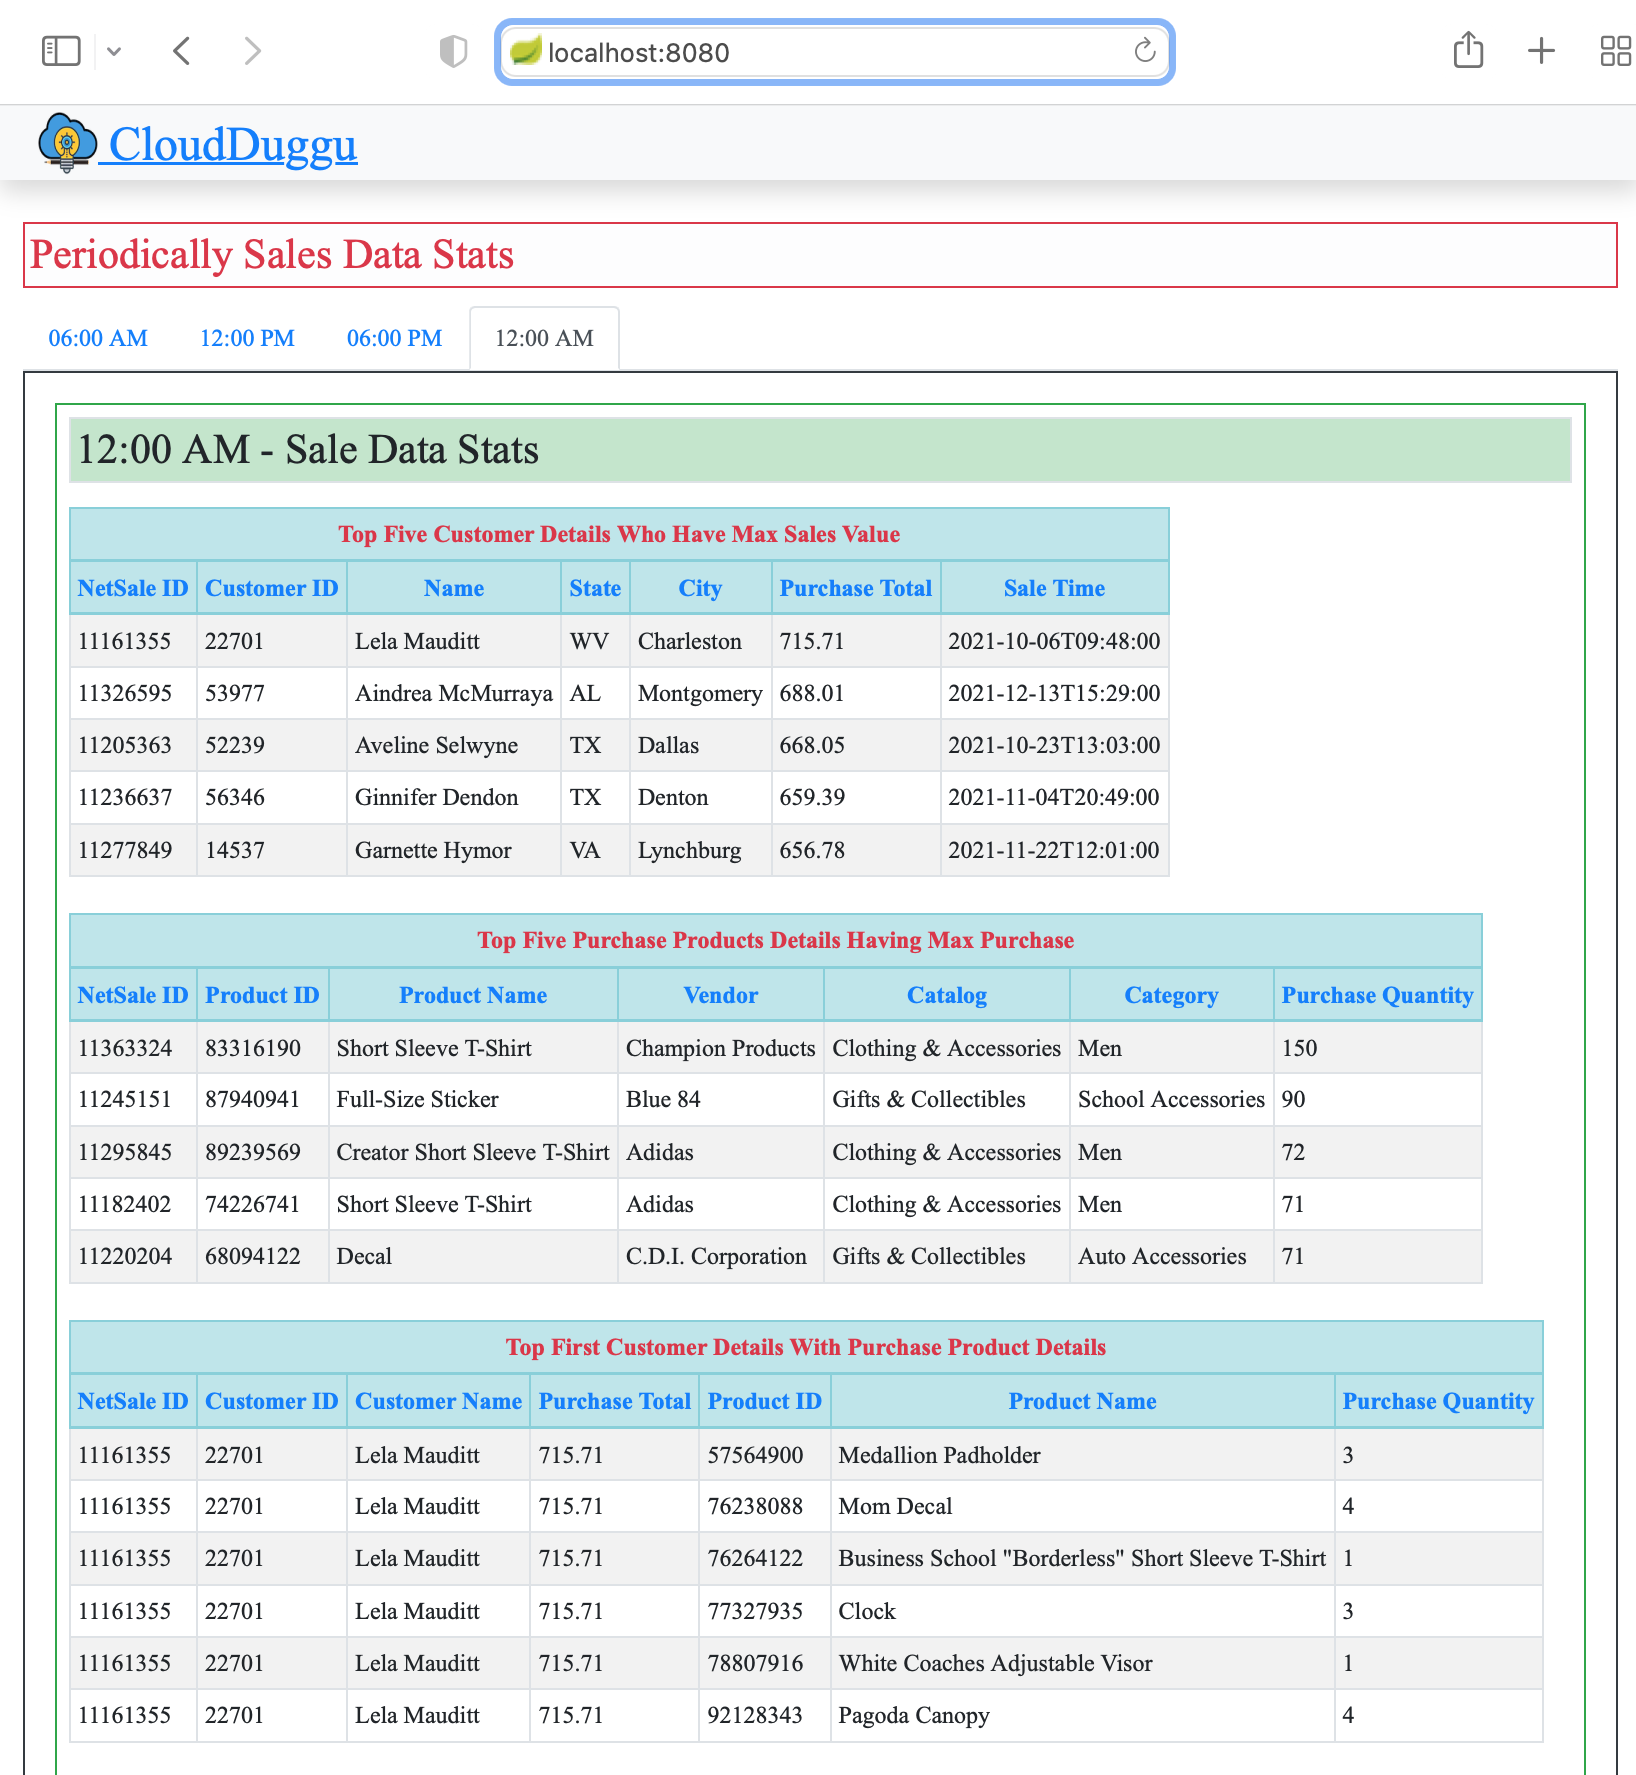
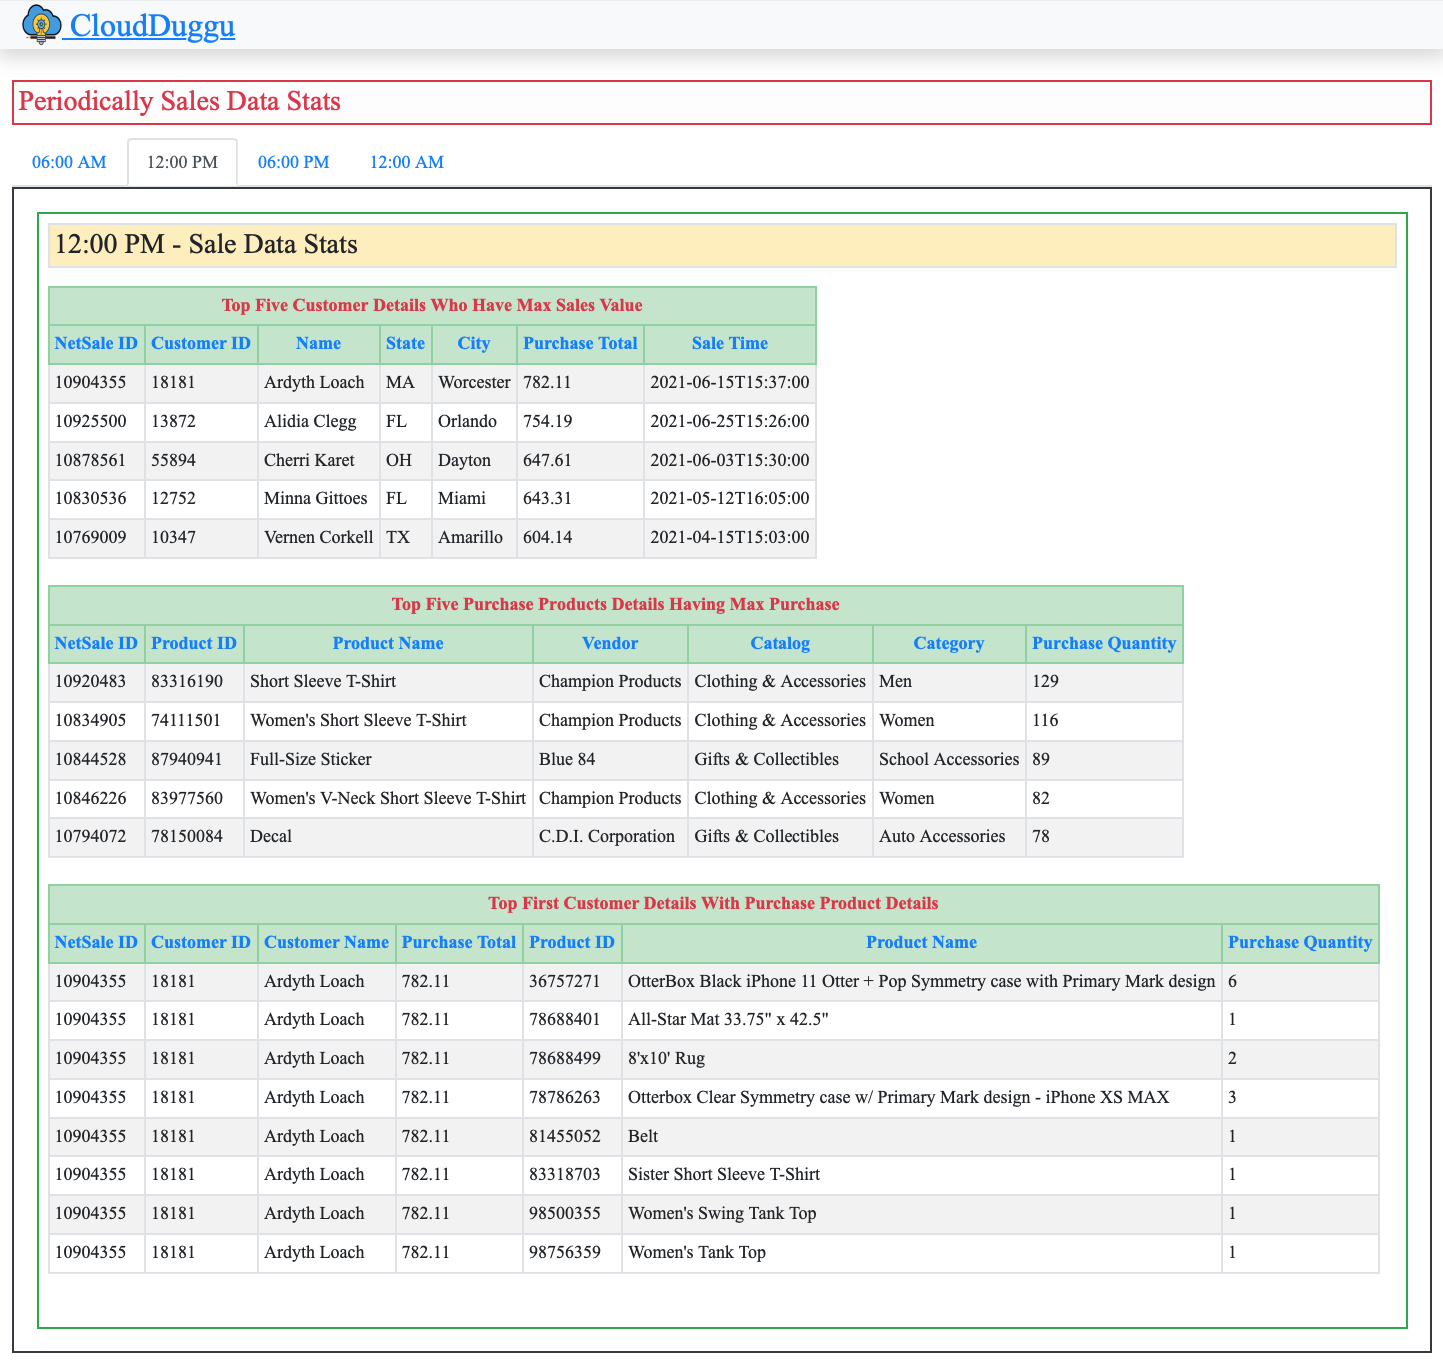
| 5. | The sales data is collected based on time, so the Client System shows the result data in tab view by time. (06:00 AM, 12:00 PM, 06:00 PM, 12:00 AM) | The Flink System executes all data files and updates the result files to the Client System accordingly as processed. |
 |
 |
4. Project Files Description In Details
(i). apprun.sh
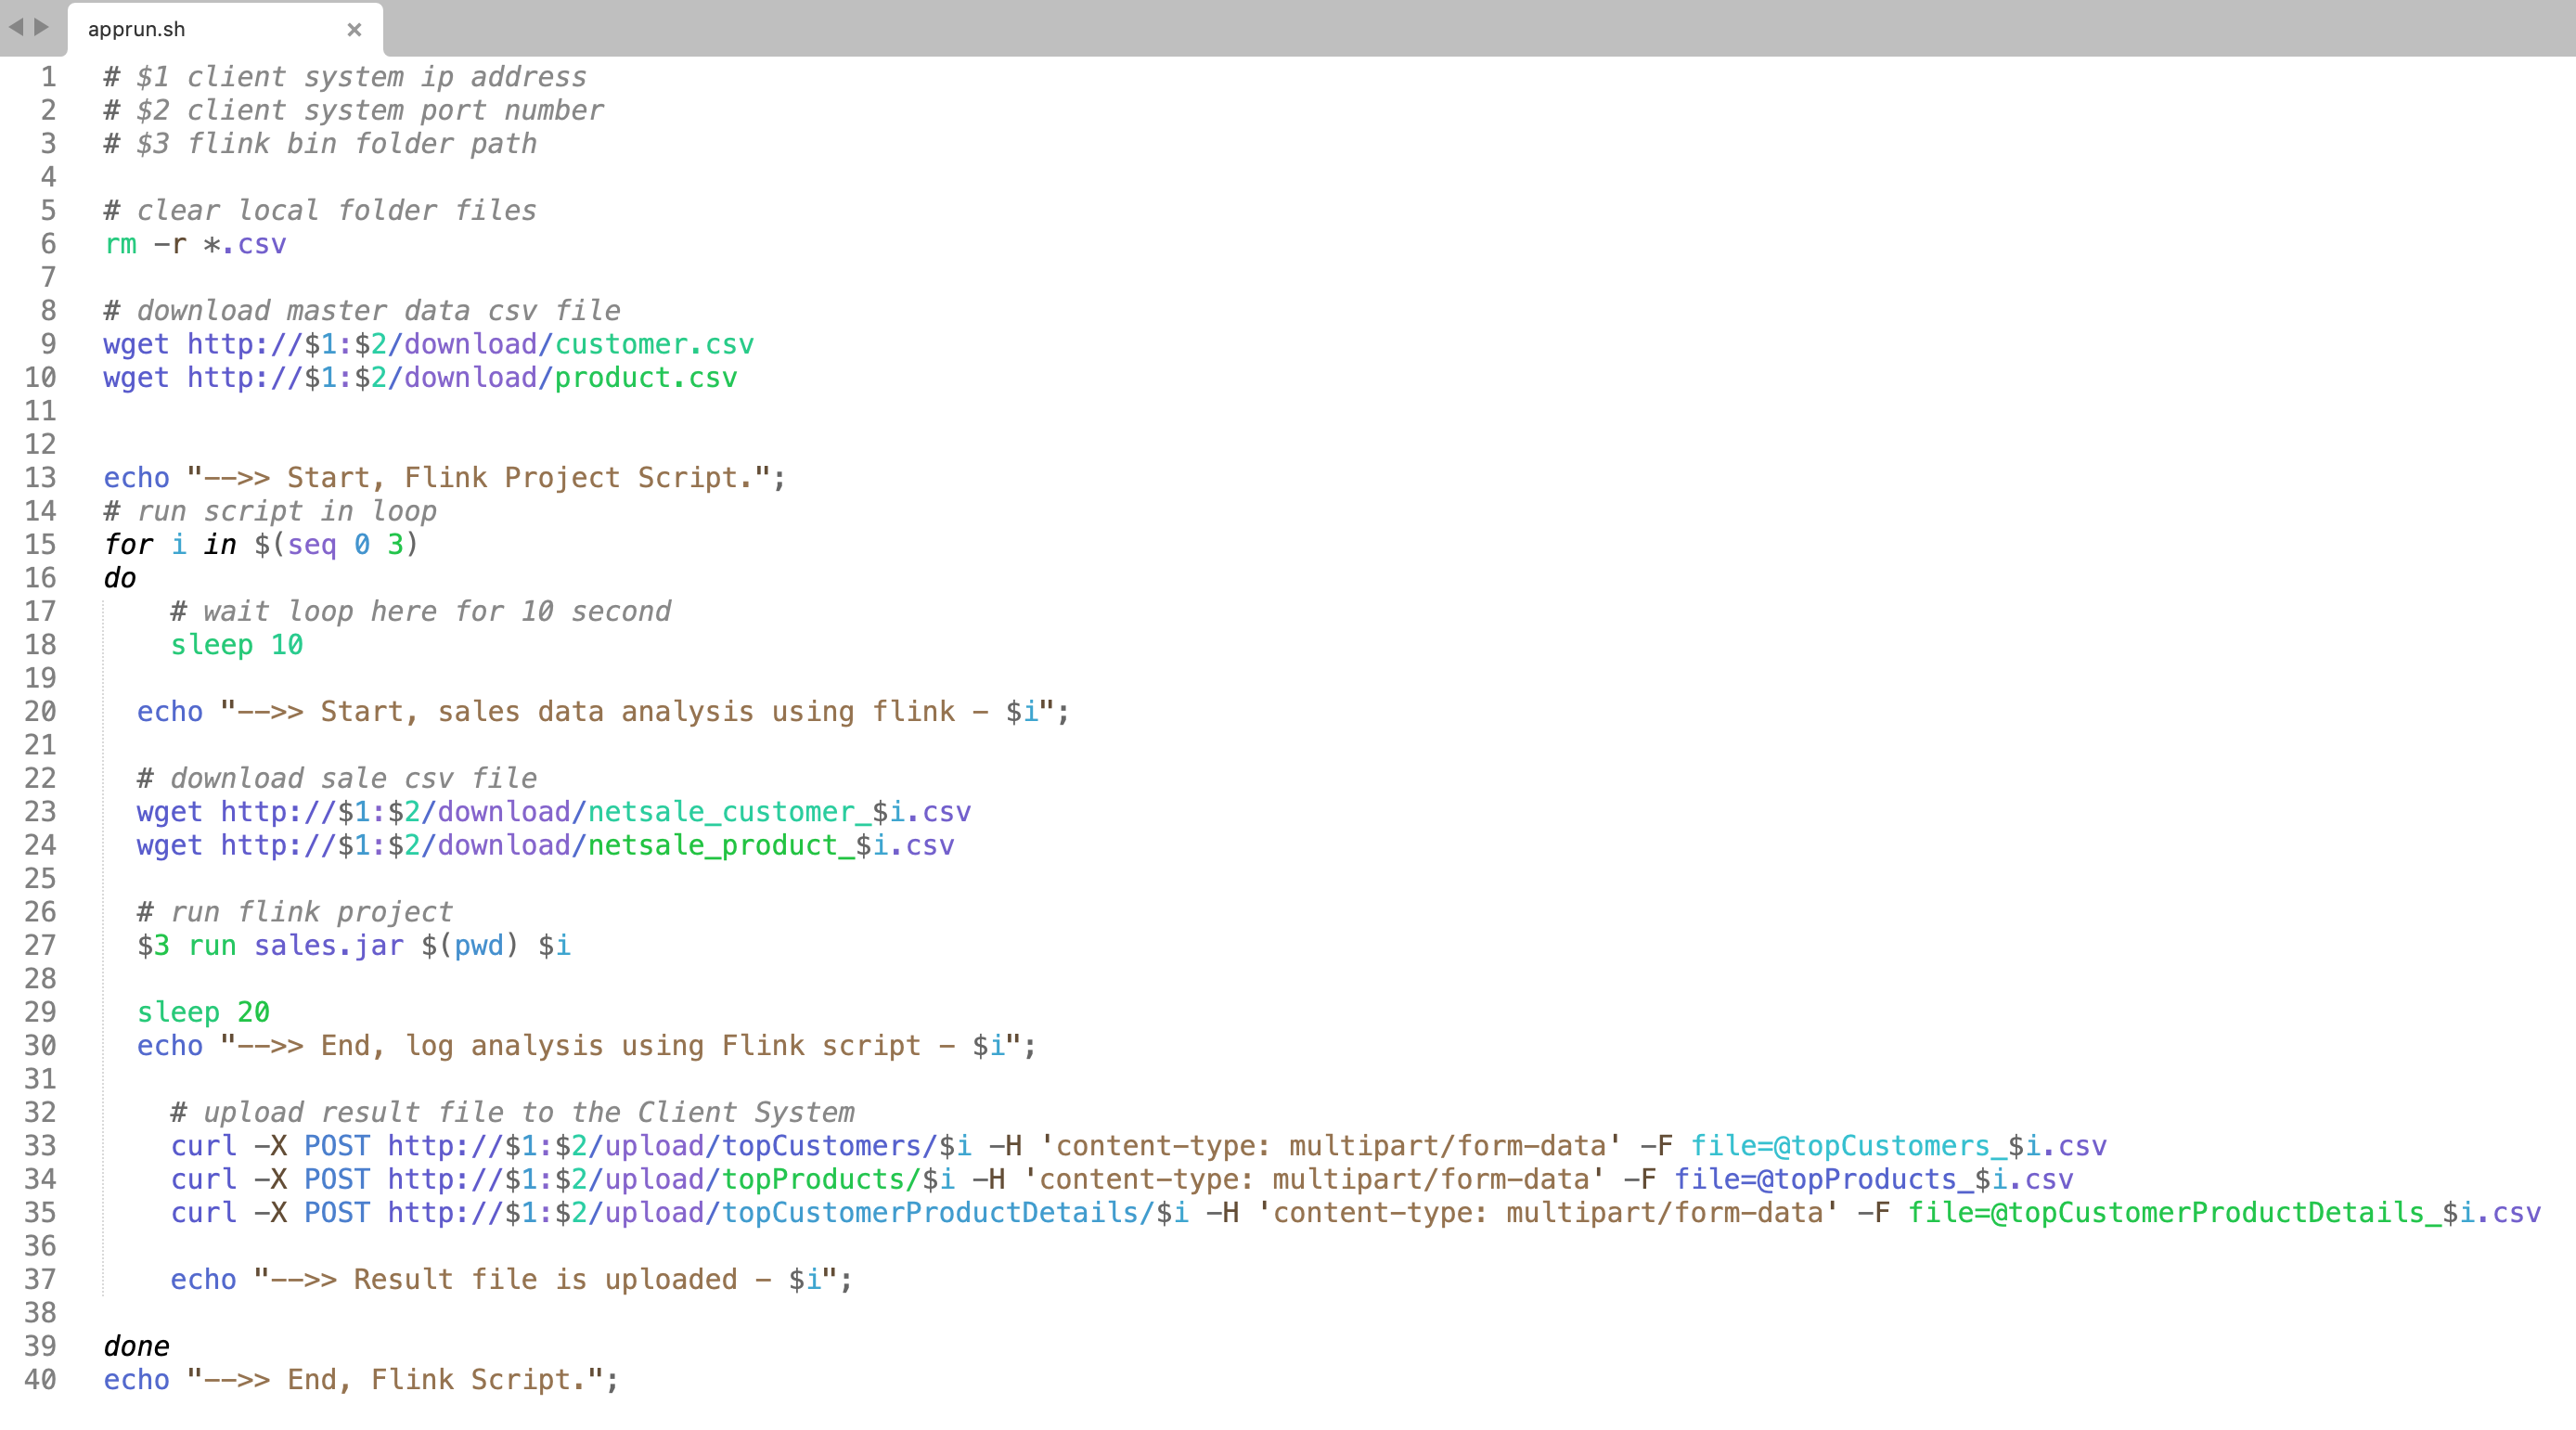
Using this script file (apprun.sh) we can easily execute the Flink application on the Flink System.
The following is the line-by-line explanation of the apprun.sh script file.
apprun.sh file has Linux shell scripts.
(Line 6) Remove the old existing files from the Flink System local directory.
(Line 9,10) Download master data CSV files (customer.csv, product.csv) from the Client System.
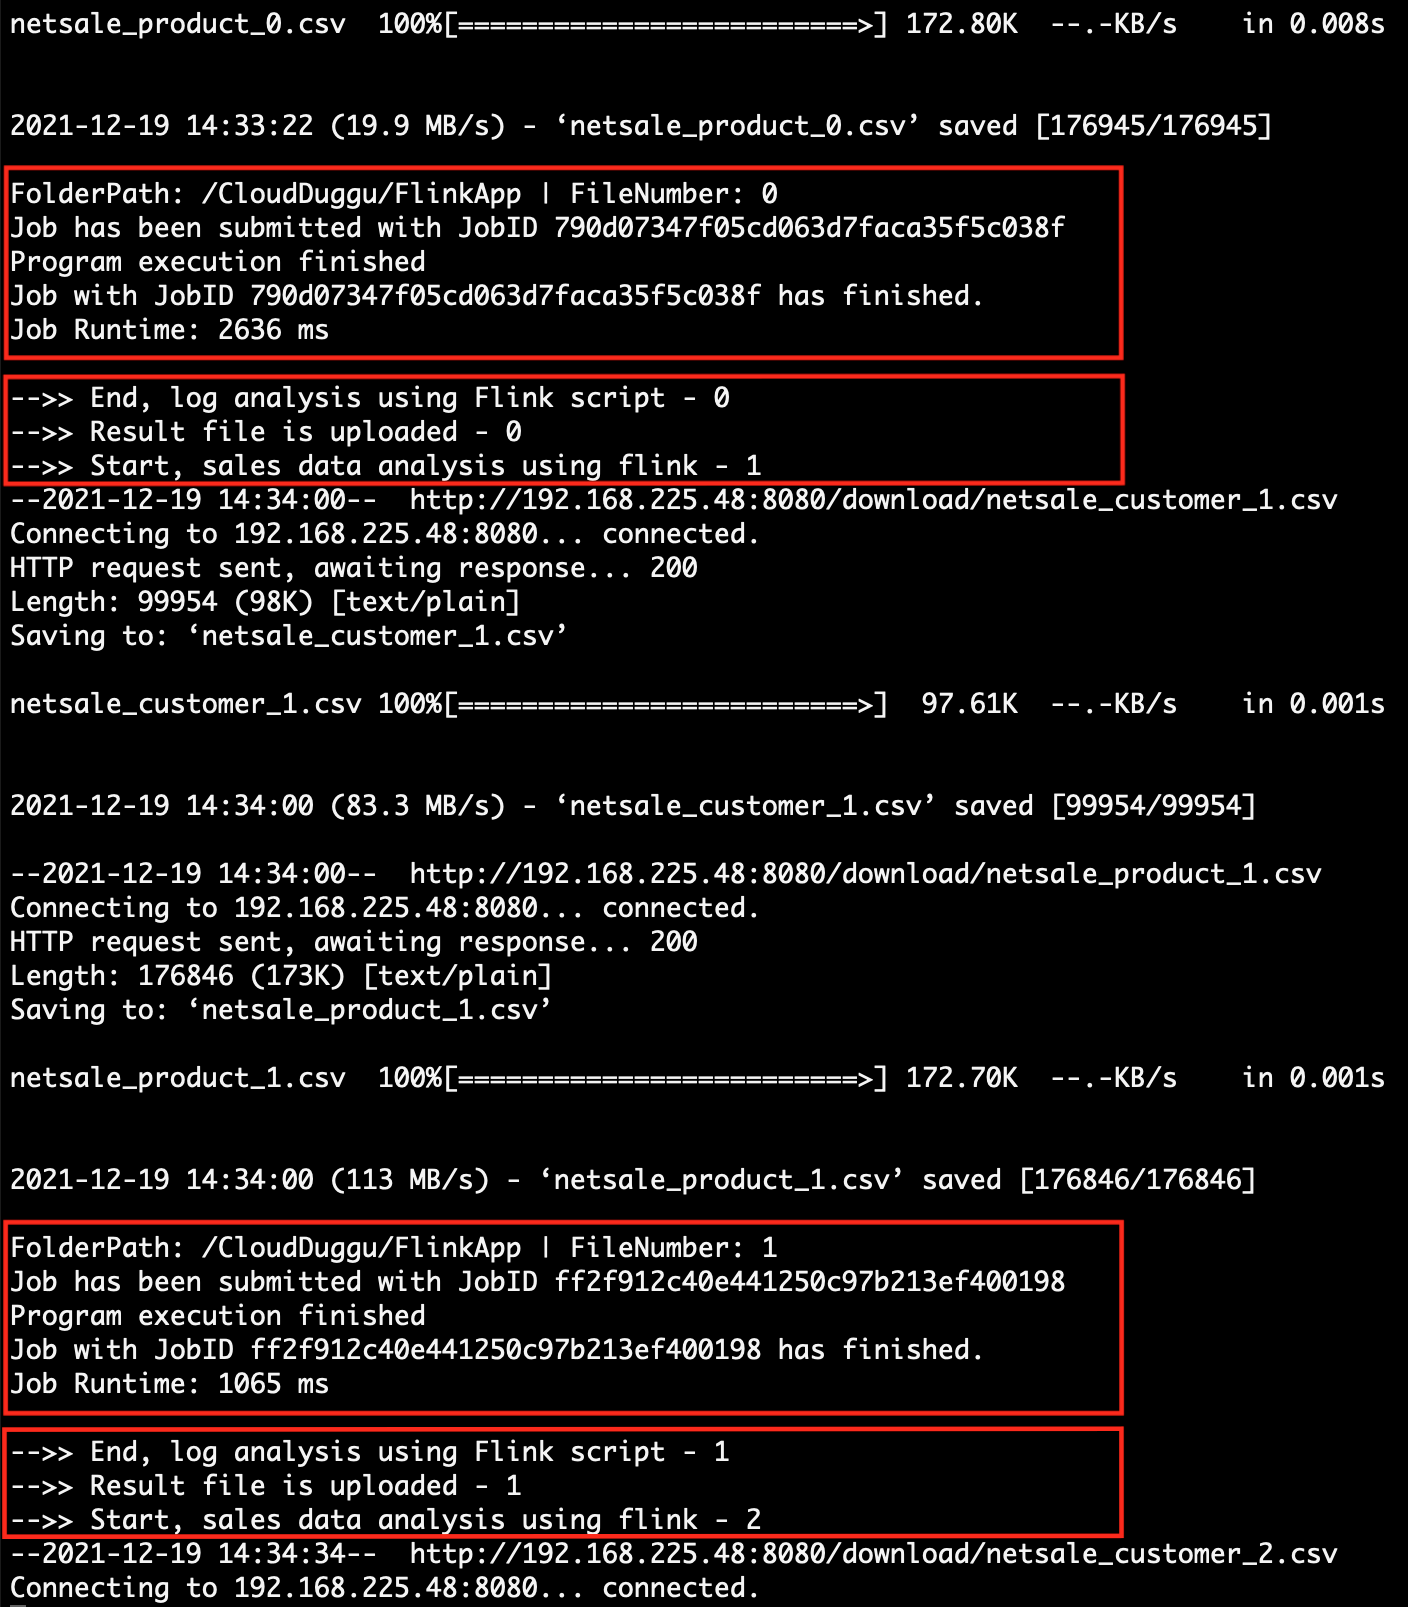
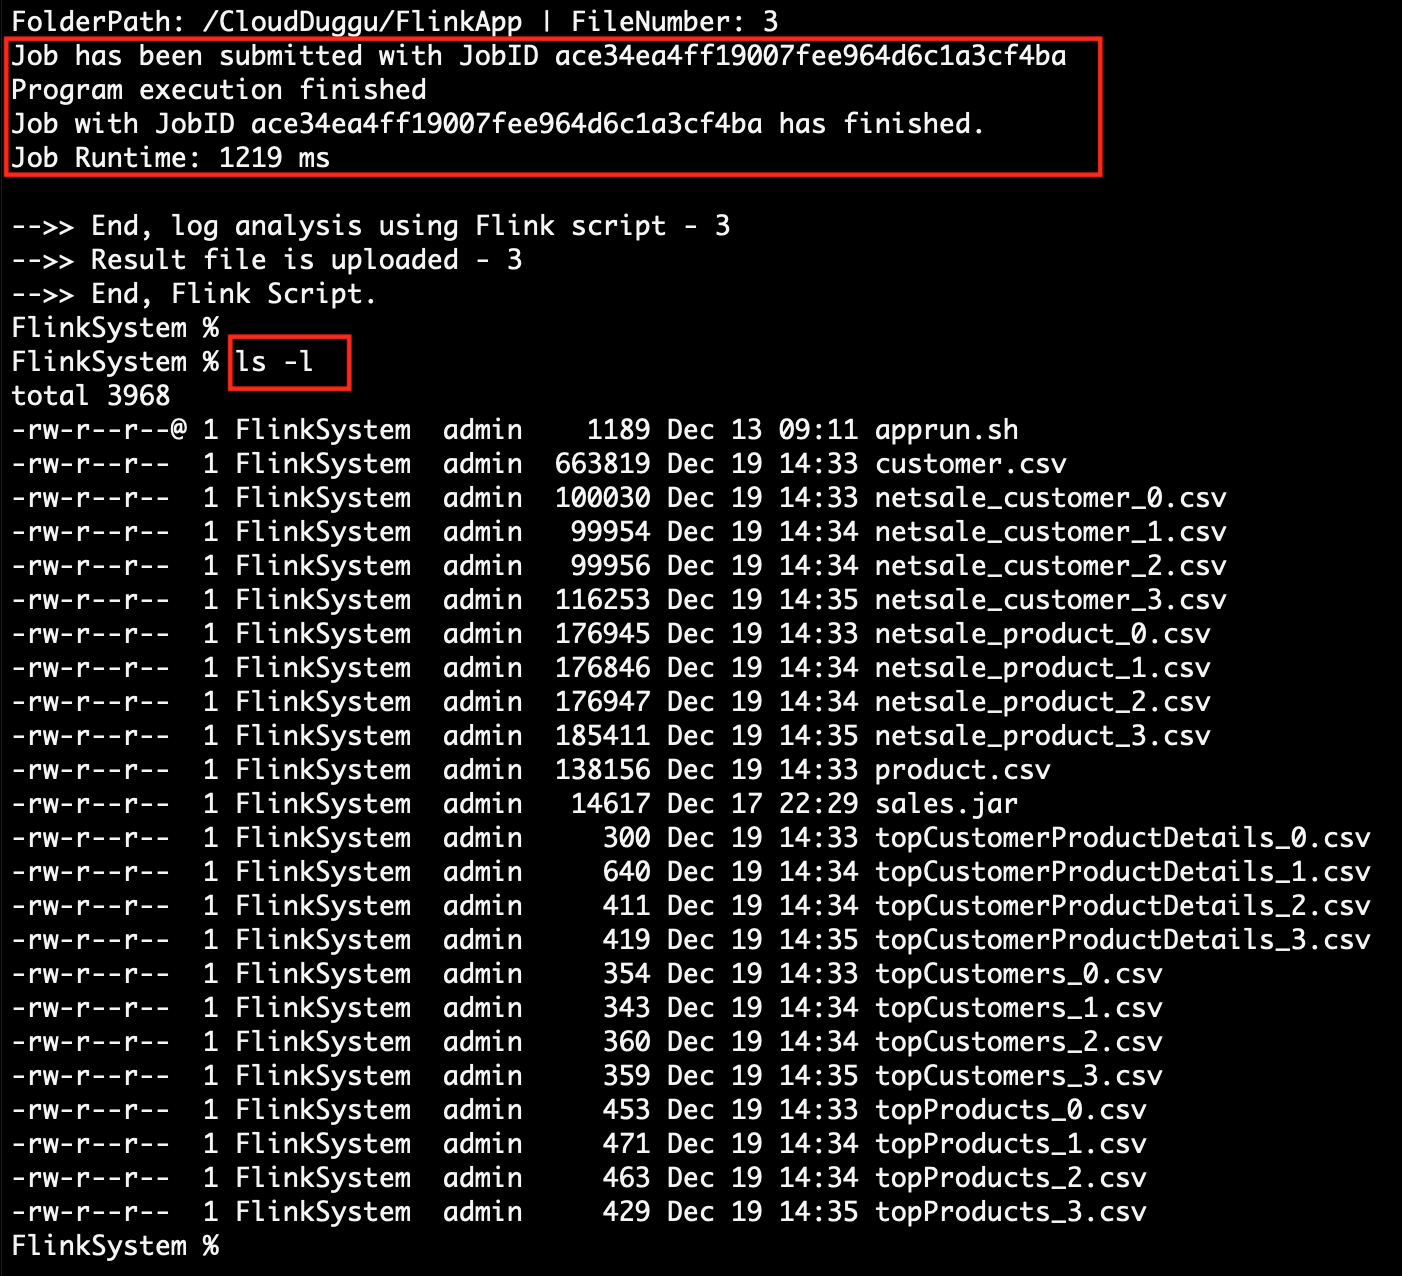
(Line 15) Execute the loop in the local Flink System. This project is decided to only submit 4 jobs, that's why it executes the loop from 0 to 3 only.
(Line 23,24) Download sales data files from the Client System and use that files by the Flink Application for sales analysis.
(Line 27) Execute Flink Project Application jar and start sale data analysis. After successful execution, the Flink application creates a result files on the same directory.
(Line 33,34,35) After the successful creation of the result file, the Flink System uploads the result files to the Client System.
(ii). getTopCustomers()
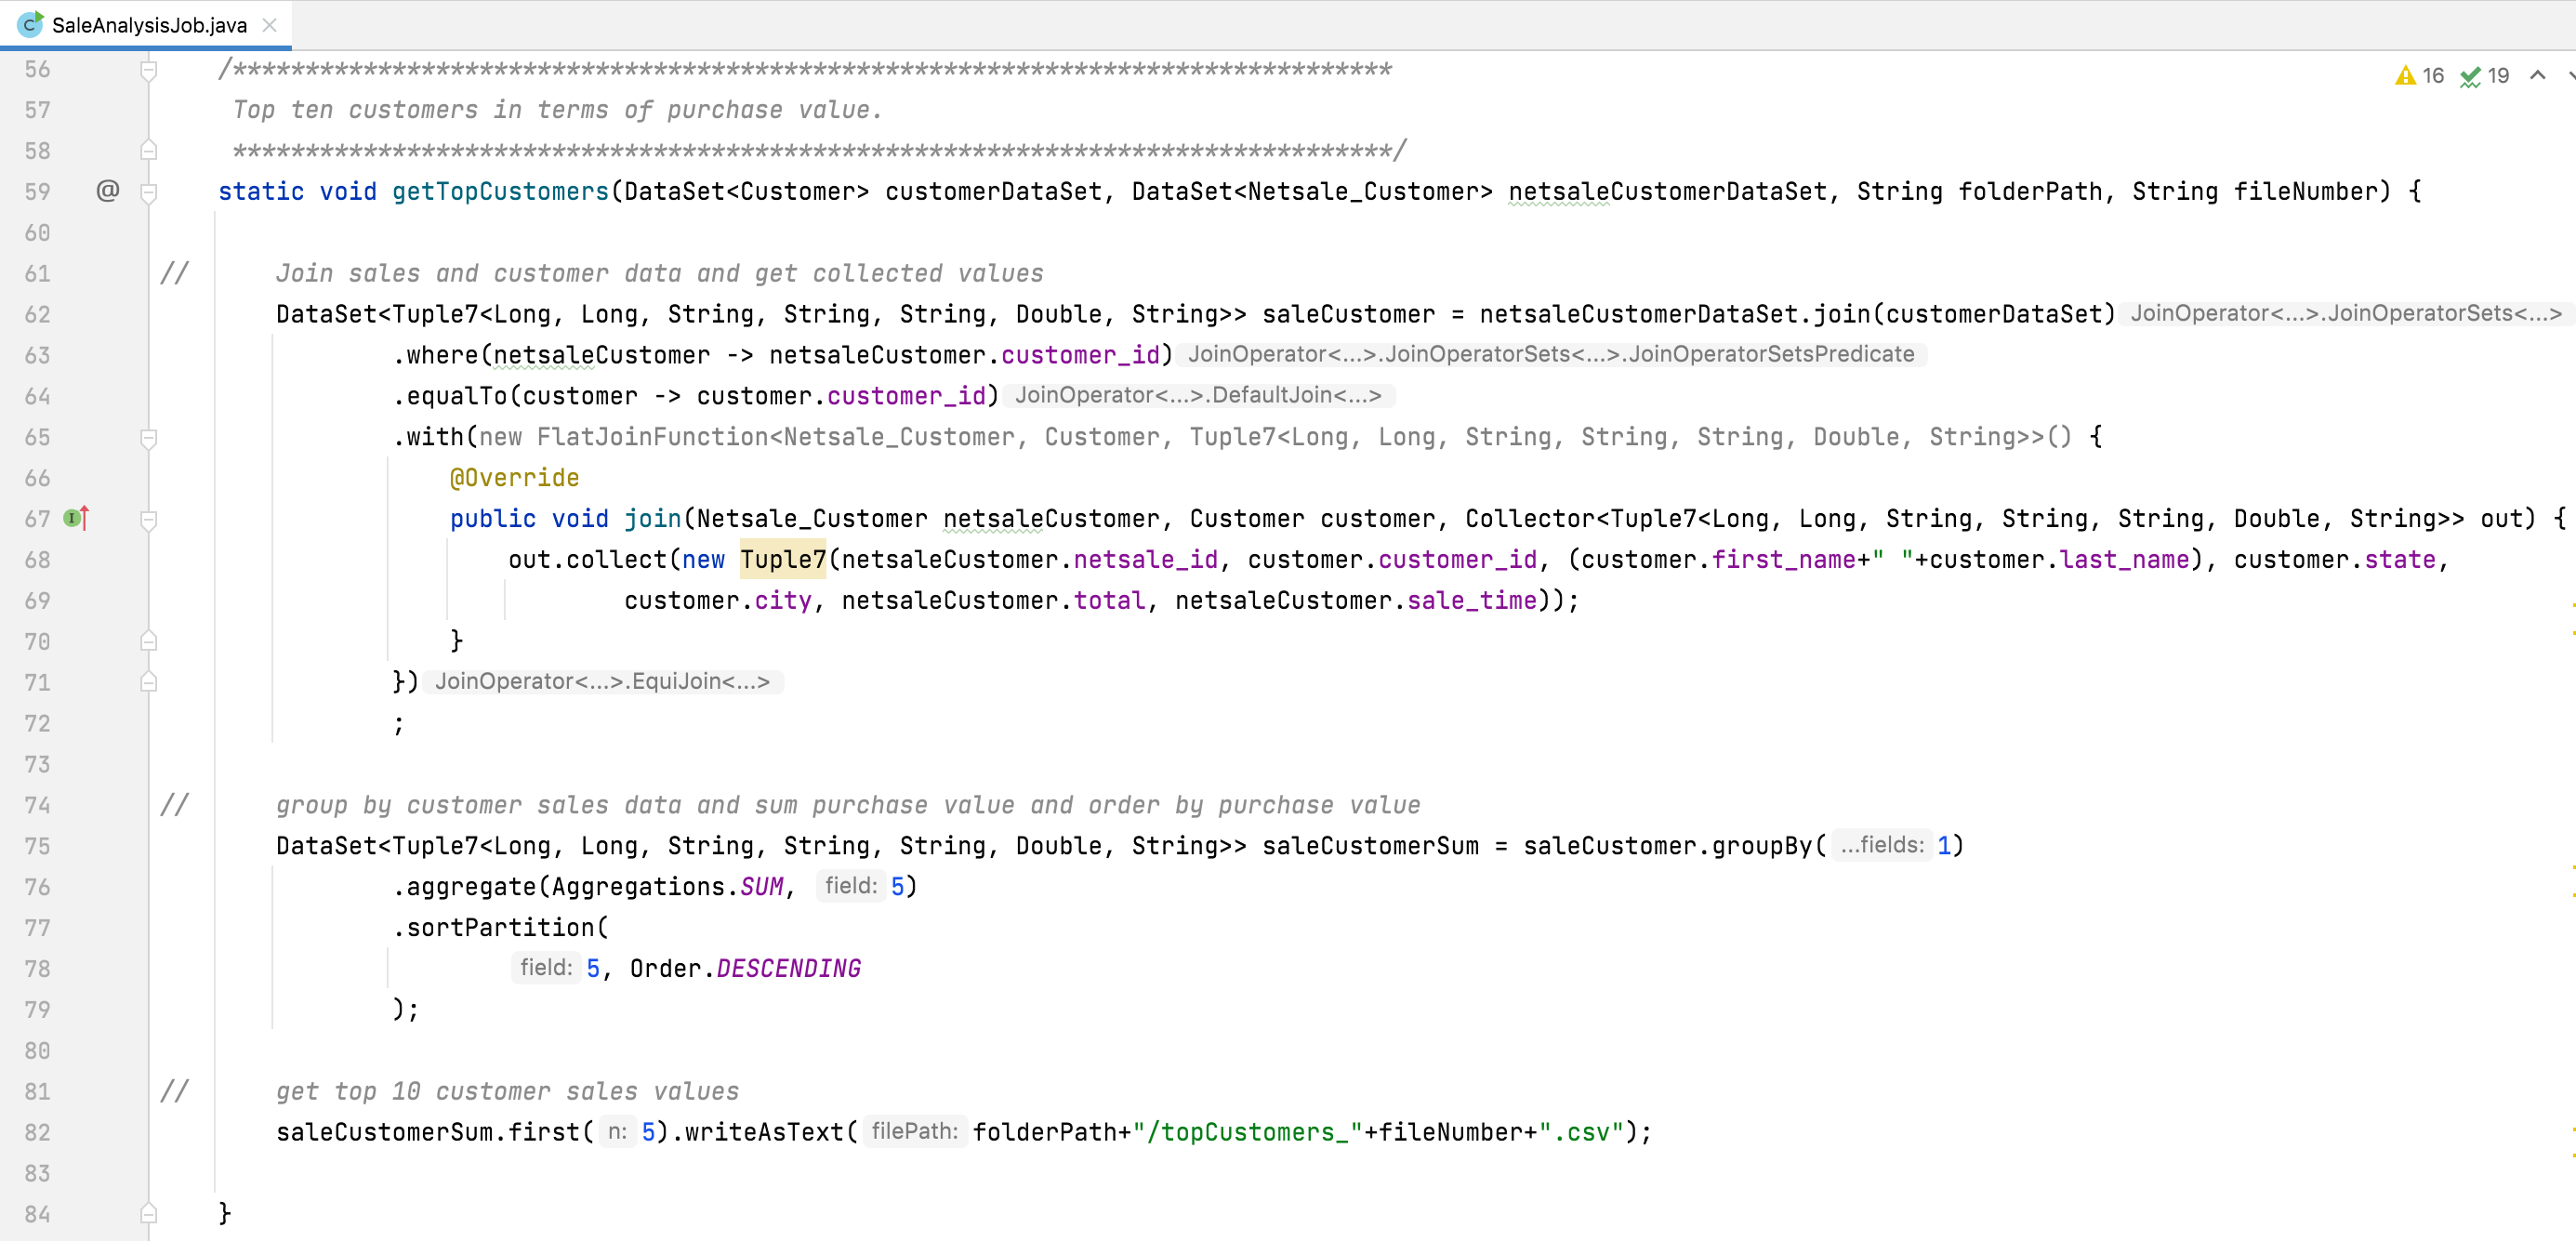
This java method is used in the Flink java project to get top customer details.
The following is the line-by-line explanation of the SaleAnalysisJob.getTopCustomers() method.
(Line 59) Create a method with 4 argument values. The first two are used to accept the Flink DataSet value and the other is used to store the result file.
(Line 62) Join two DataSet objects.
[ netsaleCustomerDataSet.join(customerDataSet) ]
(Line 63) Add where() method and use the first DataSet object variable which is common in second DataSet objects.
[ where(netsaleCustomer -> netsaleCustomer.customer_id) ]
(Line 64) Add equalTo() method and used second DataSet object variable which is common in first DataSet objects.
[ equalTo(customer -> customer.customer_id) ]
(Line 65 - 71) Add with() method and collect join the result with the help of FlatJoinFunction class object. Choose only 7 values from the join values and so that using Flink object Tuple7 for store variable value.
[ Collector<Tuple7<Long, Long, String, String, String, Double, String>> ]
(Line 75) Apply groupBy() method on the join result object. In this method pass variable index value of the object, through which want to group the result values.
[ groupBy(1) ]
(Line 76) Here apply aggregate() method and use this method to collect SUM values of one variable in the group object list.
[ aggregate(Aggregations.SUM, 5) ]
(Line 77) Here apply sortPartition() method and which is used to sort the object list.
[ sortPartition(5, Order.DESCENDING) ]
(Line 82) Now Select the first 5 object lists and write them into the CSV file.
[ first(5).writeAsText(...) ]
A client view page of the Flink project.
:) ...enjoy the flink project.