The objective of this tutorial is to create an Apache Flume project in which we will get data from HTTP Flume Source and using File-Roll Flume Sink, we will save that data. Here we have taken input data from the Client System. After receiving the data from the Client System, we will save that data in the Flume System as text files and after that, we will pass saved files information to the Client System.
So readers ... are you ready to create an Apache Flume project. (Save-Client-Data-Using-Flume)
1. Idea Of Project
| a. Enter data using an application that is running in the Client System, and send the data to the Flume System. | 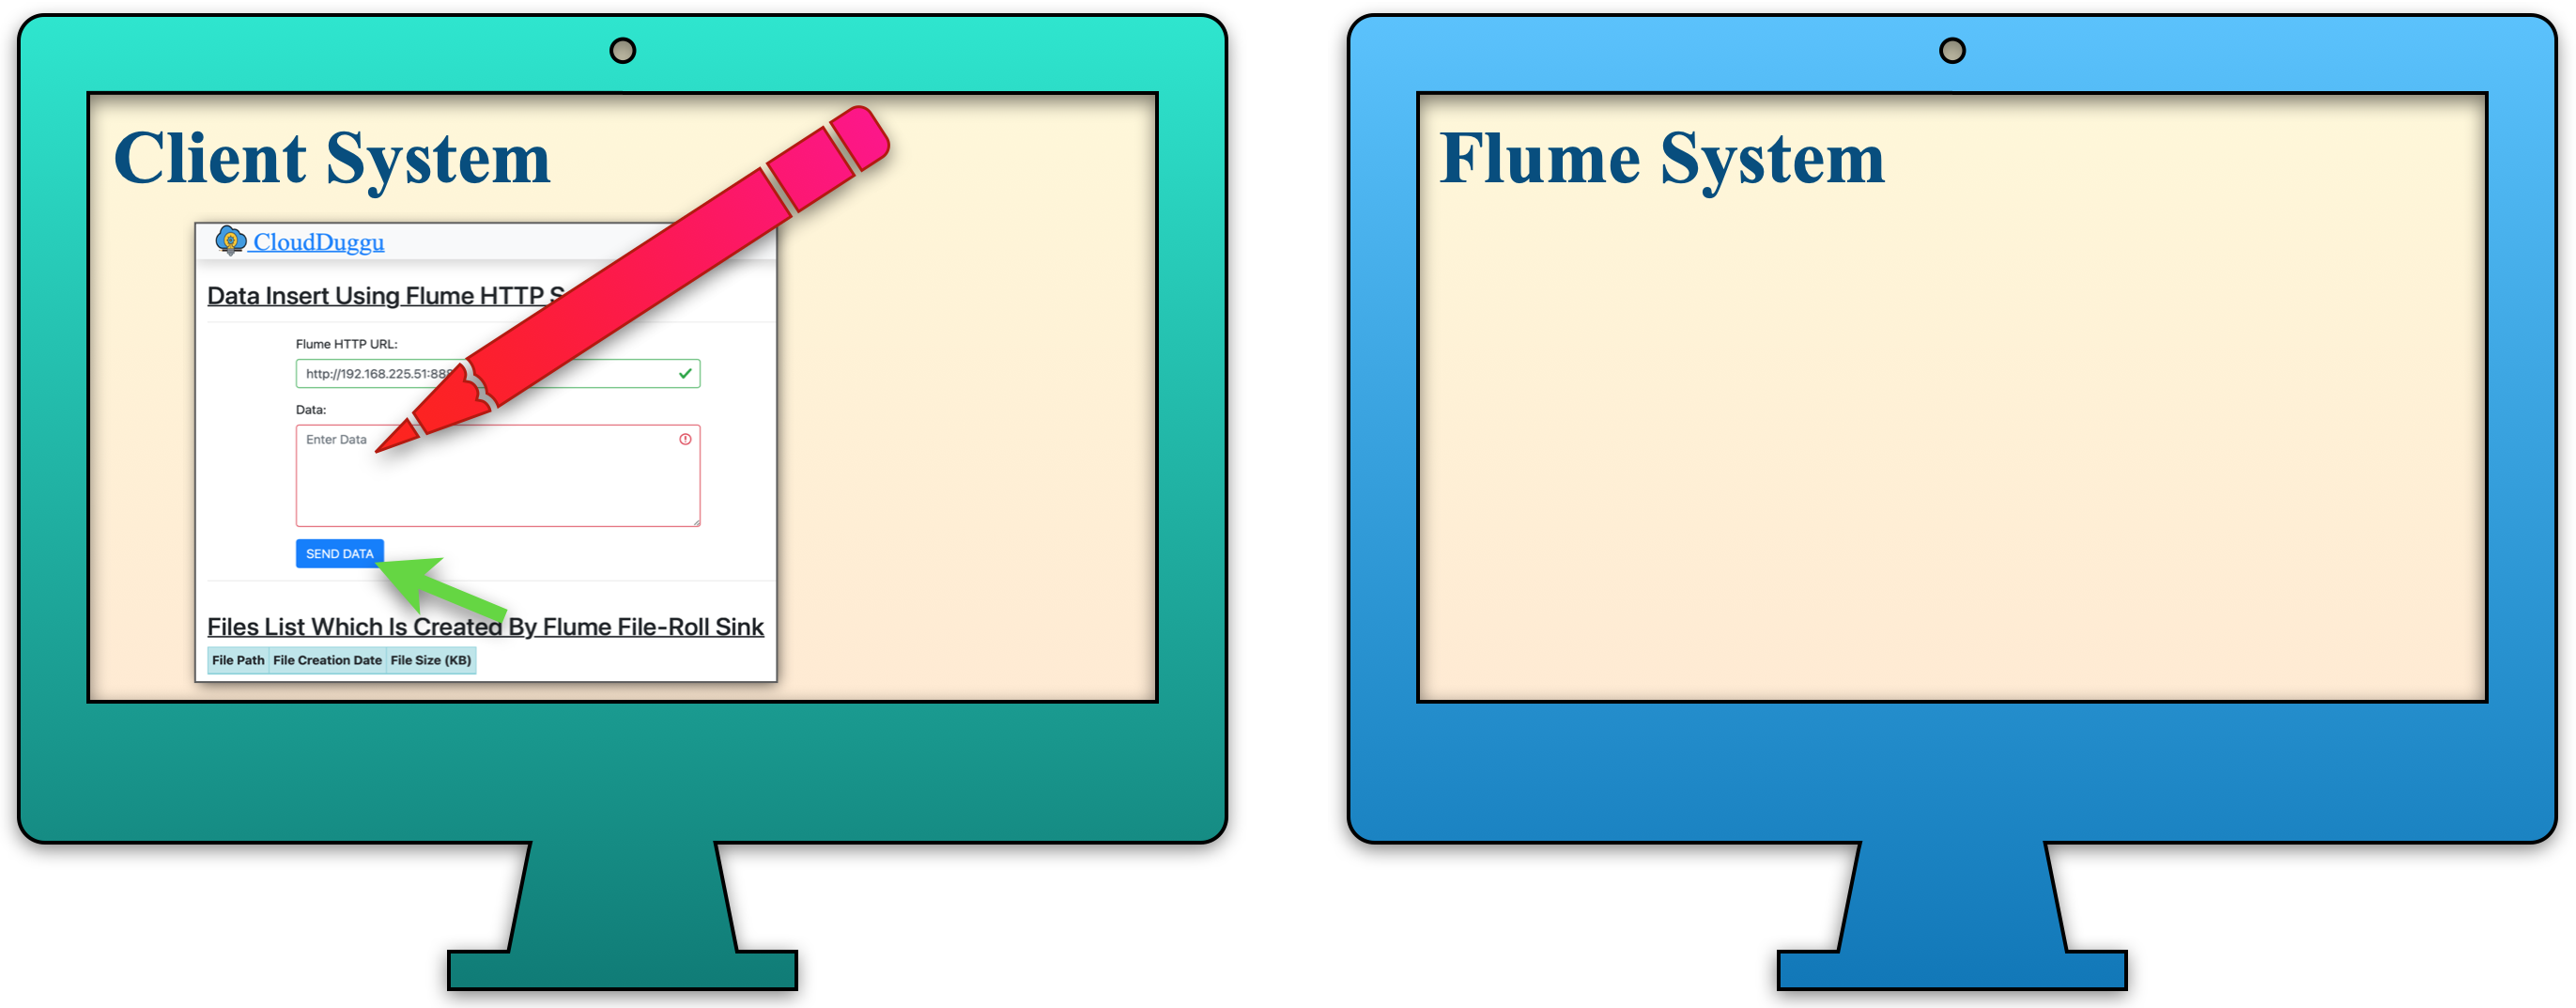 |
| b. Receive the entered data from the Client System using flume HTTP source, and the flume HTTP source is executed in the flume system. |  |
| c. After receiving data, create the text files using the flume file-roll sink. Now Text data passes from flume HTTP source to flume file-roll sink through memory channel in the Flume System. |  |
| d. Receive the entered data from the Client System using flume HTTP source, and the flume HTTP source is executed in the flume system. | 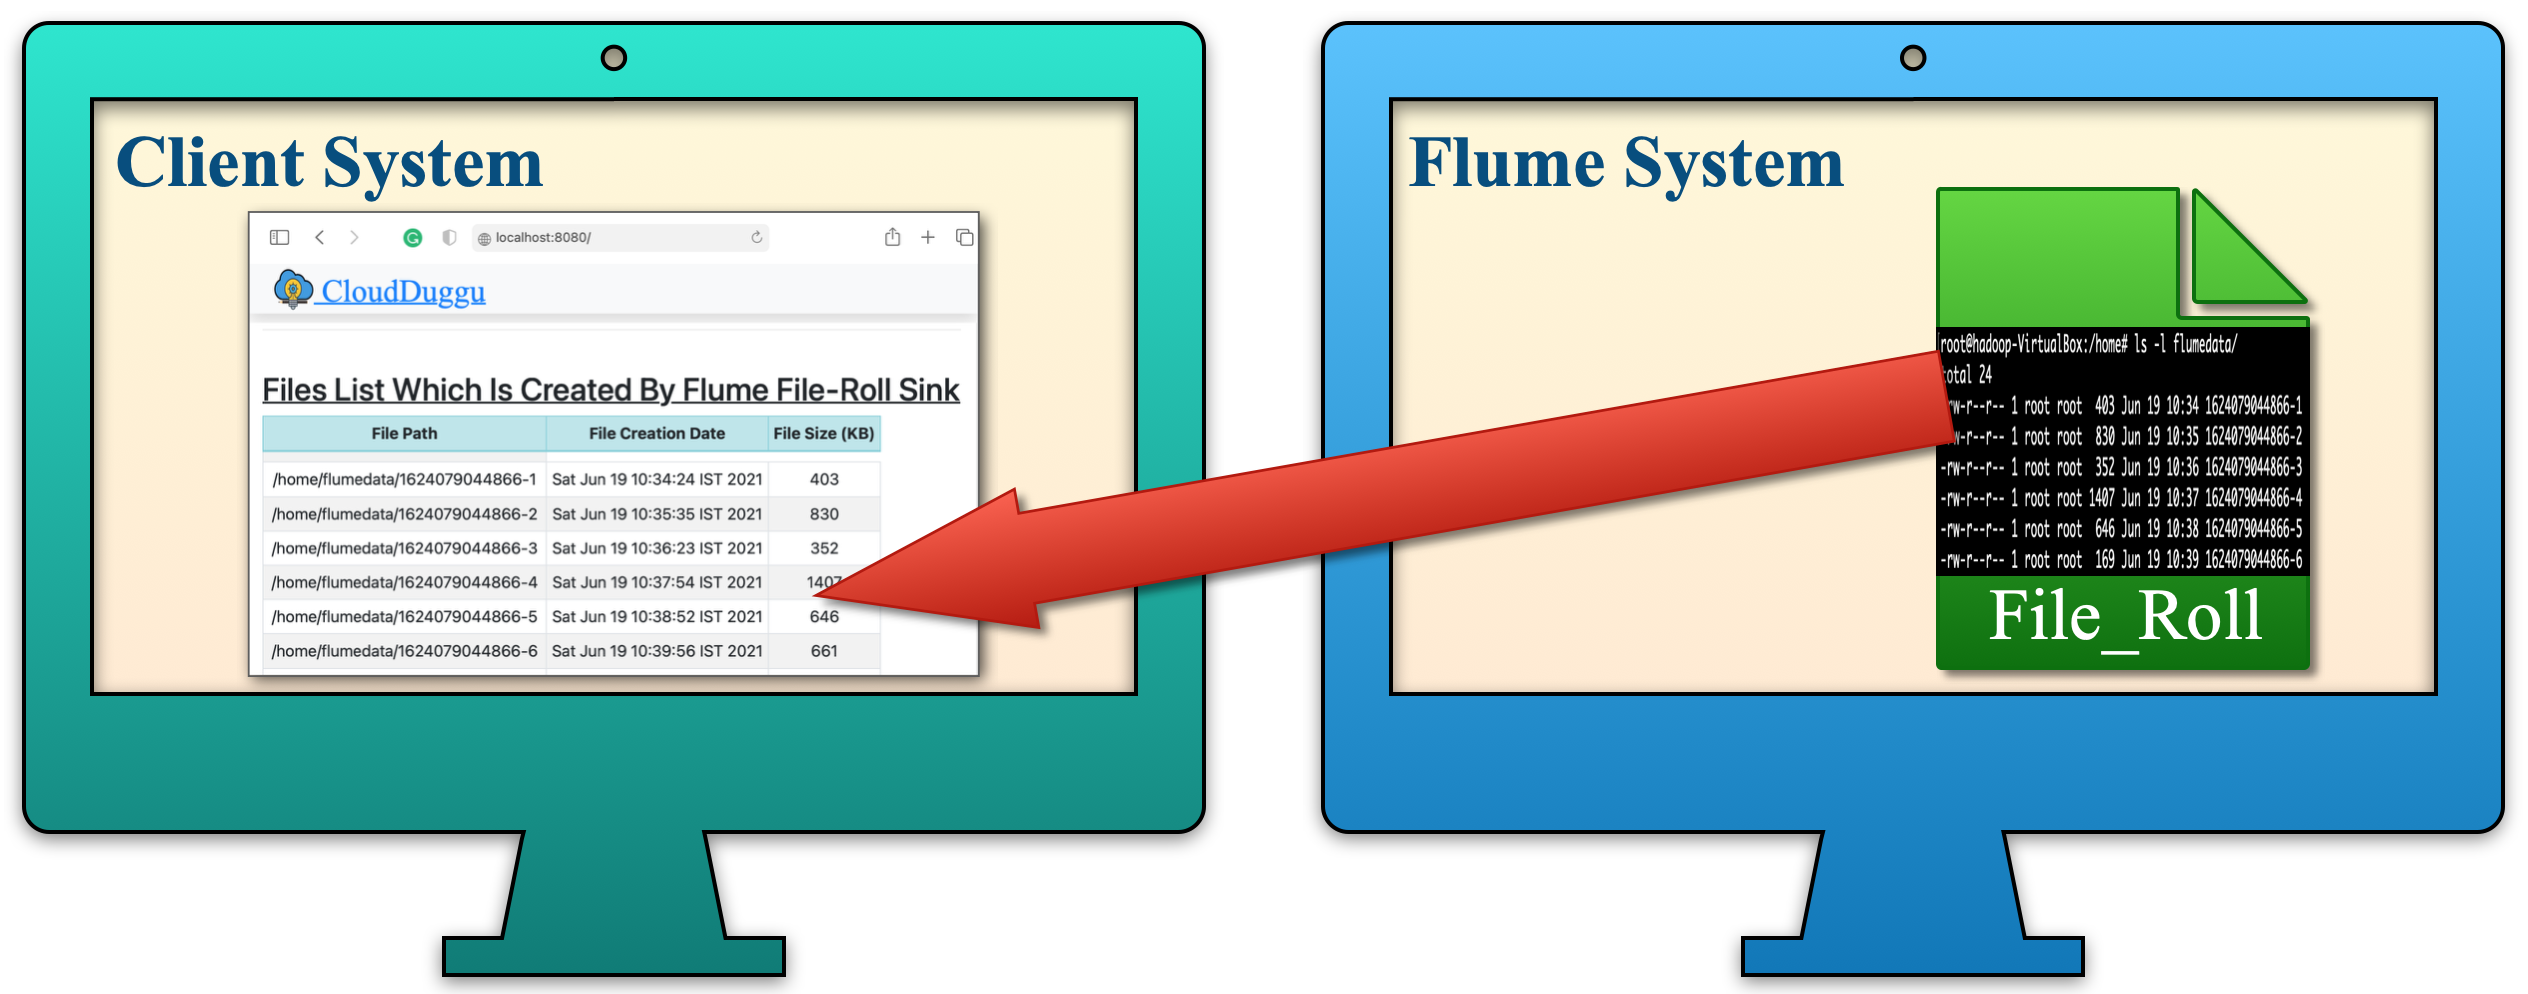 |
2. Building Of Project
To run this project you can install VM (Virtual Machine) on your local system and configured Flume on that. After this configuration, your local system will work as a Client System and Flume VM will work as a Flume System. Alternative you can take two systems which are communicating with each other and on one of the system Flume is configured.
Let us see this project in detail and run it using the below steps.
| a. The Client System | ||
|---|---|---|
| It is an example of the Spring Boot JAVA Framework. When we will build this project then it will create a "client.jar" executable file. | 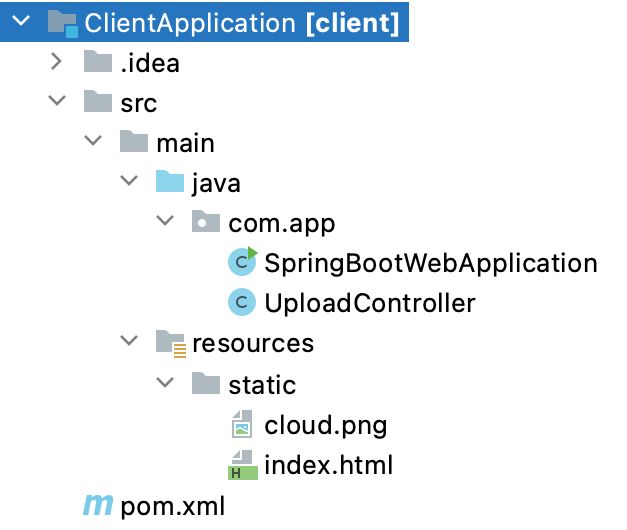 |
|
| It has java code and static HTML pages. | ||
| Java code has 2 files, SpringBootWebApplication.java and UploadController.java | ||
| SpringBootWebApplication.java is the main project file, which is responsible for building code and running it on an embedded server. | ||
| UploadController.java is used to provide upload URL HTTP services for uploading result files. | ||
| The Static folder has HTML page code (index.html). This is the main client view page which shows the Flume process result data. | ||
| pom.xml is a project build tool file. This file has java dependencies and builds configuration details. | ||
| For creating the “client.jar” file we use the command "mvn clean package". | ||
| Click Here To Download the "ClientApplication" project zip file. | ||
| b. Apache Flume System | ||
|---|---|---|
| The Flume system has the Flume setup installed and ready to use. To easily execute the project we will run Flume services on one machine and we will use another machine to run the client application. | ||
| Download the http_source.conf flume configuration file that we will use to run the flume service. | ||
| Download the flumerun.sh shell script file that is used to run the flume System. This Script file automatically executes the flume service and sends the result data to the Client system. | ||
3. Run The Project
| a. Client System | b. Flume System | |
|---|---|---|
| 1. | Download the client.jar in the Client System. Click Here To Download the "client.jar" executable jar file. |
Download the http_source.conf flume configuration file and the flumerun.sh script file in the Flume System. |

|

|
|
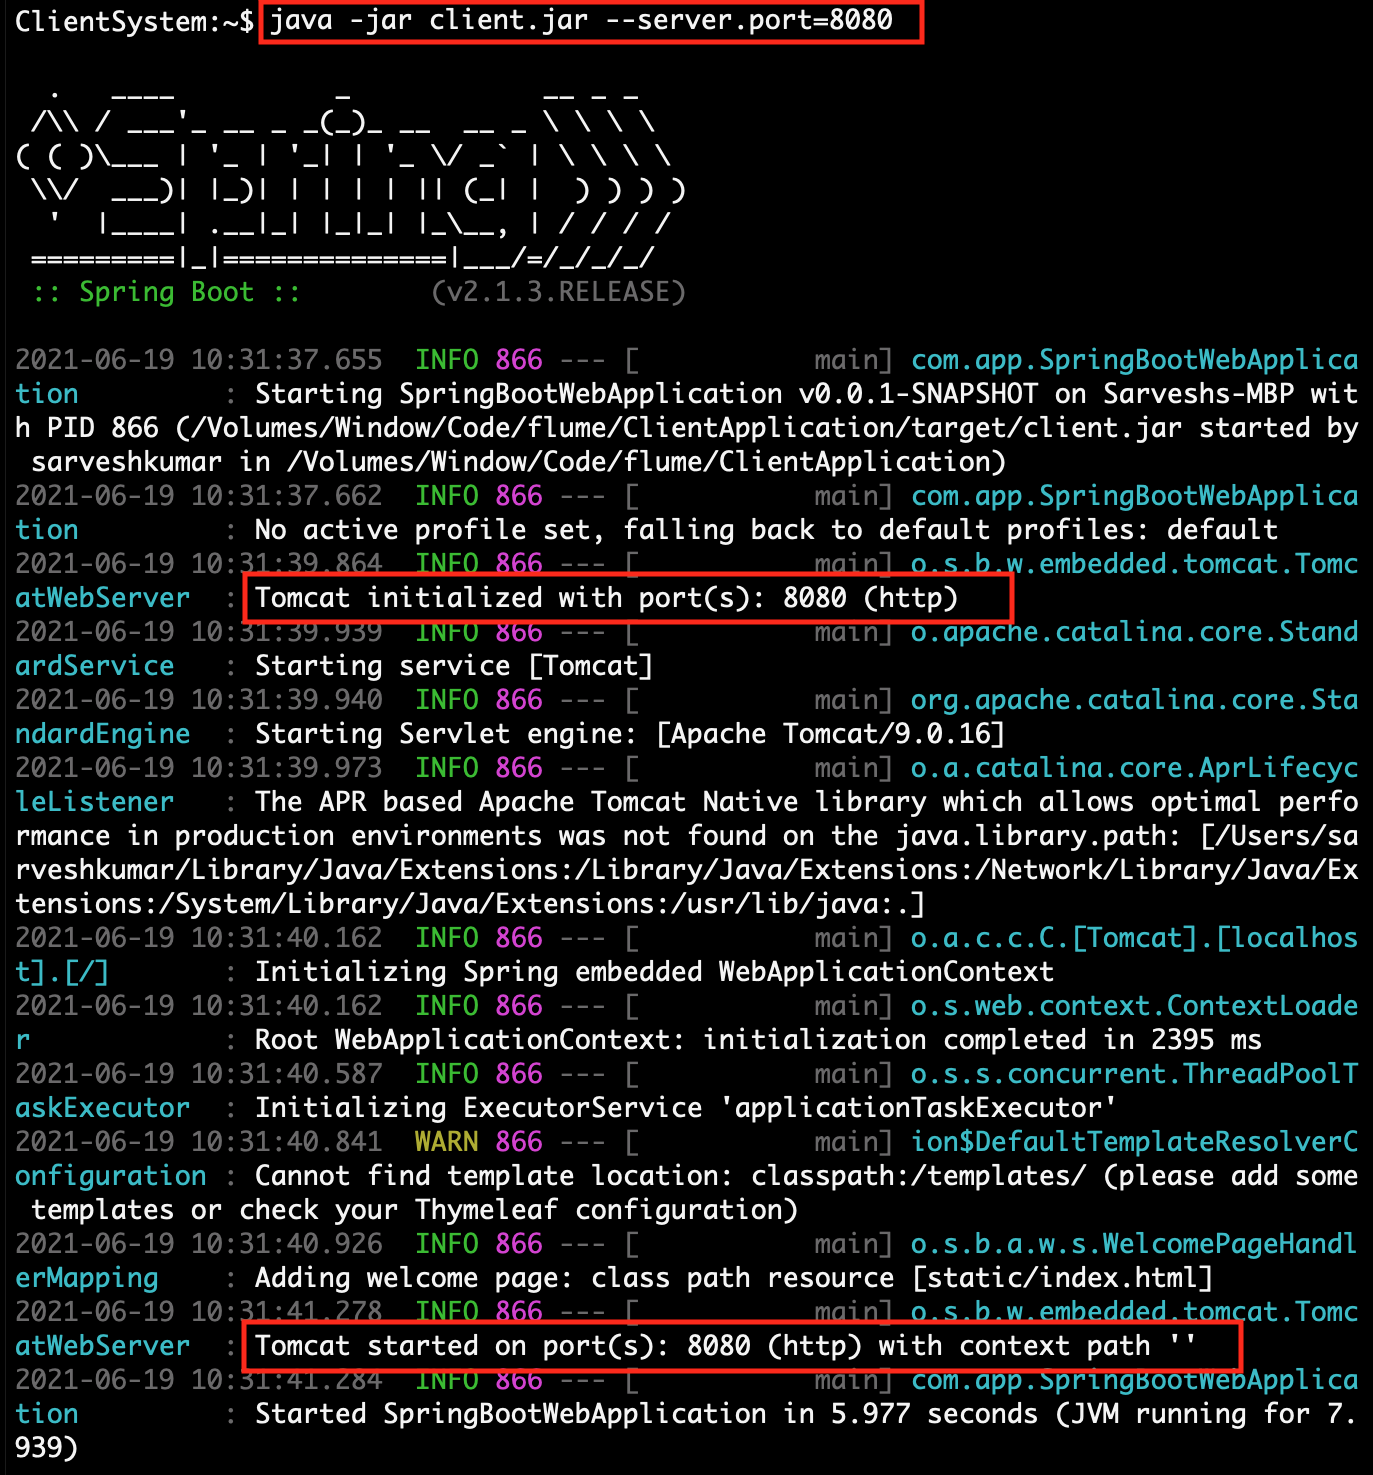
| 2. | Run client.jar in the client system. At execution time pass server port 8080.
Here we can use a different port if the port already uses in the client system.java -jar client.jar --server.port=8080
|
|
 |
||
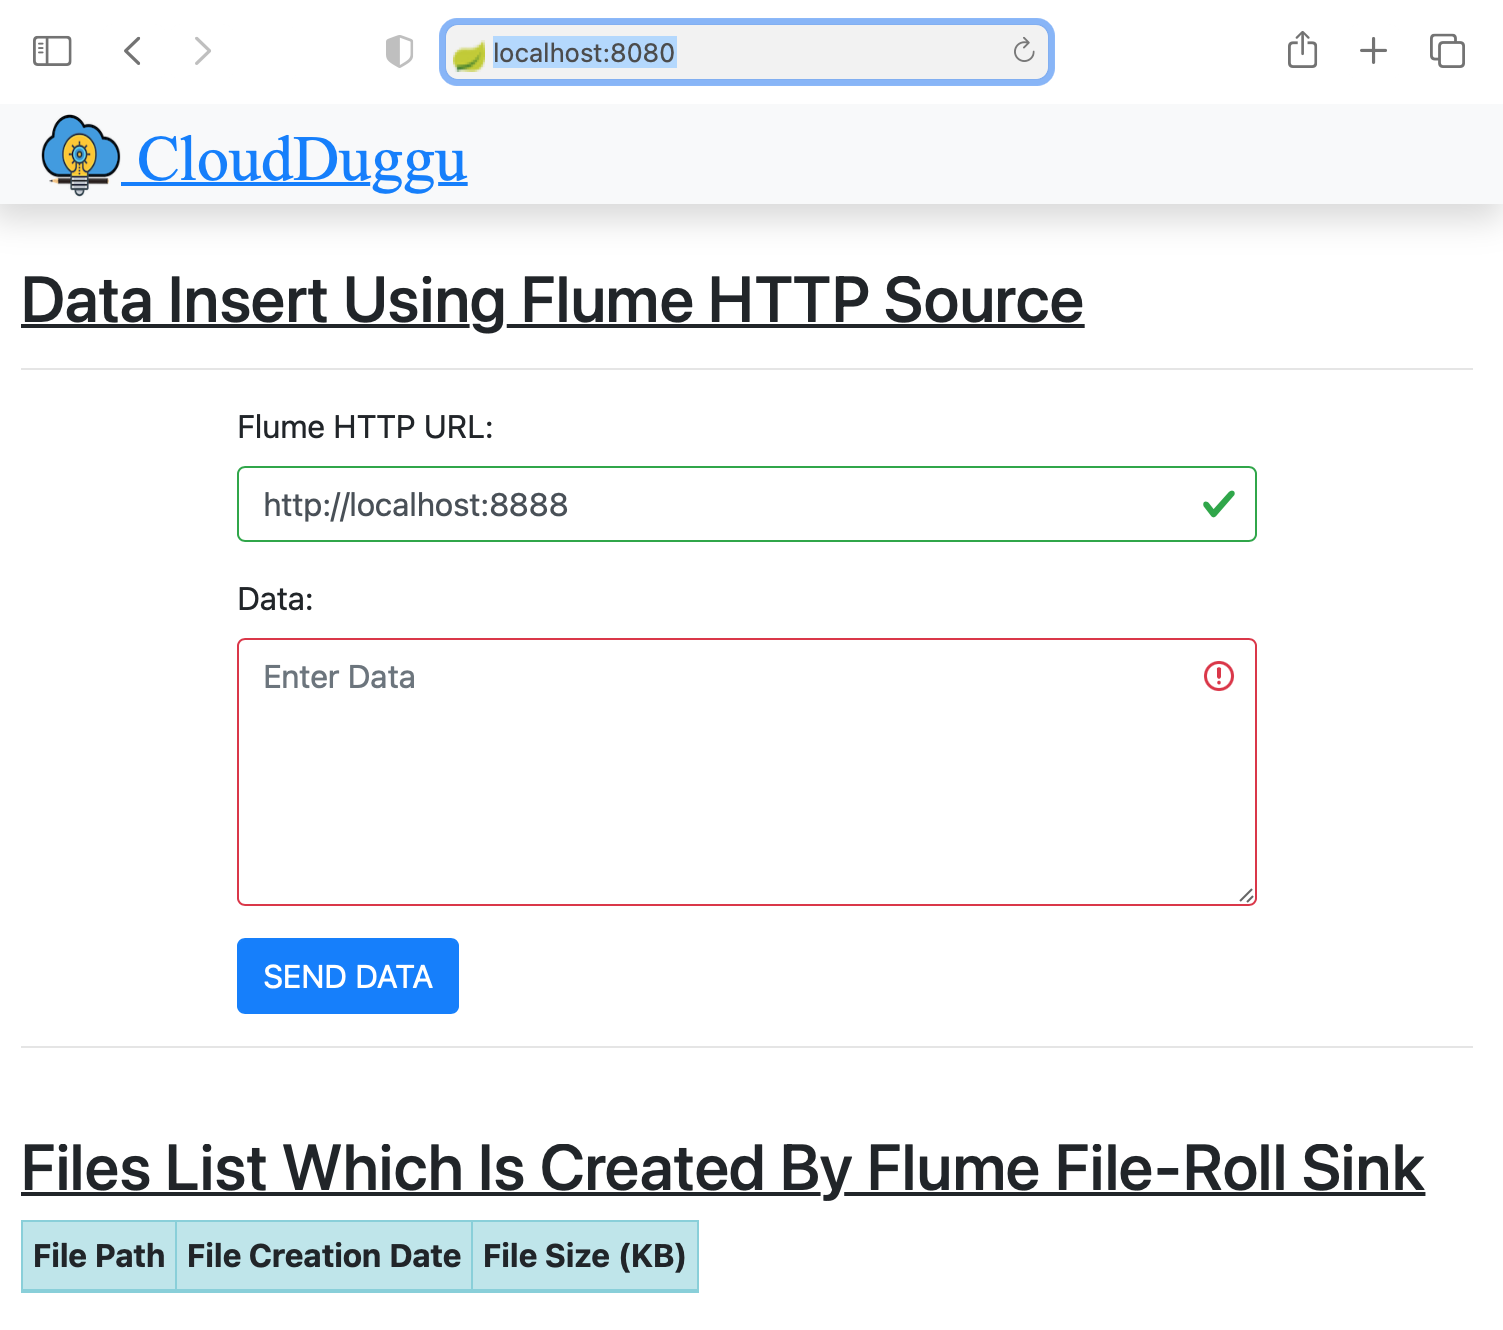
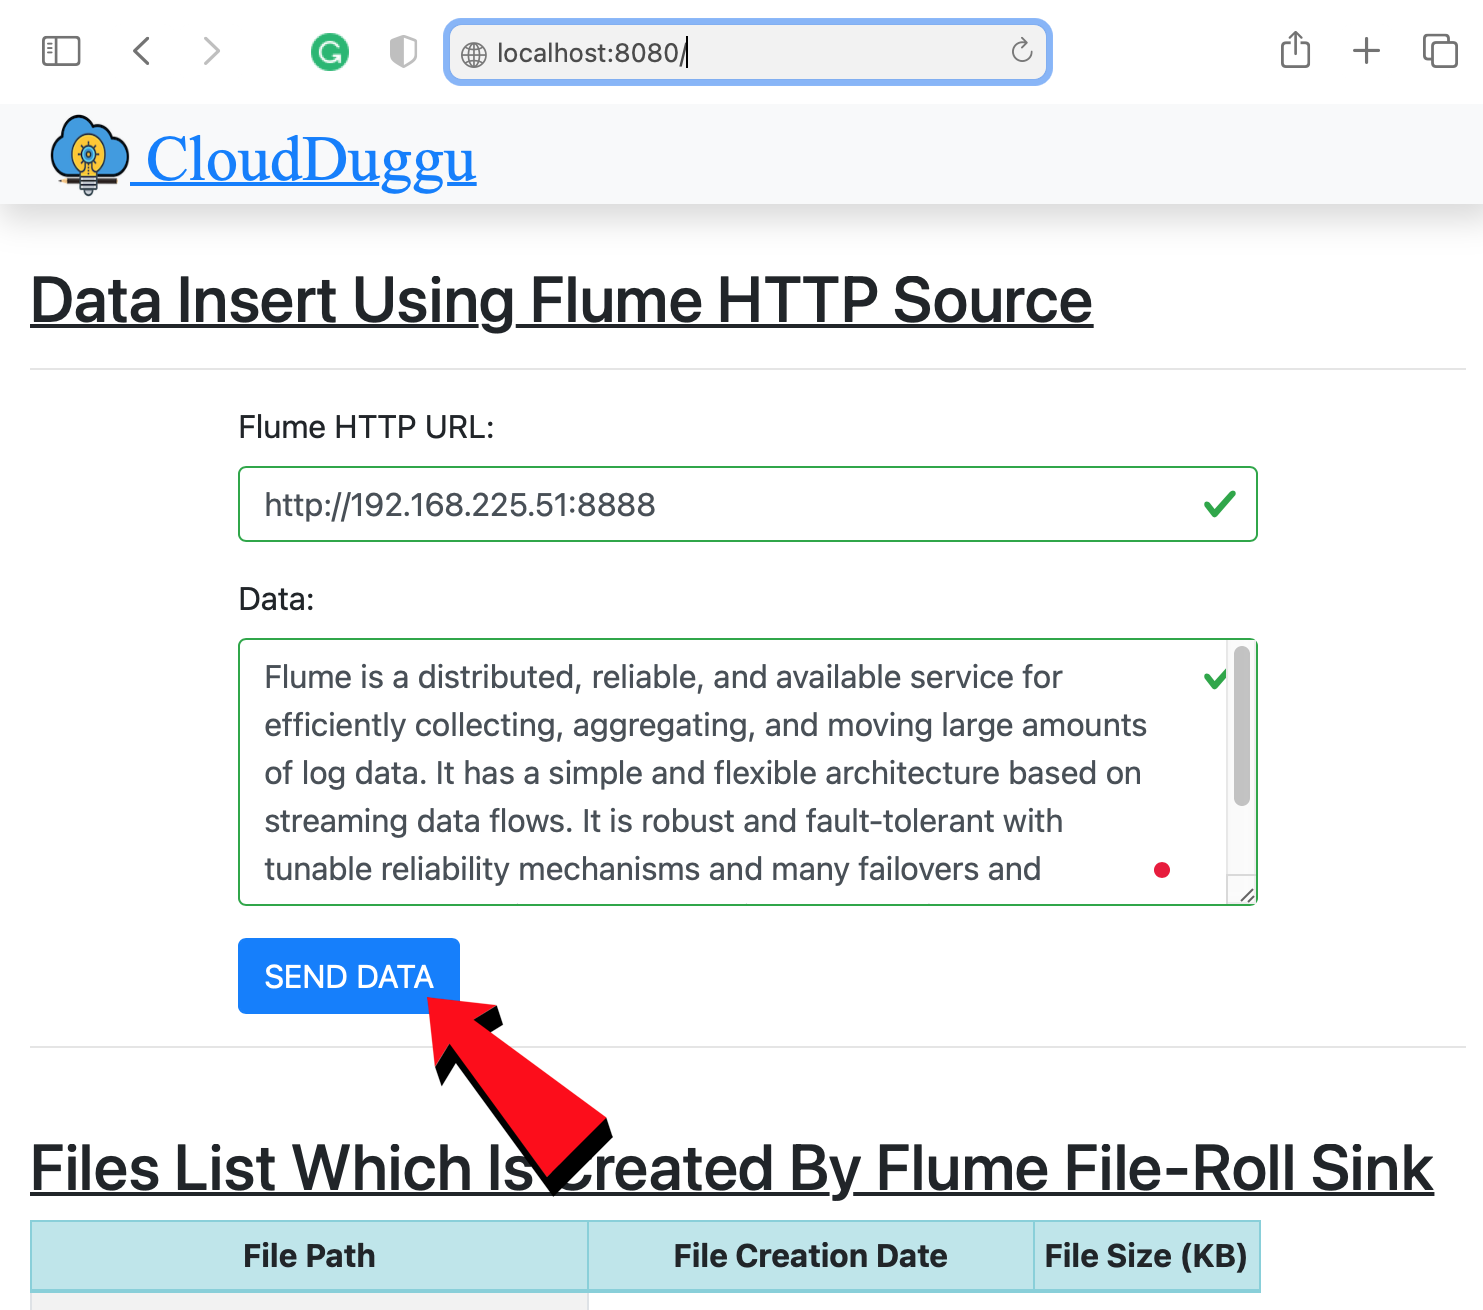
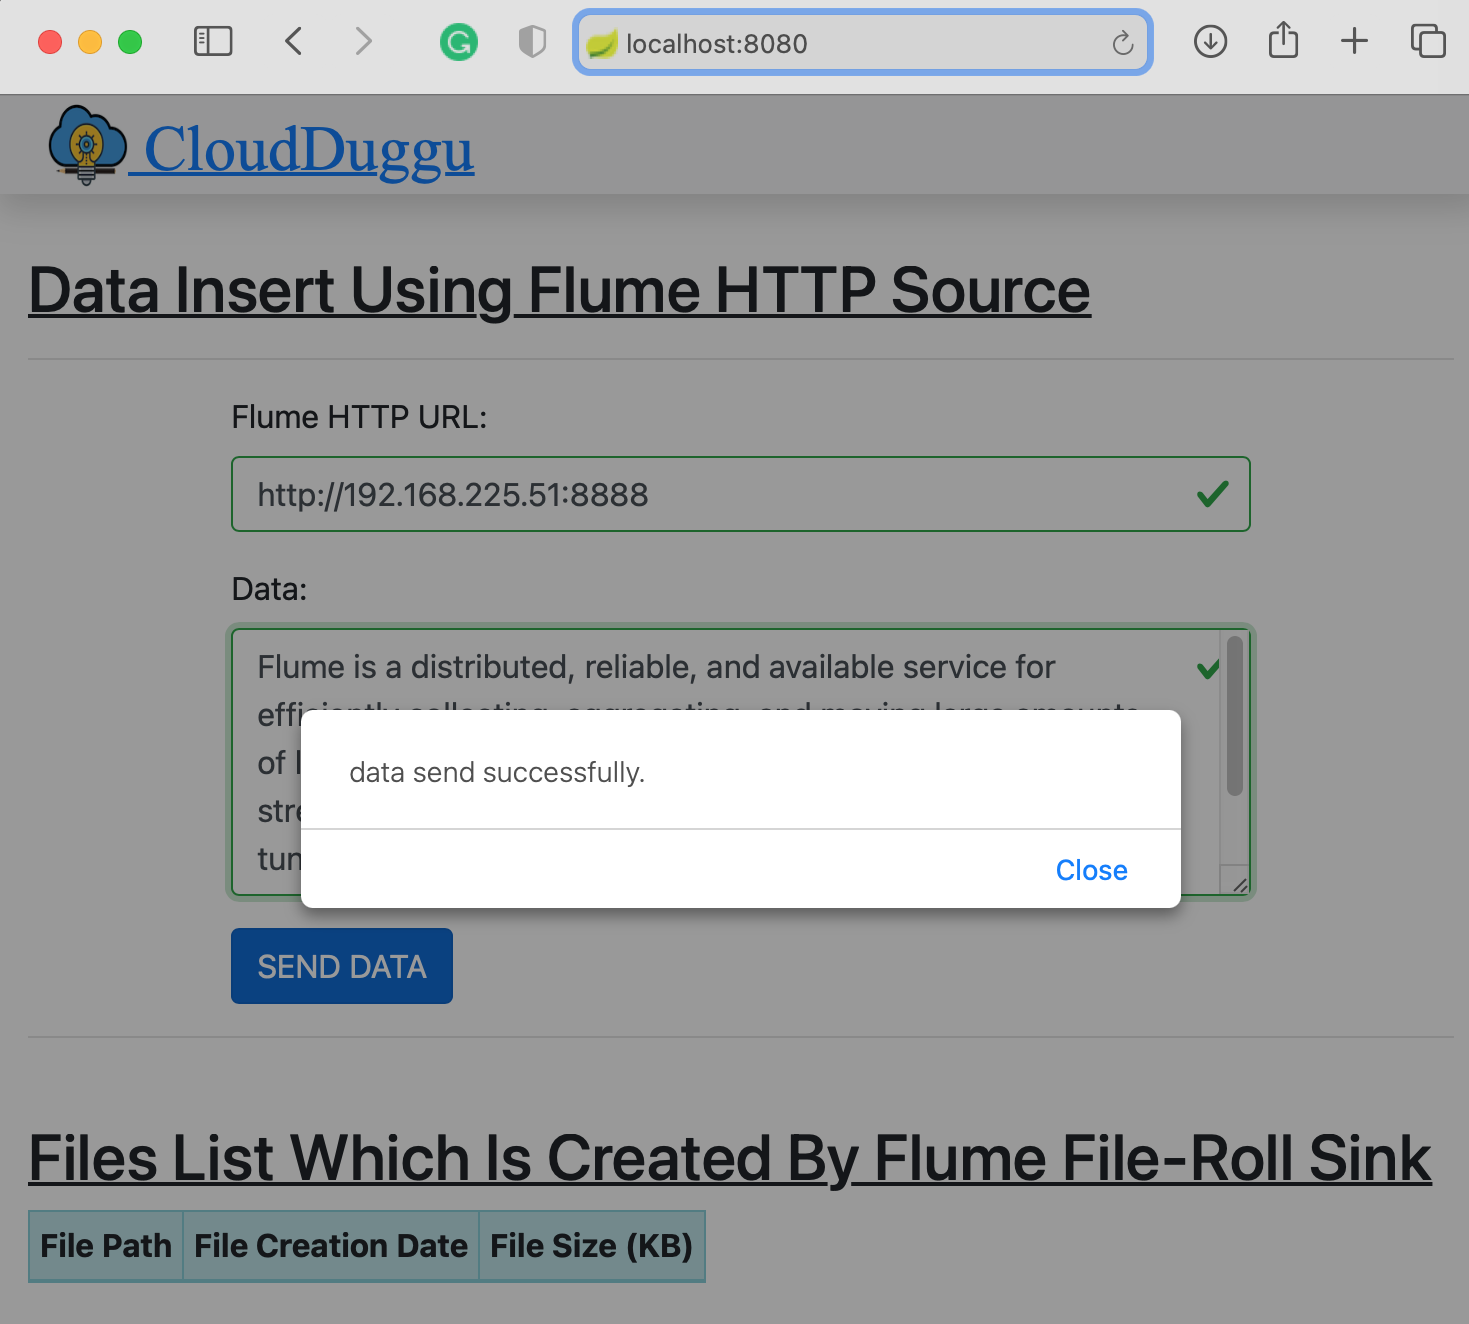
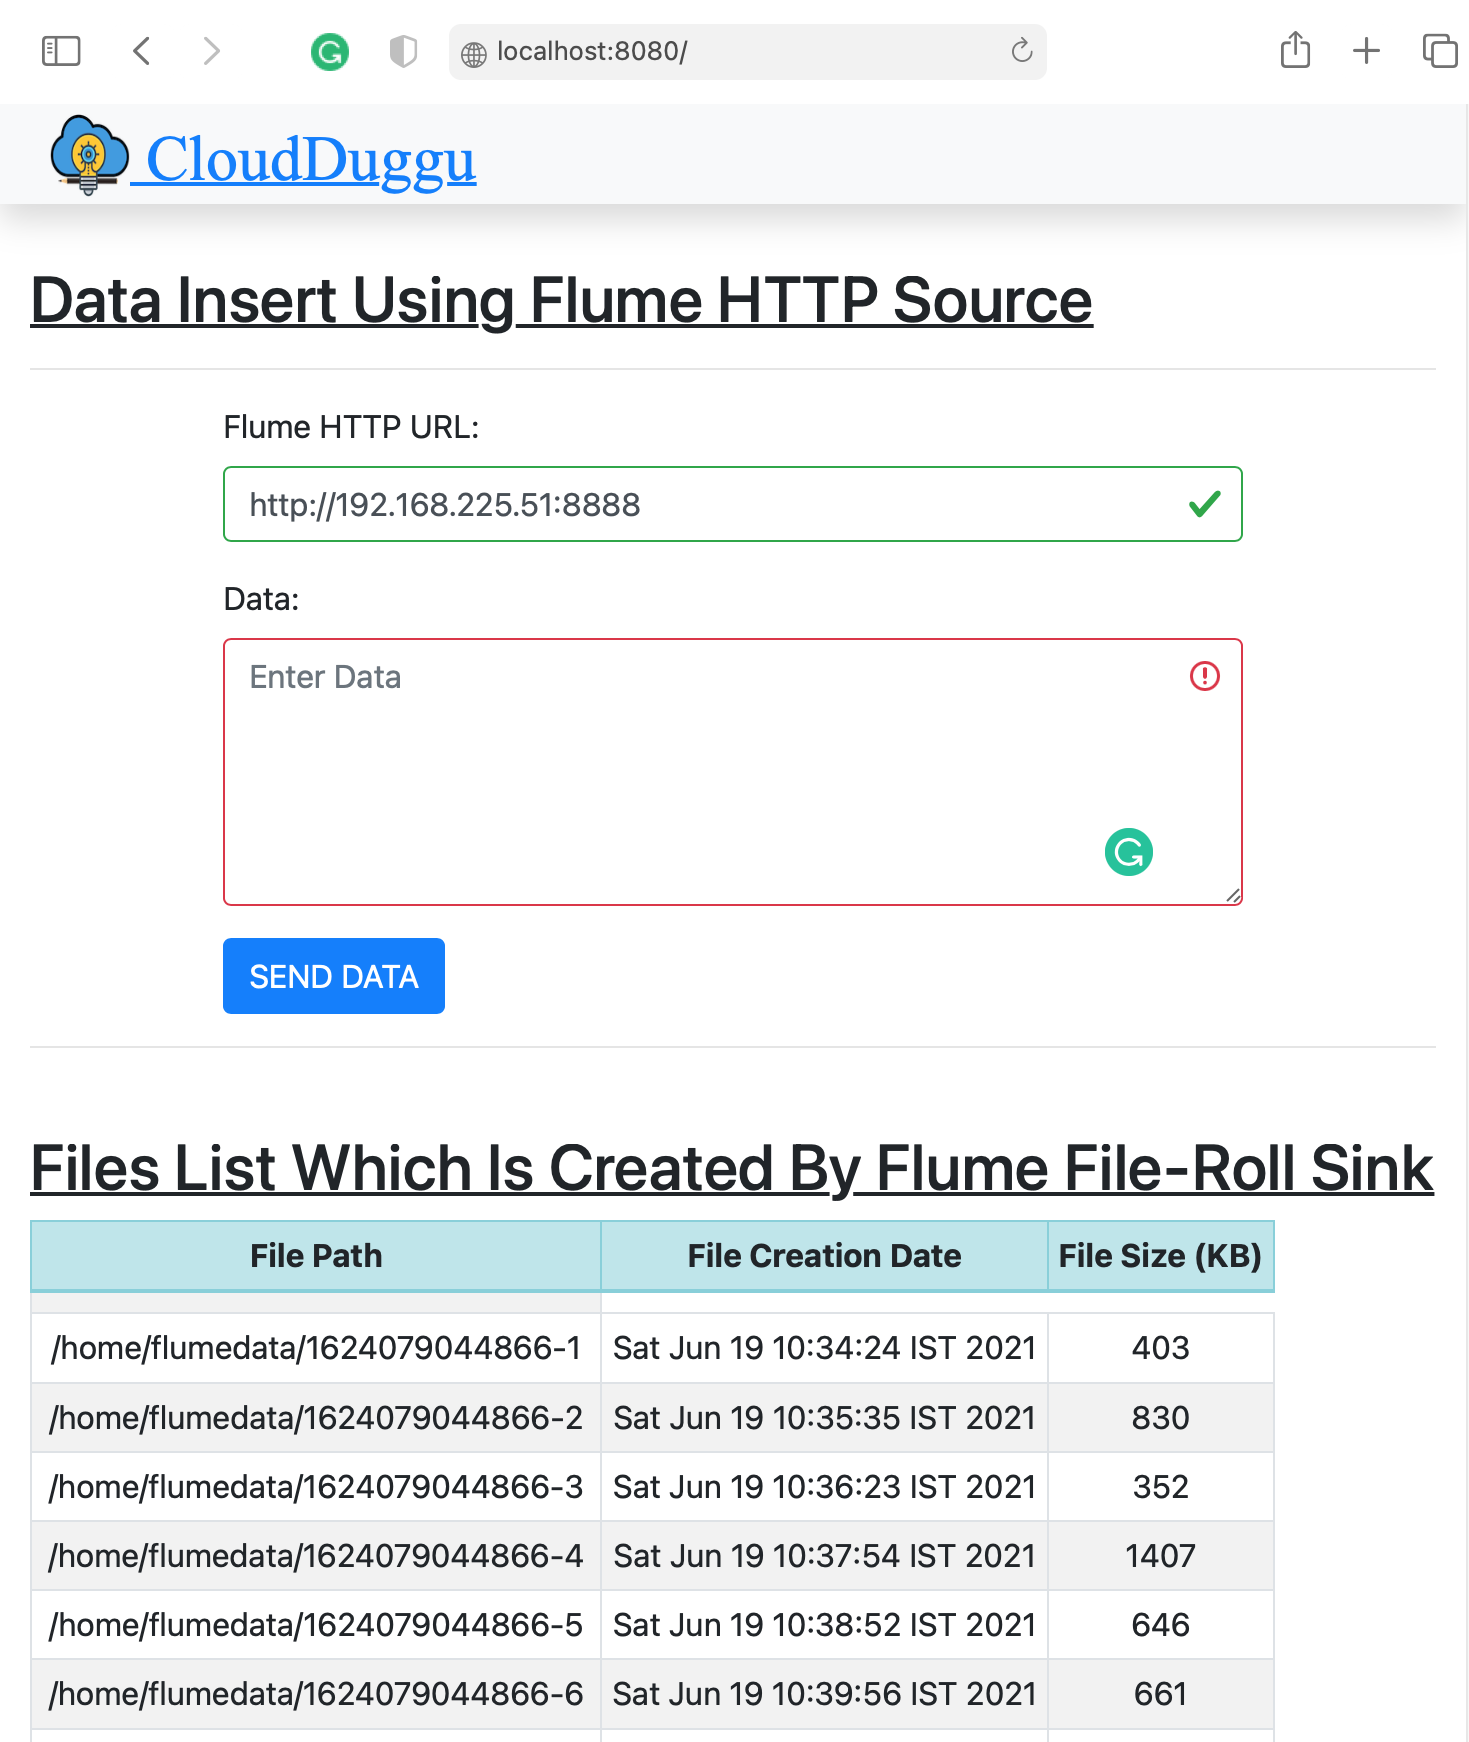
| 3. | Open the Web browser and check the Client page using URL: http://localhost:8080 | |
 |
||
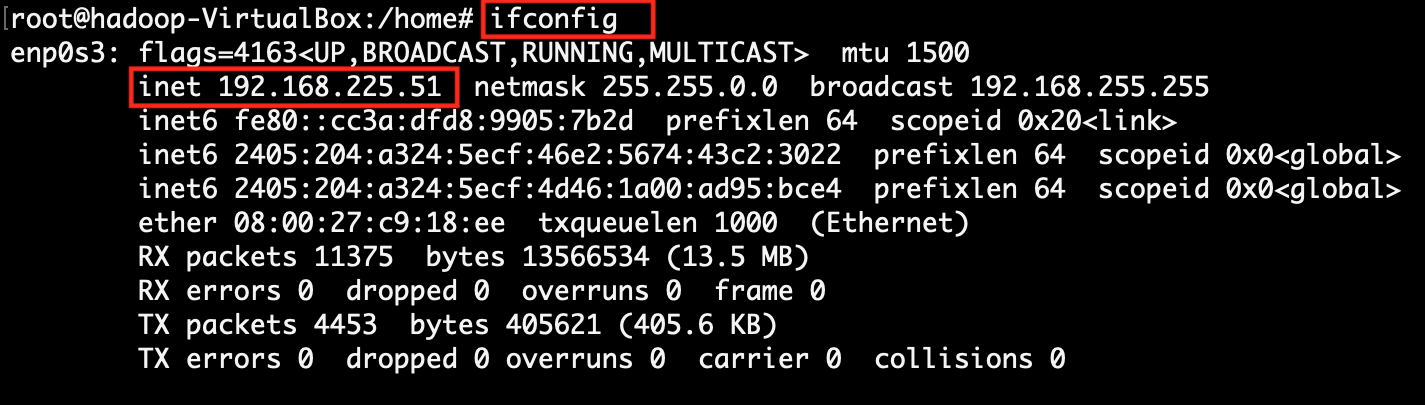
| 4. | Find client system IP, which will be accessible to the Flume system. | Execute the script file flumerun.sh. At the time run, pass the client-ip-address, client-port-number and result folder (/home/flumedata).
sh flumerun.sh <client-ip> <client-port> <result-folder> sh flumerun.sh 192.168.225.48 8080 /home/flumedata
|
 |

|
|
| 5. | The Client enters data from the client page and submits it to Flume System with Flume System IP address and Flume HTTP service port. | Flume System finds the IP and Port in the flume configuration file (http_source.conf) with property name "a1.sources.r1.port". |
 |
|
|
| 6. | The Client System continuously sends data and simultaneously receives stored file information from Flume System and showing this information on the same page in a tabular format. | Flume System continuously receives data from Client System and continuously store data in the files and periodically send storage file information to the client. |
 |
 |
|
| 7. | The client system shows all information shared by the Flume system. | Files' detail is stored in Flume System. The same information is shared with the Client System. |
 |
 |
4. Project Files Description In Detail
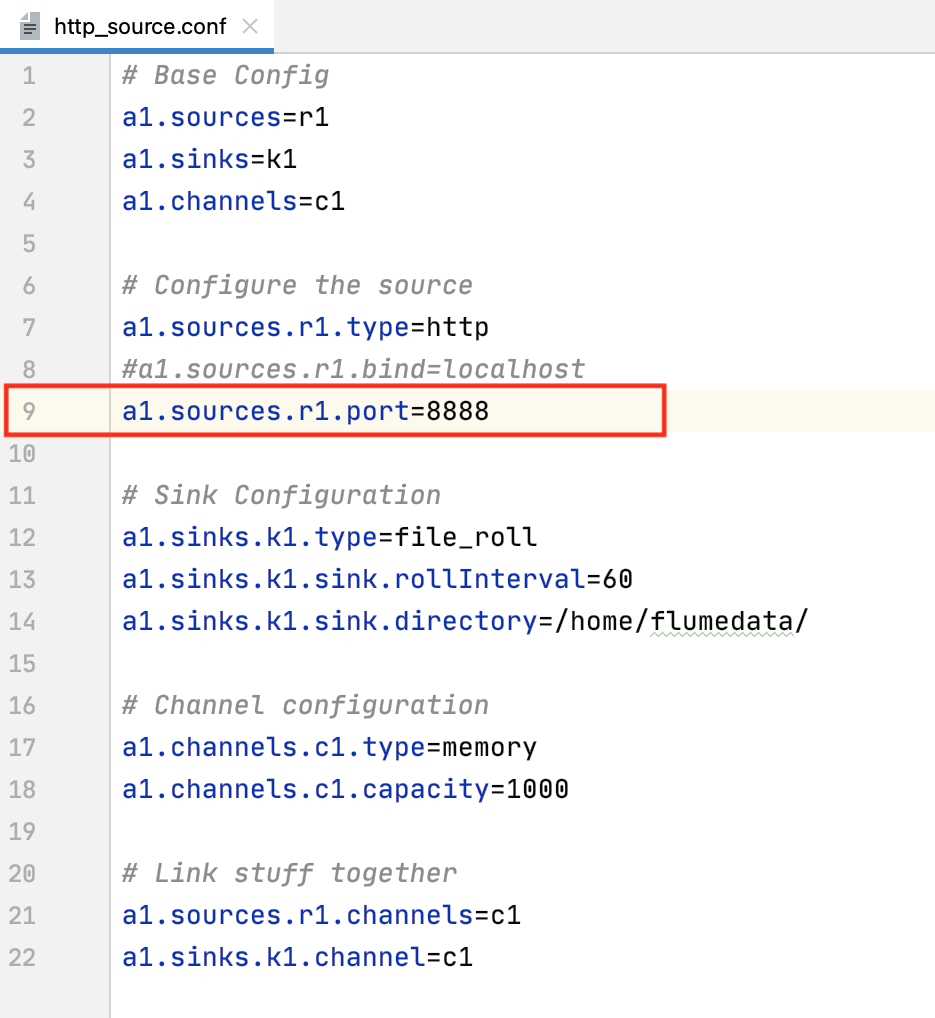
(i). http_source.conf
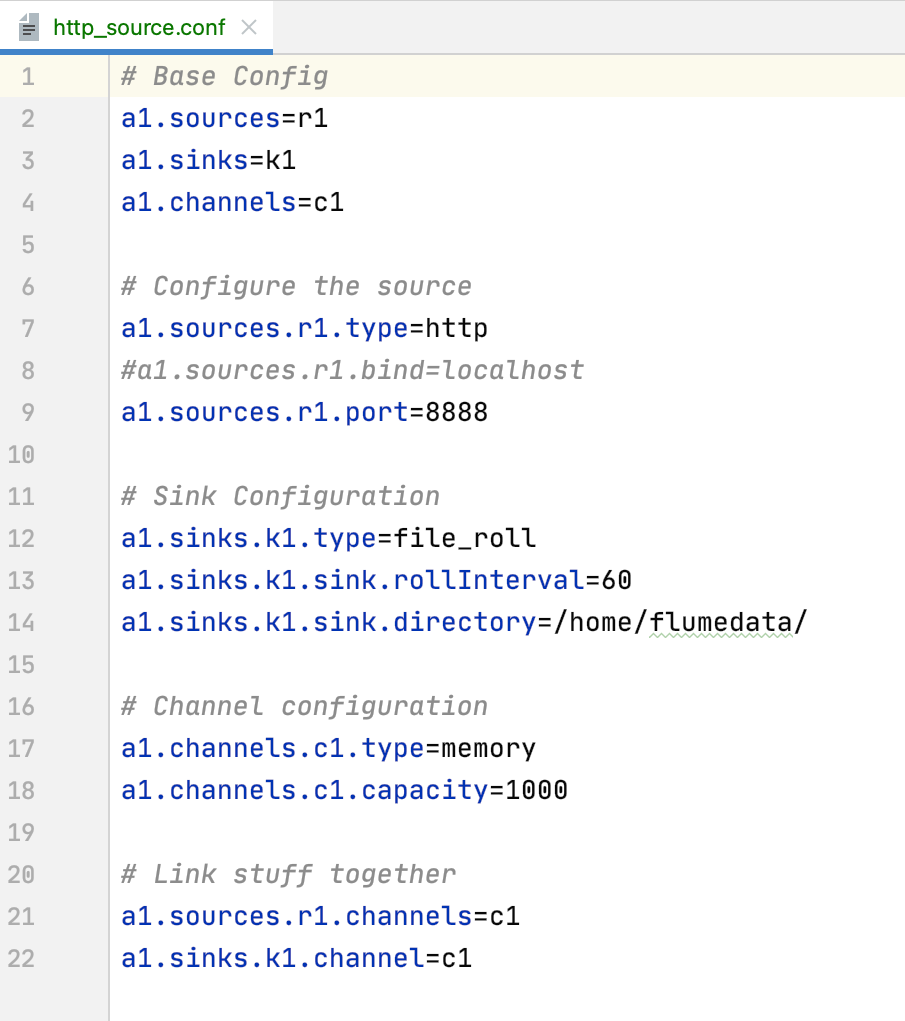
This configuration file is used to configure the Flume service. Using this file the Flume service runs with HTTP and saves the information in the files.
The explanation of each line of configuration (http_source.sh) properties is mention below.
http_source.sh file has Flume properties detail.
(line 2,3,4) Here the Flume sources, sinks, and channels variable name is declared.
(line 7) Here the Flume sources type (HTTP) is set and the client connects to the Flume service on this sources type.
(line 9) Here the Flume sources type port is set. The Flume Sources service runs on this port which is accessed by the client.
(line 12) Here the Flume sinks types are set (file_roll). Through this sinks type, Flume stores the data sent from clients in the files.
(line 13) This property is used to configure sinks to create new files at a specified interval.
(line 14) This property is used to configure the result file location. The same file location value is passed in "flumerun.sh" for easier execution of the project.
(line 17,18) Here the Flume channel properties are set, which buffers events in memory.
(line 21,22) This line binds the source and sinks to the channel.
(ii). flumerun.sh
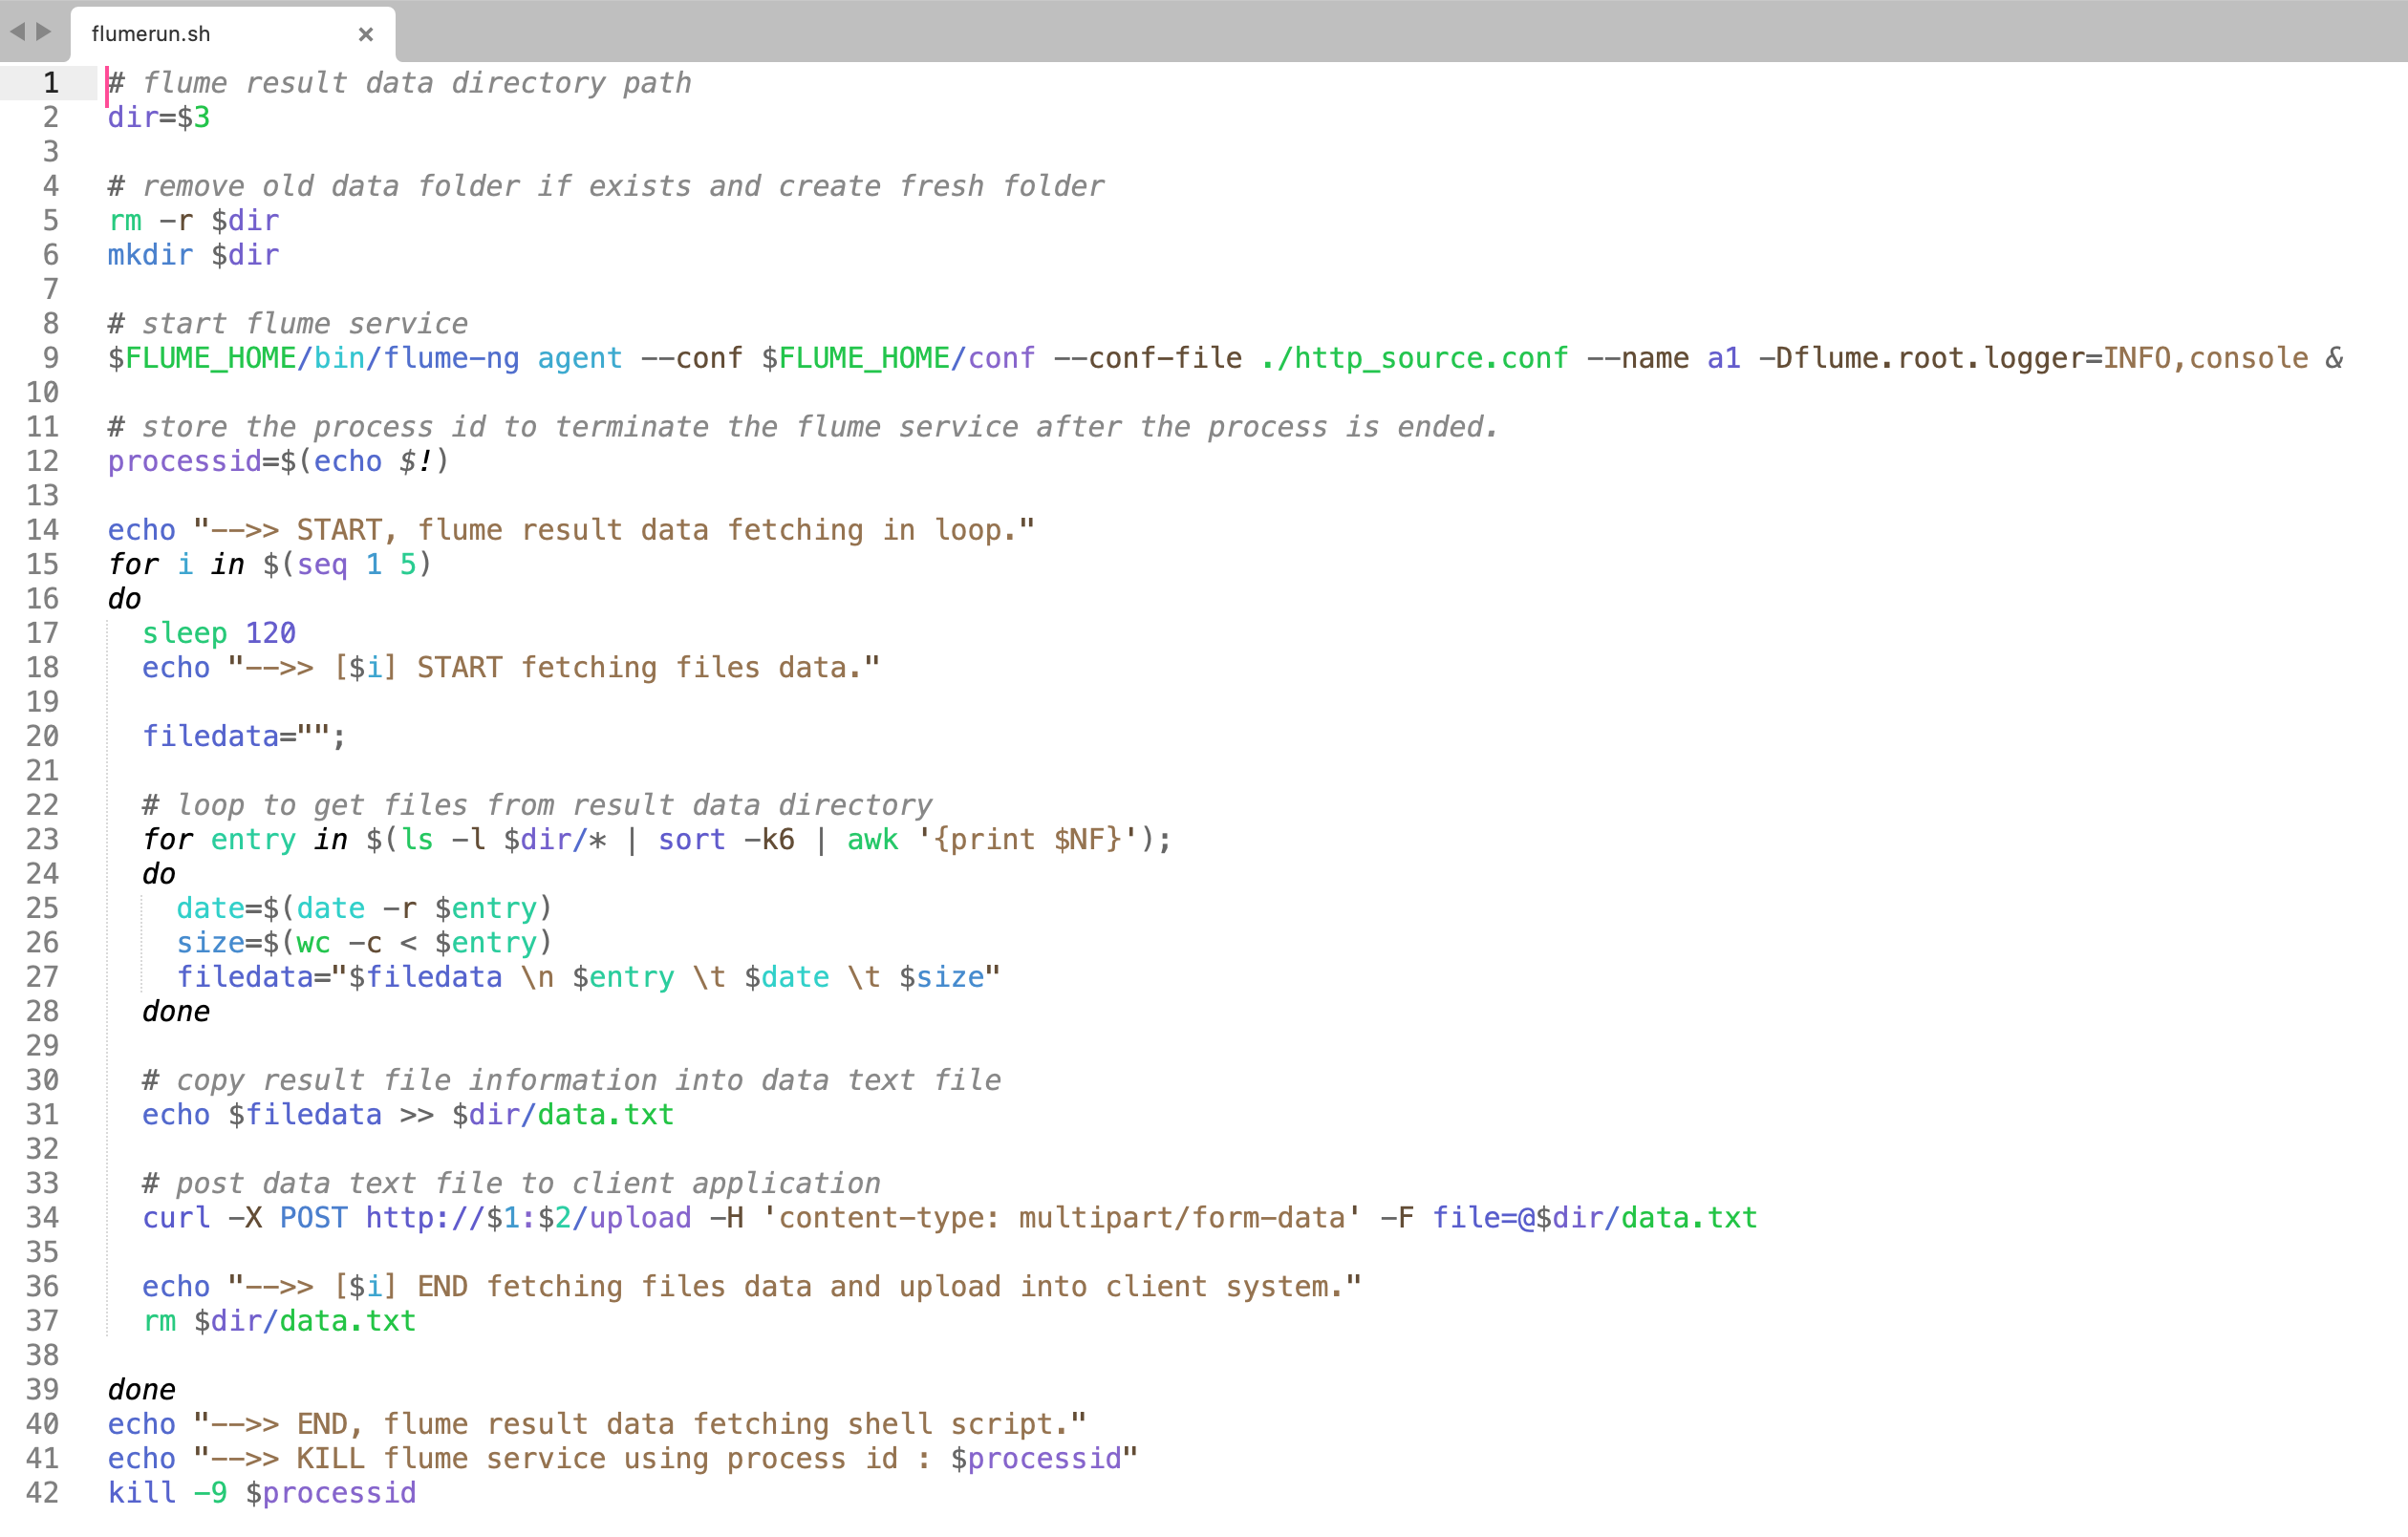
Using this script file (flumerun.sh) we can easily execute project logics in the Flume system.
The following is the line-by-line explanation of the flumerun.sh script file.
The sqooprun.sh file contain the Linux scripts. Command to run this file is (sh flumerun.sh 192.168.225.48 8080 /home/flumedata)
(Line 2) The variable($3) will hold the result folder path. Pass the path description that is mentioned in the Flume config file (http source.conf) in the same variable.
{a1.sinks.k1.sink.directory=/home/flumedata/}
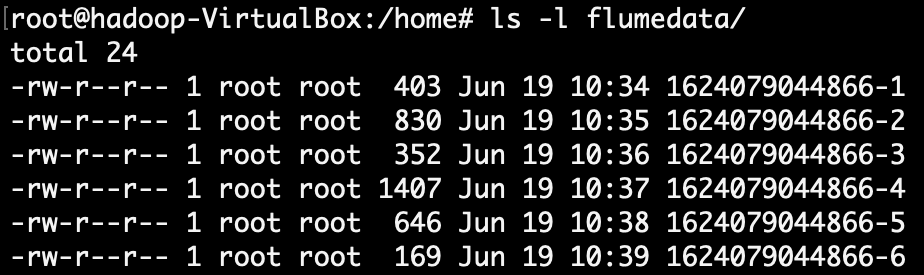
(Line 5 & 6) Delete the result folder if it already exists and create a new result folder (/home/flumedata).
(Line 9) Run the Flume service with the downloaded config file (http_source.conf).
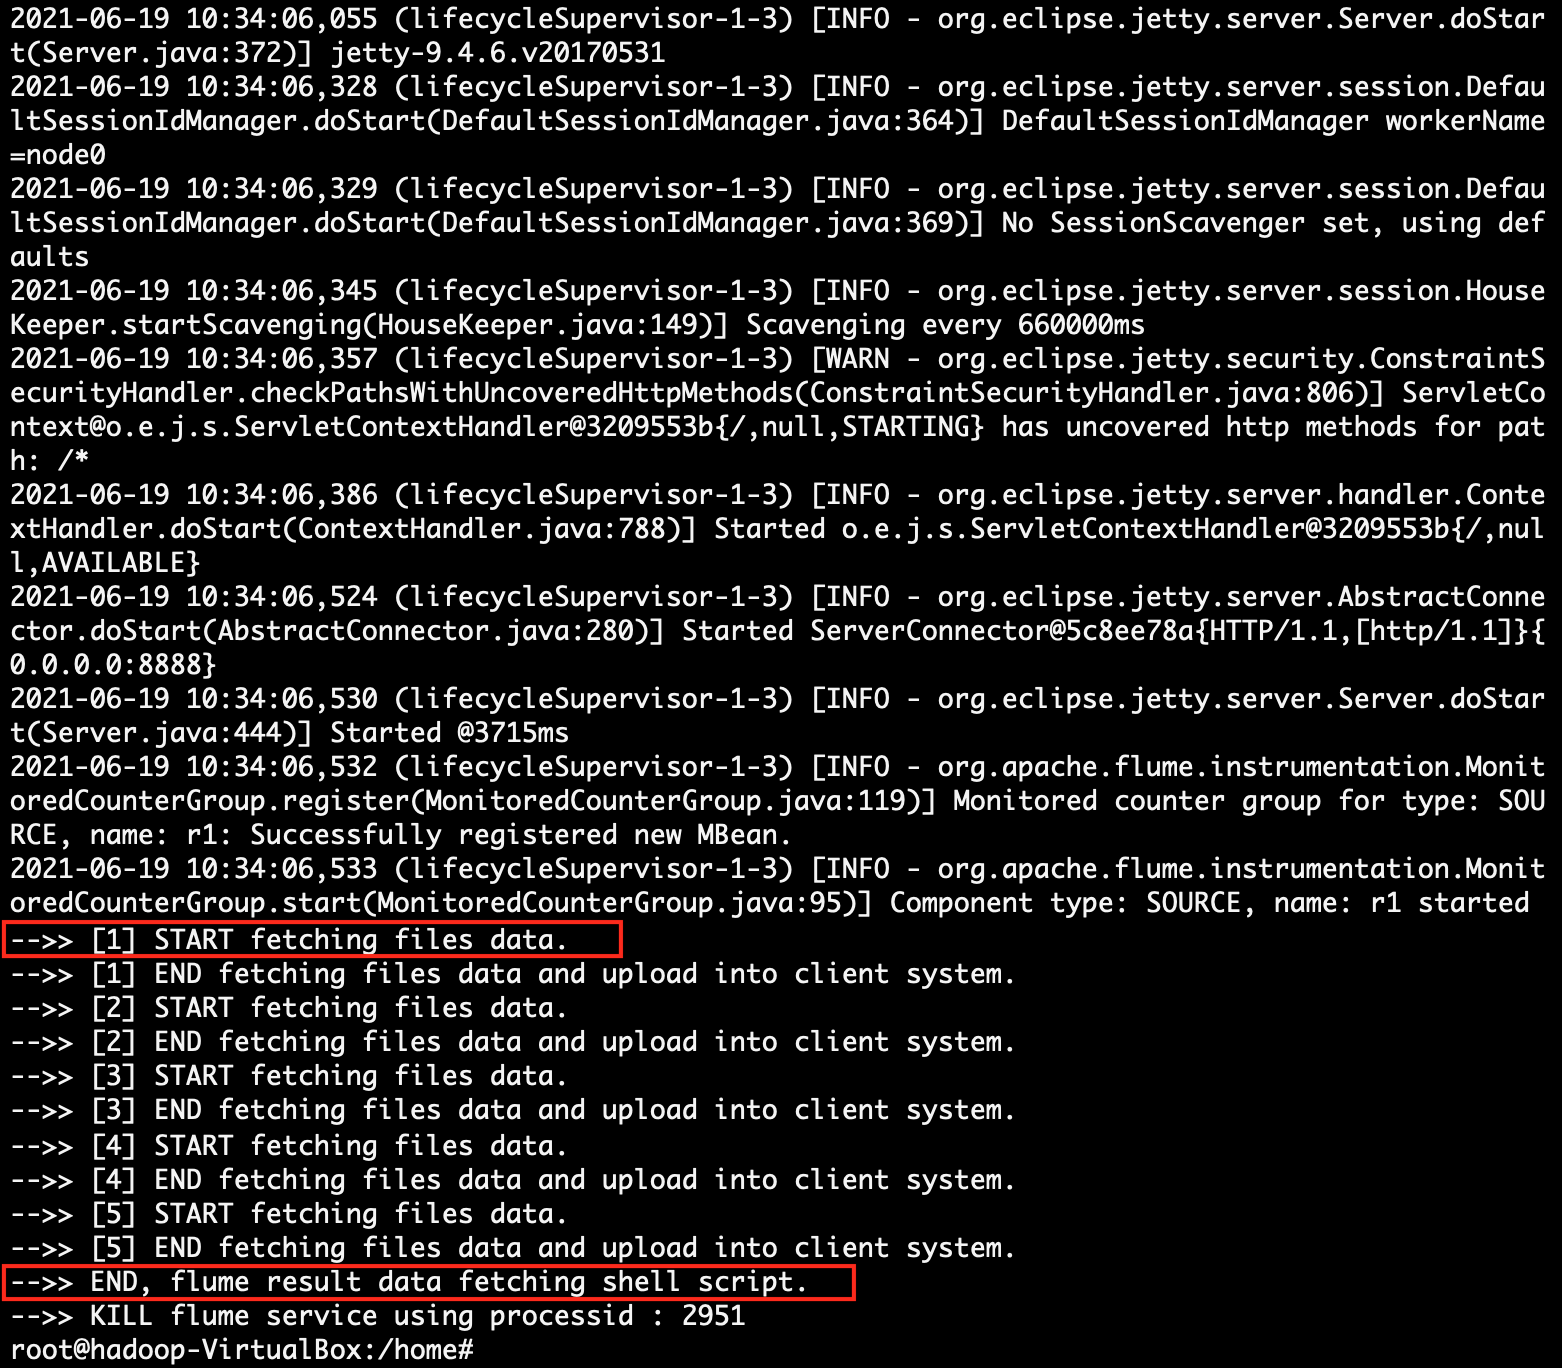
(Line 12) The running Flume service process id is saved in the variable. This variable value will be used to terminate the flume service after all logic is finished.
(Line 15) Start project logics in the loop. The loop will start from line 15 and ends at line 39.
(Line 23) This iterative script will get the detail of all the files from the result folder.
(Line 25 & 26) In this line, the result file creation date and the result file size will be received.
(Line 27) Here the file description is appended to a single string variable.
(Line 31) Here the string value is passed to a temporary text file, which is used to upload the data to the client system.
(Line 34) Upload data to the Client System with the help of valid Client_System_IP($1) & Client_System_Port($2) variable value.
According to this project here, the value is, $1=192.168.225.51 and $2=8080
(Line 37) After updating the data in the Client System successfully, the temporary text data file is deleted.
(Line 42) After successful completion of all project logic, the running flume service is killed with the help of stored flume process id.
[The Flume Project] final page of the success.
| Client System | Flume System |
|---|---|

|

|
:) ...enjoy the Flume project.