Apache Flume is a Big data injection tool used to move stream data from the source system to the destination system. It is another top-level project from the Apache Software Foundation that is developed to provide continuous data injection in Hadoop HDFS. The data can be any kind of data, but Flume is mainly well-suited to handle log data, such as the log data from web servers. Apache Flume basically processes event data.
Streaming Data?
Streaming data is a form of data that is generated continuously from various sources in the size of KBs. The generated data includes log files from a web application, the purchase history of eCommerce websites, online games, data generated from social networks, and so on.
Log Data?
The logs are generated from the system level for example the log file generated from OS or it is generated from the other software. Logs are very important data for analysis and in many cases, it is stored in a single file.
After analysis of Stream and log data, we can get the below insights.
- We can find out the insights such as performance-related issues, Hardware, and Software failure issue.
- We can see the trend of user’s behavior for a particular product, based on that a better business plan can be prepared.
To perform analysis on data in Hadoop, it should be stored in HDFS first and by using Flume we can put data in HDFS.
Let us see the process to transfer data from Flume to Hadoop HDFS.
Setup To Transfer Data from Flume to HDFS
The following setup we need to do to transfer the data from Flume to storage units such as HDFS, HBase, and so on.
1. Setting up an Agent
We can store Apache Flume agent configuration in a local configuration file. This configuration file is a text file that contains the detail of every source-sink and the detail about the channel. It follows the Java properties file format. One or more agent’s configuration can be specified in the same configuration file.
2. Configuring individual Components
Every component such as source, sink, or channel has a name in a flow, type, and set of properties that are specific to the type and instantiation. If we take an example of Avro sources then it would require an IP address and port for receiving data.
3. Wiring the pieces together
The agent is required to know that what individual components are going to load and how they are connected to constitute the flow. This is done by listing the names of each source, sinks, and channels in the agent, and then specifying the connecting channel for each sink and source.
4. Starting an agent
We can start the Apache Flume agent using the flume-ng script. The location of this script is present under the Flume bin directory.
We can specify the agent name, the config directory, and the config file on the command line.
$ bin/flume-ng agent -n $agent_name -c conf -f conf/flume-conf.properties.template
Data Transfer Steps from Flume to HDFS
Now we will see an example to copy event logs from the local system to HDFS using Flume. To perform this activity we will configure Apache Flume.
Step 1. We have an event log file “eventlogfile.log” which is located on the local file system at the “/home/cloudduggu/flume” path.

Step 2. Now we will create a file name “flume.conf” inside the “/home/cloudduggu/flume/” directory and add below configuration details of Flume in that file. Please put your system location in which the log file is present.
agent1.sources = tail
agent1.channels = Channel-2 agent1.sinks = sink-1
agent1.sources.tail.type = exec
agent1.sources.tail.command = cat /home/cloudduggu/flume/eventlogfile.log
agent1.sources.tail.channels = Channel-2
agent1.sinks.sink-1.channel = Channel-2
agent1.sinks.sink-1.type = hdfs
agent1.sinks.sink-1.hdfs.path = hdfs://localhost:9000/flumelogs
agent1.sinks.sink-1.hdfs.fileType = DataStream
agent1.sinks.sink-1.hdfs.rollInterval = 60
agent1.sinks.sink-1.hdfs.rollSize = 0
agent1.sinks.sink-1.hdfs.rollCount = 0
agent1.channels.Channel-2.type = memory
$nano flume.conf
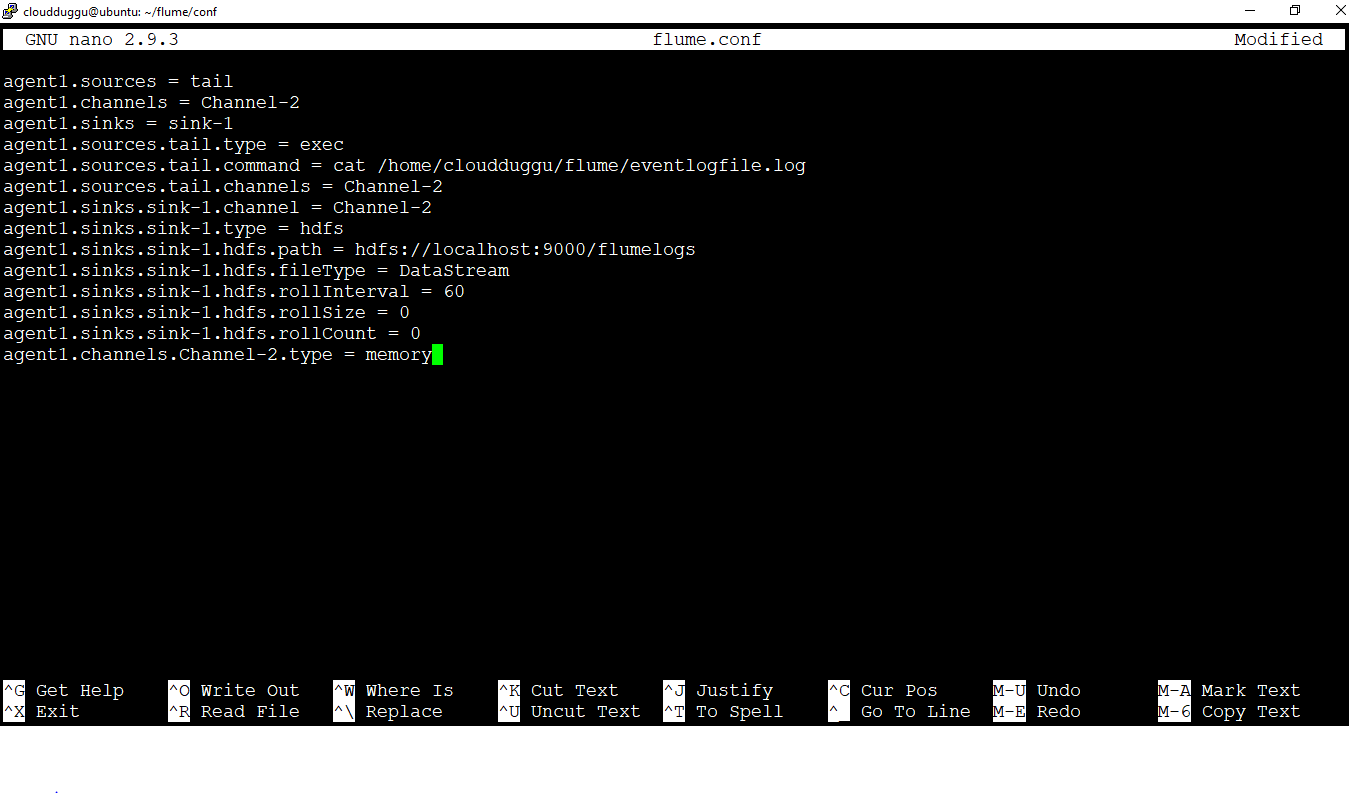
Now save the changes by pressing CTRL + O and exit from the nano editor by pressing CTRL + X.
Step 3. Now we will create a file name “flume.conf” inside the “/home/cloudduggu/flume/” directory and add below configuration details of Flume in that file. Please put your system location in which the log file is present.
Now we will use the below command to copy “eventlogfile.log” from the local file to HDFS.
Please make sure Hadoop services are up before performing this activity.
cloudduggu@ubuntu:~ /flume$ bin/flume-ng agent –conf ./conf/ -f conf/flume.conf -n agent1 -Dflume.root.logger=DEBUG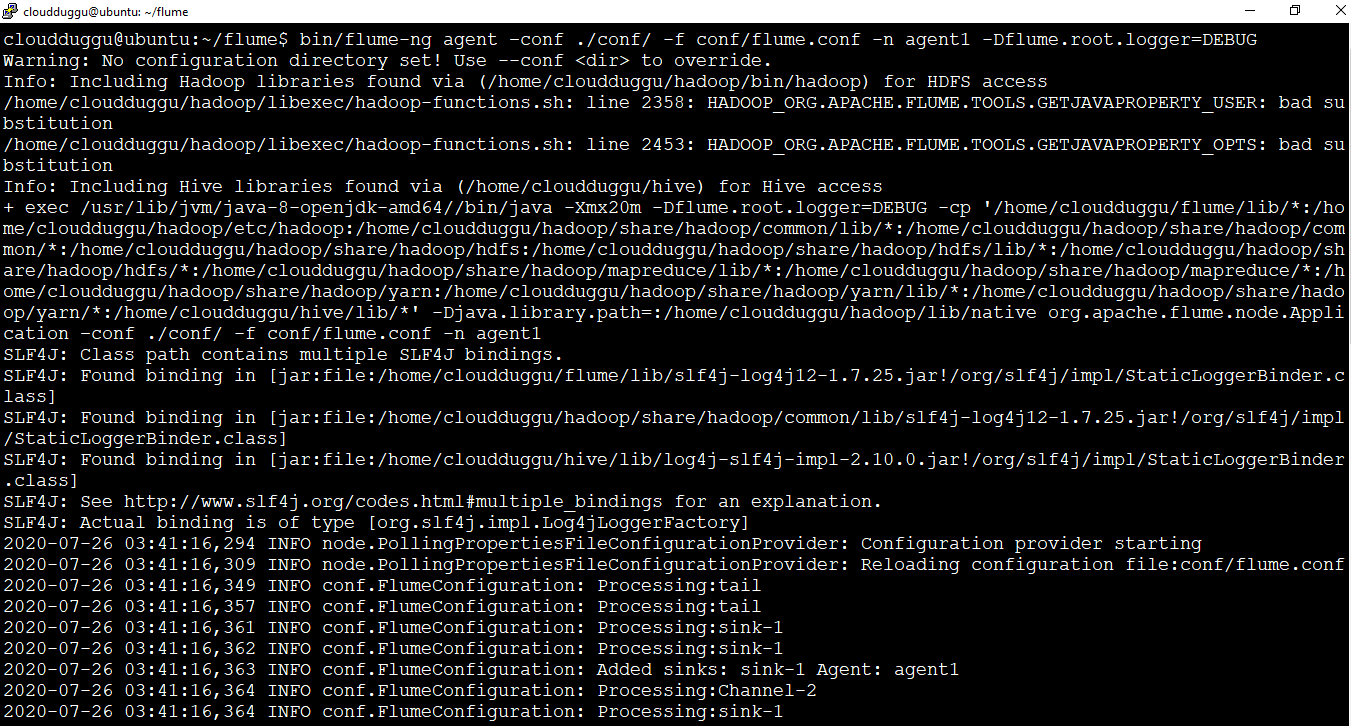
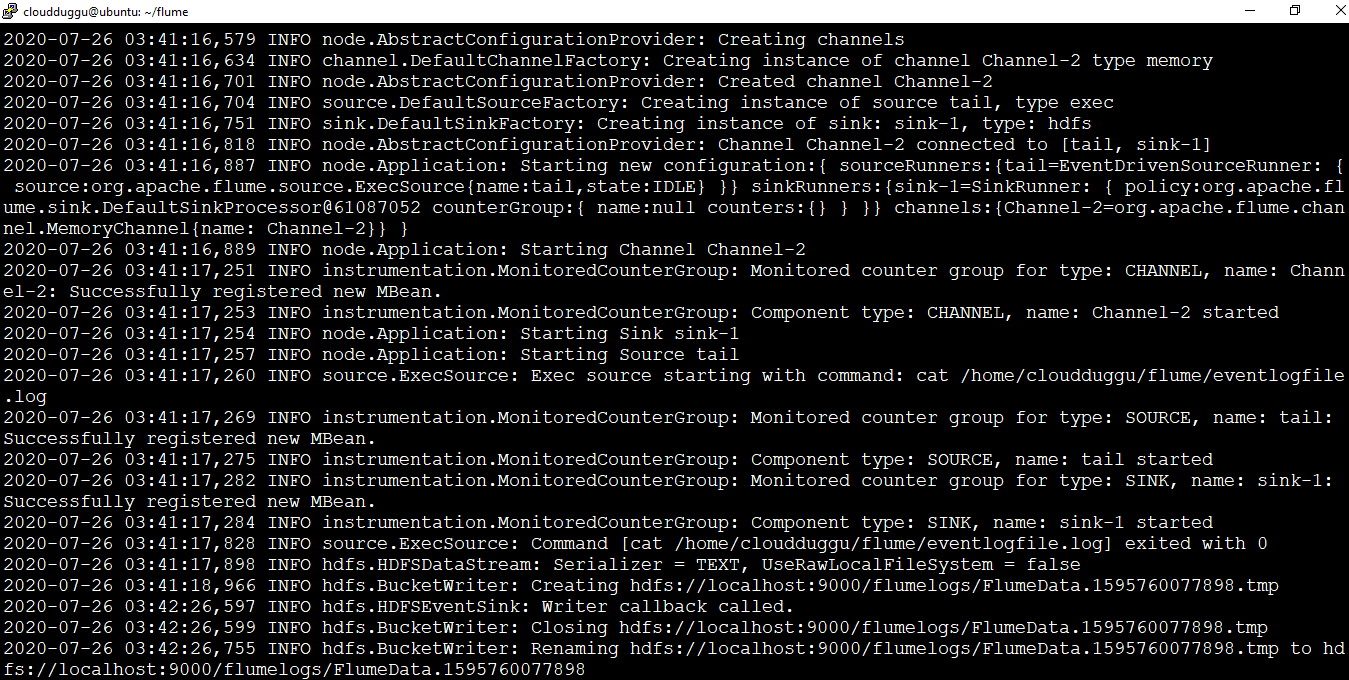
Step 4. We can see from the below output that the log is copied from the local file system to HDFS with the name “FlumeData.1595760077898” under the “/flumelogs/” HDFS directory.

Single-node Flume deployment and Processing
Let us see an example of a single-node Flume configuration that lets the user generate events and subsequently logs them to the console.
We will create a configuration file of Flume which will contain details of the agent, source details, sink, and channels, and run it on the first window. Then we will open the second window and telnet first window and pass the message. After that first will receive the message and print it on the terminal.
Let us understand this example with the below steps.
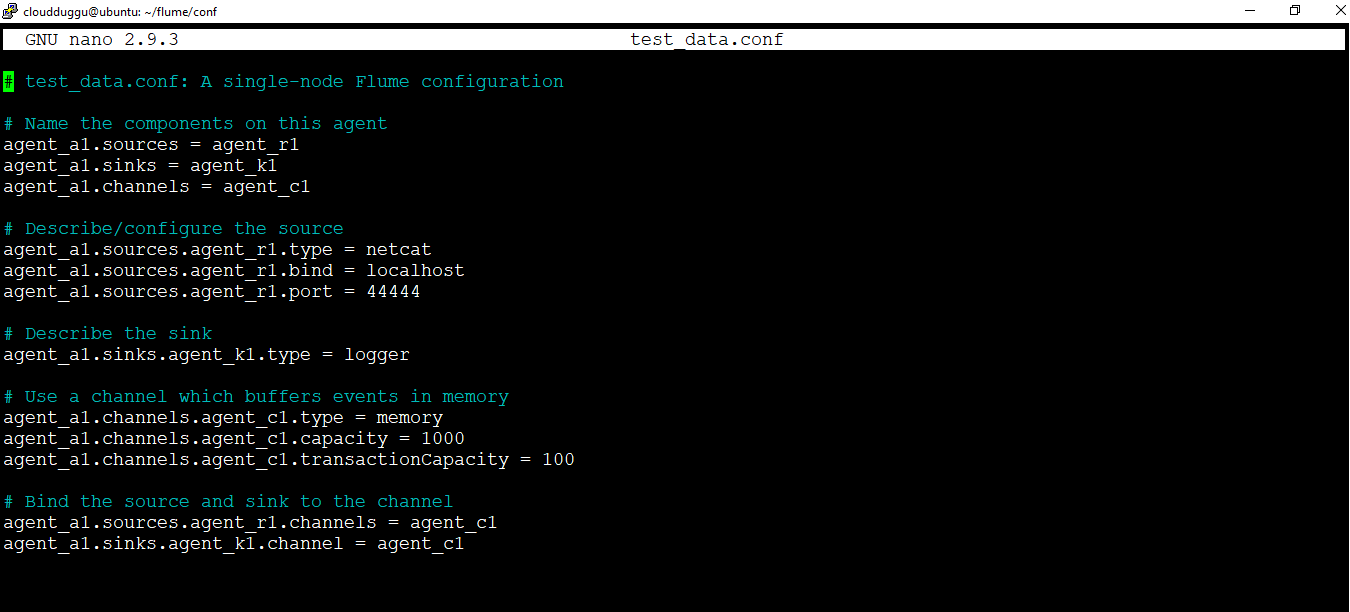
Step 1. We will create a Flume configuration file in “/home/cloudduggu/flume/conf” which will contain the below information.
    # test_data.conf: A single-node Flume configuration

    # Name the components on this agent
    agent_a1.sources = agent_r1
    agent_a1.sinks = agent_k1
    agent_a1.channels = agent_c1

    # Describe/configure the source
    agent_a1.sources.agent_r1.type = netcat
    agent_a1.sources.agent_r1.bind = localhost
    agent_a1.sources.agent_r1.port = 44444

    # Describe the sink
    agent_a1.sinks.agent_k1.type = logger

    # Use a channel which buffers events in memory
    agent_a1.channels.agent_c1.type = memory
    agent_a1.channels.agent_c1.capacity = 1000
    agent_a1.channels.agent_c1.transactionCapacity = 100

    # Bind the source and sink to the channel
    agent_a1.sources.agent_r1.channels = agent_c1
    agent_a1.sinks.agent_k1.channel = agent_c1
This configuration defines a single agent named agent_a1. agent_a1 has a source that listens for data on port 44444, a channel that buffers event data in memory, and a sink that logs event data to the console. The configuration file names the various components then describe their types and configuration parameters.
Step 2. Now start the Flume agent on the first window (left window) using the below command.
cloudduggu@ubuntu:~ /flume$bin/flume-ng agent --conf conf --conf-file conf/test_data.conf --name agent_a1 -Dflume.root.logger=INFO,console
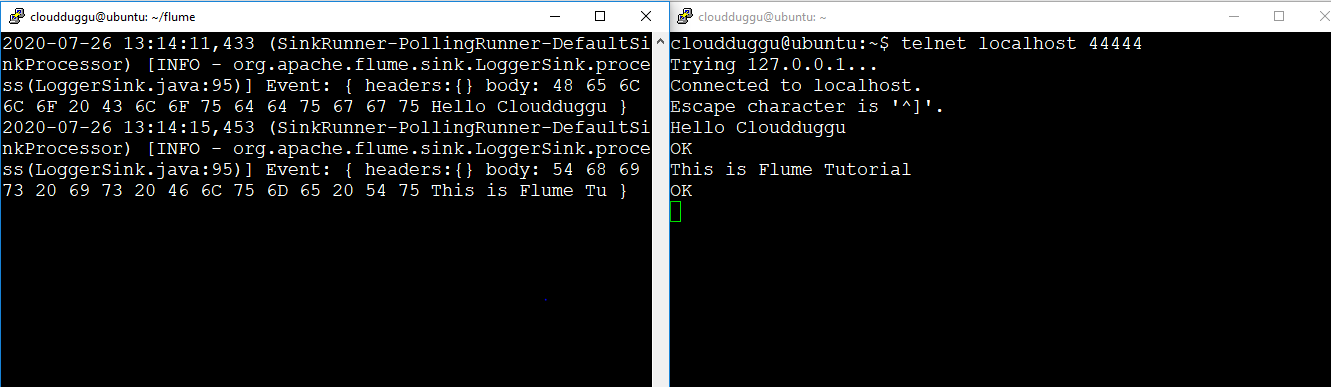
Step 3. Flume agent is started in the first window(Left window) now we have to telnet localhost on post 44444 in the second window(Right Window) which we have already configured in Flume configuration file to send data to first window.
cloudduggu@ubuntu:~$ telnet localhost 44444We can see below output that when we type “Hello Cloudduggu” and “This is Flume Tutorial” in the second window the same message was streamed to the first window and printed on the terminal.