The objective of this tutorial is to describe step by step process to install Derby (Version 10.13.1.1 ) on Ubuntu 18.04.4 LTS (Bionic Beaver), once the installation is completed you can play with Derby.
Platform
- Operating System (OS). You can use Ubuntu 18.04.4 LTS version or later version, also you can use other flavors of Linux systems like Redhat, CentOS, etc.
- Derby. We have used Apache Derby-10.13.1.1 version for installation.
Download Software
- Derby.
https://archive.apache.org/dist/db/derby/db-derby-10.13.1.1/db-derby-10.13.1.1-bin.tar.gz
Steps to Install Apache Derby version(10.13.1.1) on Ubuntu 18.04.4 LTS
Please follow the below steps to install Derby.
- Embedded Mode
- Network Server Mode
Step 1. Please verify if Java is installed. We have installed JDK 1.8.0.
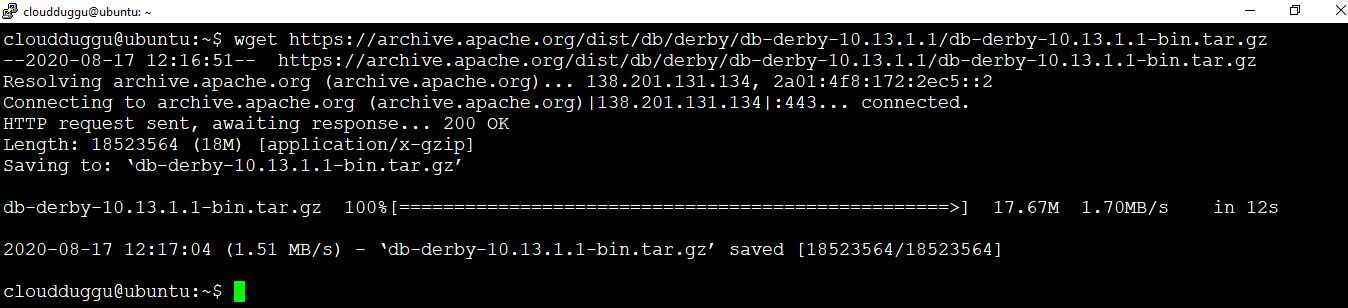
Step 2. Please download Derby 10.13.1.1 from the below link.
On Linux: $wget https://archive.apache.org/dist/db/derby/db-derby-10.13.1.1/db-derby-10.13.1.1-bin.tar.gz
On Windows: https://archive.apache.org/dist/db/derby/db-derby-10.13.1.1/db-derby-10.13.1.1-bin.tar.gz
Step 3. Let us extract the tar file using the below command and rename the folder to derby to make it meaningful.
$tar -xzf db-derby-10.13.1.1-bin.tar.gz
$mv db-derby-10.13.1.1-bin derby

As discussed in the previous tutorial Apache Derby can be deployed in two modes.
Let us see Apache Derby installation in each mode.
1. Embedded Mode
In this mode, the Derby database can be accessed using the Derby JDBC driver. We can start and stop Derby through the java application. In embedded mode database engine and application will run on the same java virtual machine(JVM).
Please follow the below steps to install Derby in Embedded Mode.
Step 1. Below set below path in the .bashrc file. Please verify your java and derby path.
export JAVA_HOME=/usr/lib/jvm/java-8-openjdk-amd64/
export PATH=$JAVA_HOME/bin:$PATH
export DERBY_HOME=/home/cloudduggu/derby
export DERBY_INSTALL=/home/cloudduggu/derby/bin
export CLASSPATH=$DERBY_INSTALL/lib/derby.jar:$DERBY_INSTALL/lib/derbytools.jar:.
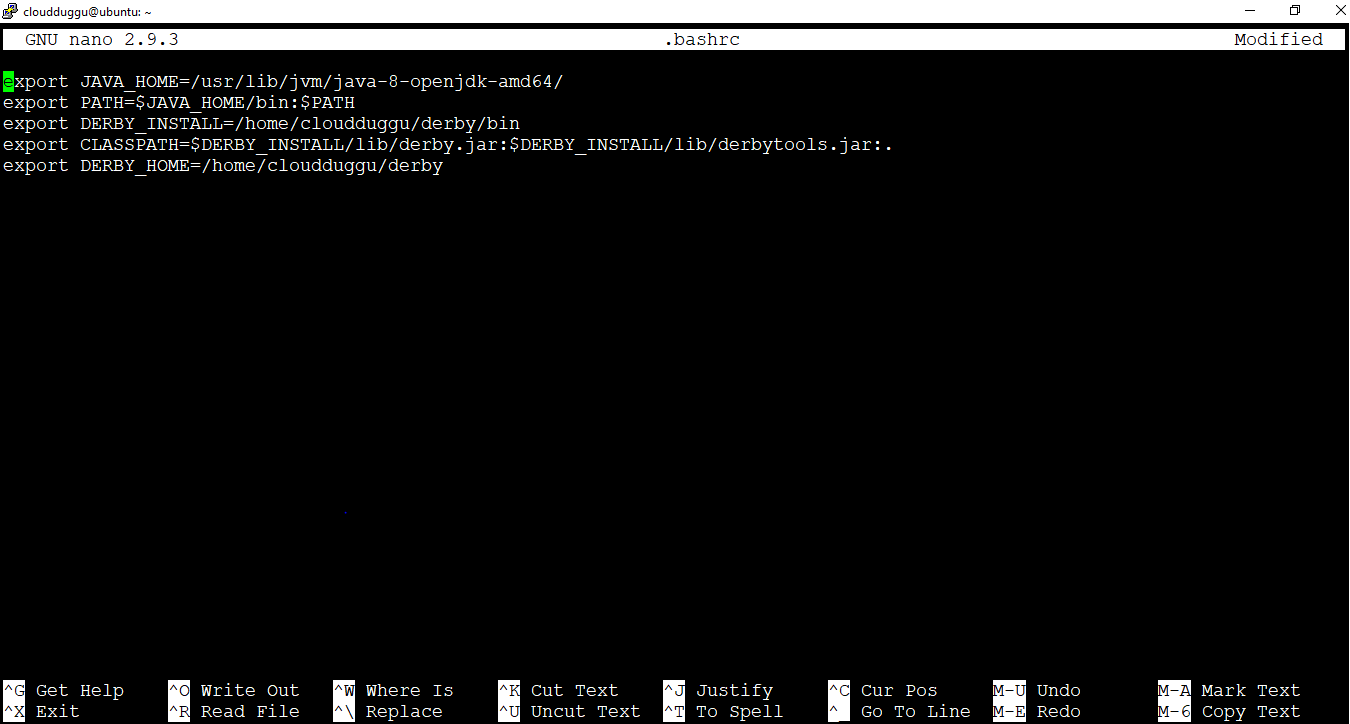
Save the changes by pressing CTRL + O and exit from the nano editor by pressing CTRL + X.
Step 2. Run this command “setEmbeddedCP” from Derby/bin folder.
cloudduggu@ubuntu:~/derby$./bin/setEmbeddedCP
Step 3. Start the “ij” tool using the below command.
cloudduggu@ubuntu:~/derby$./bin/ij
Step 4. Verify the connection by creating a database name “exampleDB”.
ij> connect 'jdbc:derby:exampleDB;create=true';

2. Network Server Mode
In client-server mode, we can access Derby using client and server fashion. The client machine will be running in different java virtual machine (JVM) and the server will run on different java virtual machine (JVM). The client will send a request to the server and the server will respond to it.
Please follow the below steps to install Derby in Network Server Mode.
Step 1. Please follow step 1 of “Embedded Mode” and export the variable in the .bashrc file.
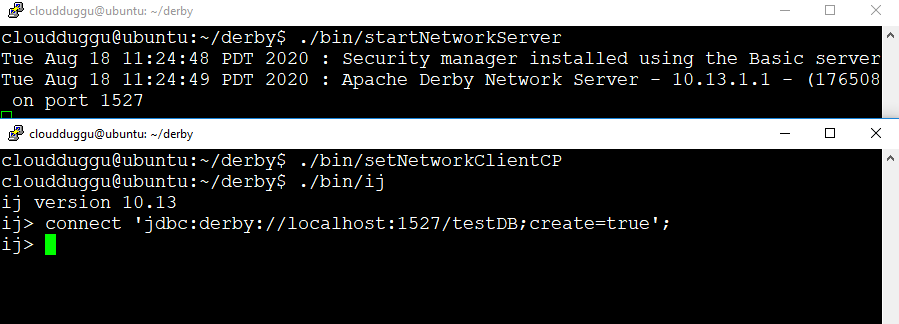
Step 2. Open two terminals, in the first terminal start the network server using the below command.
cloudduggu@ubuntu:~/derby$./bin/startNetworkServer
Step 3. In the second terminal start the network client using the below command.
cloudduggu@ubuntu:~/derby$./bin/setNetworkClientCP
Step 4. In the second terminal, start the “ij” tool and verify the connection by creating a database name "testDB".
ij> connect 'jdbc:derby://localhost:1527/testDB;create=true';
In both deployment modes, we can see databases are created in the Derby home directory with the names “exampleDB” and “testDB”.
